The Best OctoPrint Plug-ins

OctoPrint is a powerful tool, but adding a cherry on top makes it even better. Check out our selection of the best OctoPrint plug-ins around!
OctoPrint is a popular network-based 3D printer management tool that typically runs on a Raspberry Pi single-board computer (SBC). It allows you to start and monitor 3D prints wirelessly using an online user interface.
OctoPrint plug-ins take this incredibly useful tool to the next level by providing custom features and add-ons that make your 3D printing experience even smoother. Installable from within the OctoPrint interface, they’re an easy way to add substantial functionality. Simply click on the spanner icon on the OctoPrint navigation bar (NavBar), and you’ll find the “Plugin Manager” among the list of settings.
In this article, we’ll take a look at some of the best OctoPrint plug-ins out there. To kick things off, let’s check out what exactly makes a good OctoPrint plug-in.

Considerations
To pick out the best OctoPrint plug-ins for our list, we looked at four main factors: functionality, ease of use, user base, and pricing.
- Useful functionality: We looked for plug-ins that fill some existing needs of the OctoPrint experience. It doesn’t have to be big: even a subtle UI fix can vastly improve your day-to-day experience.
- Easy to use: We tried to strike a balance between simple features and slightly more advanced ones, so you can adjust to your needs.
- Large user base: The more people using the plug-in, the easier it’ll be to find helpful resources. Especially when plug-ins are buggy or conflict with one another, a large online community is an invaluable troubleshooting resource. For our list, we’ve gone with plug-ins with at least 4,000 monthly active instances (based on January 2024).
- Free or low-cost: Most plug-ins are free, but certain options (as we’ll see) merit paid plans. For these, we’ve picked out ones that have free versions, without debilitating limitations.
With that, we’re ready to get started! Here’s our take on the best OctoPrint plug-ins, progressing from new functionality to safety, user interface, and more. Let’s get started!
New Functionality
One of the most significant advantages of plug-ins is the new possibilities they can offer. The following plug-ins take your OctoPrint instance to the next level by adding new and exciting features, usually with a click of a button.
Cancelobject
Nearly everyone has had the experience of starting a multi-part print, only for one of the objects to suffer poor bed adhesion or layer shifting. The only solution used to be canceling the entire print, wasting loads of material, and starting again. This plug-in changes things.
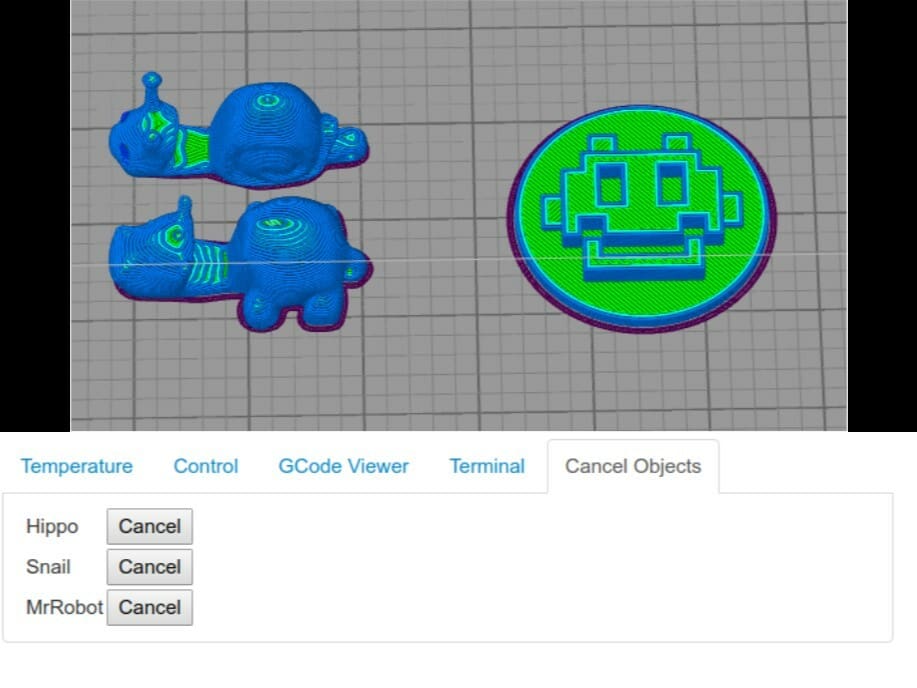
Cancelobject is a must-have plugin, compatible with PrusaSlicer, SuperSlicer, Cura, and Simplify3D. Cancelobject allows you to cancel individual items in a print without interrupting the other objects. A tab gets added with a straightforward UI that lets you press the “Cancel” button on any of the objects, leaving the others to keep printing without disruption.
- Why you need it: It gives you the control to cancel printing models on an individual basis while allowing the printing of other models to continue.
- Complexity: Medium
- Active Instances: ~10,500
- Developed by: Paul Paukstelis
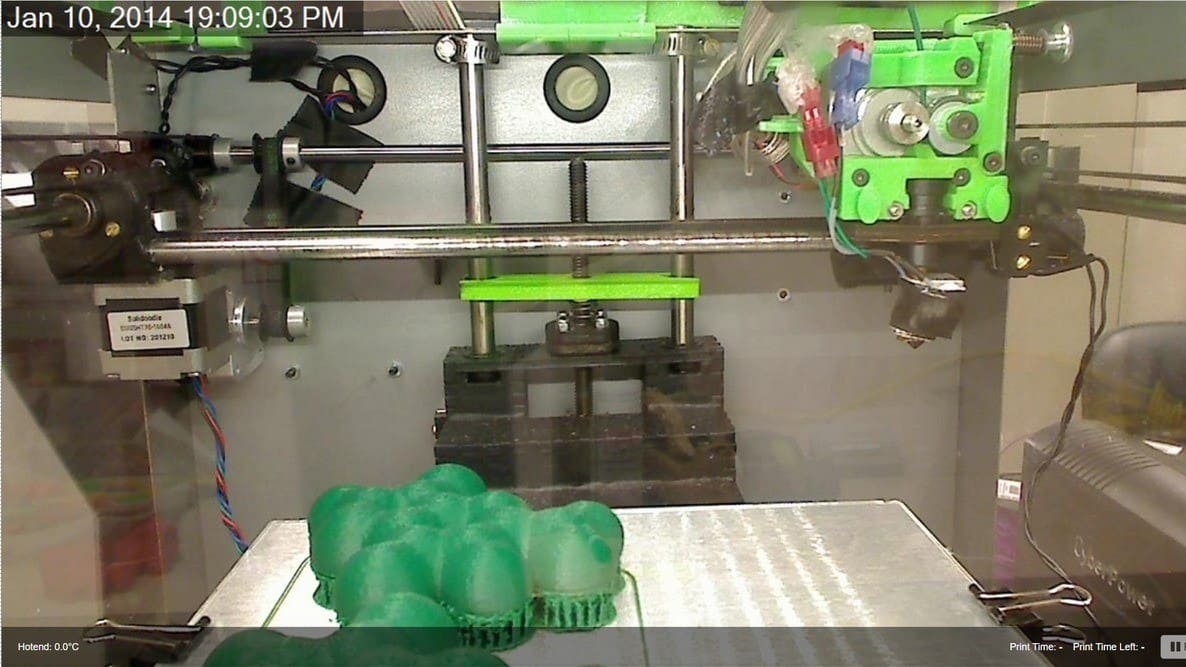
OctoLapse
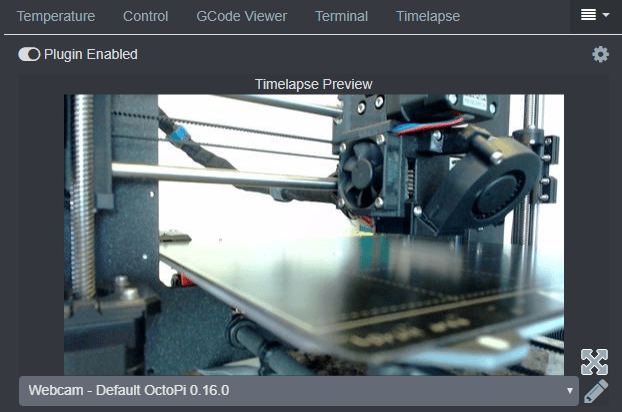
For videographers and those who like to document their prints, OctoLapse by Brad Hochgesang is an absolute must-have. OctoLapse creates stable, smooth time-lapses of your 3D prints, making the models appear as if they are growing out of thin air. It’s sure to turn a few heads.
- Why you need it: It creates trippy, high-quality time-lapses to record your prints.
- Complexity: High
- Active instances: ~28,500
- Developed by: Brad Hochgesang
Firmware Updater
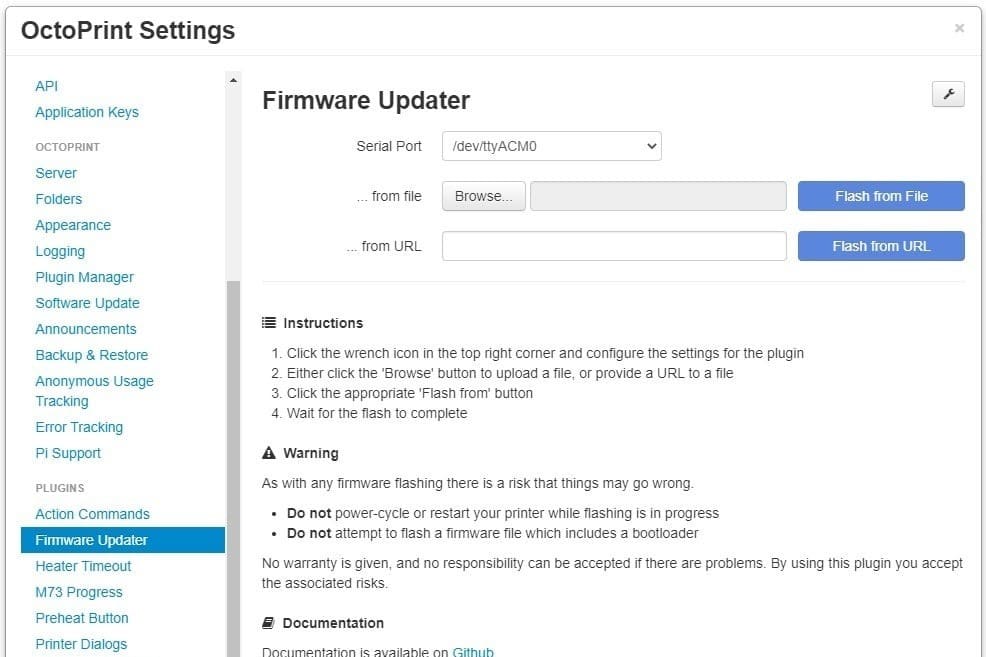
For heavier tinkerers, the Firmware Updater is a handy little tool. It allows you to flash firmware directly to the printer from OctoPrint. Supported motherboards include common 8-bit Atmel Atmega MCUs and 32-bit boards.
- Why you need it: Remote firmware updates give you added convenience and reduced hassle.
- Complexity: High
- Active instances: ~27,500
- Developed by: Ben Lye, Gina Häußge, and Nicanor Romero Venier
Bed Level Visualizer
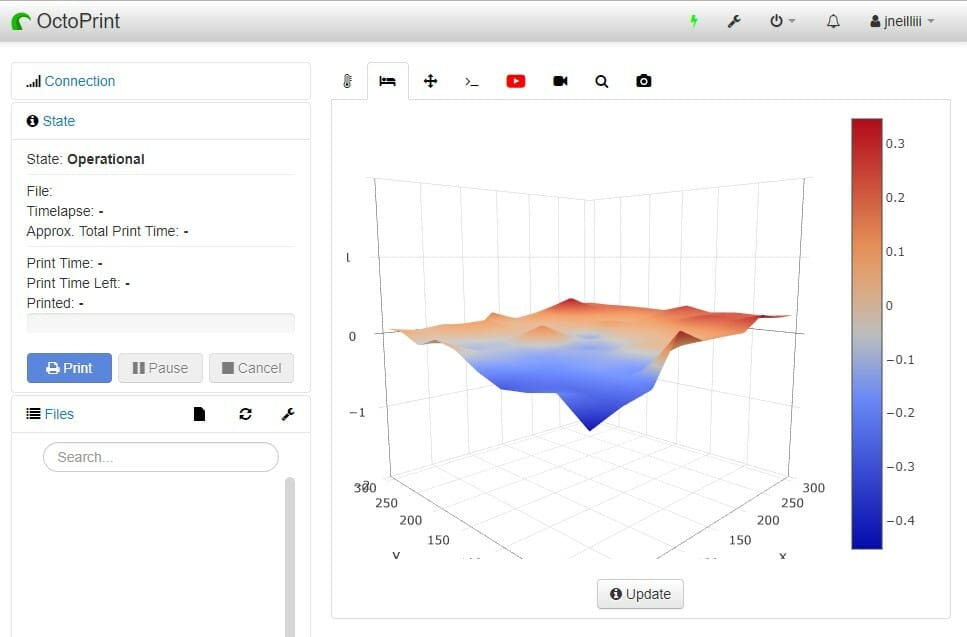
If your printer has mesh bed leveling, the Bed Level Visualizer plug-in is a great tool for you. It provides a nice 3D view of what your print surface looks like, giving you a better understanding of what’s going on with your machine.
- Why you need it: It’s a handy way to visualize your build plate, especially if it turns out to need attention.
- Complexity: High
- Active instances: ~38,000
- Developed by: jneilliii
Resource Monitor

Resource Monitor allows you to view information about CPU, RAM, disk, and network usage of the system you use to run OctoPrint. This plug-in can be useful if you’re live streaming with a webcam or managing more than one 3D printer with OctoPrint.
This plug-in can also help you troubleshoot and pin down any performance issues you may be having while 3D printing with OctoPrint.
- Why you need it: To pinpoint print issues and ensure the device you’re running OctoPrint on can handle the load.
- Complexity: Low
- Active instances: ~7,900
- Developed by: Renaud Gaspard
Exclude Region
We all hate when 3D prints fail. But it’s the worst when a multi-part 3D print job needs to be canceled just because one single part detached from the bed or failed to print correctly.
But don’t worry: Exclude Region can help you. This plug-in allows you to continue the printing job by having your 3D printer ignore the G-code assigned to specific regions of the build plate. This way, the printer will not be extruding mid-air where the failed part was located, allowing you to finish printing the remaining parts without any issues.
- Why you need it: Exclude Region allows you to resume multi-part 3D printing jobs when one or more parts fail.
- Complexity: High
- Active instances: ~10,800
- Developed by: Brad Fisher
Safety
3D printers can be quite dangerous devices if not used properly. The plug-ins in this category add some sort of safety feature to OctoPrint to make your 3D printing devices more secure.
Heater Timeout
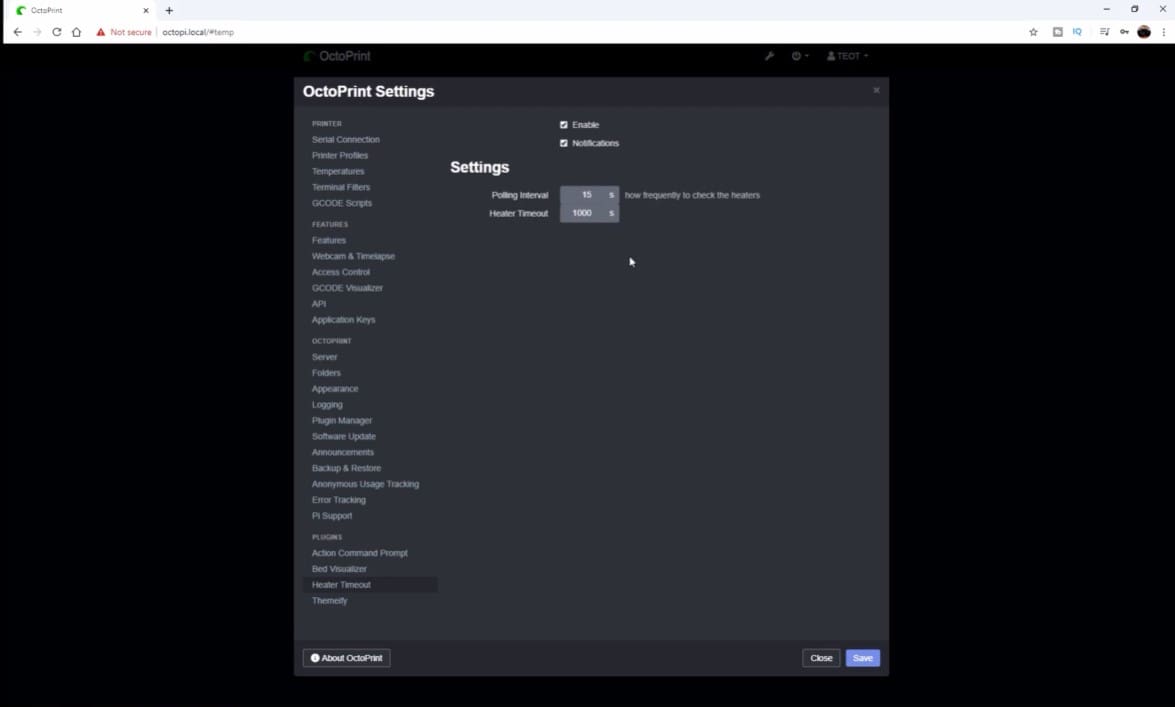
What if you accidentally leave your 3D printer’s hot end on? Heater Timeout by Andrew Cherevatkin and Uriah Welcome has got you covered. This OctoPrint plug-in will automatically shut off your hot end if it’s left on and idle for too long. It’s basically an essential safety feature.
- Why you need it: No printer is designed to burn down, but it’s better to be safe than sorry!
- Complexity: Medium
- Active instances: ~5,000
- Developed by: Andrew Cherevatkin and Uriah Welcome
Simple Emergency Stop
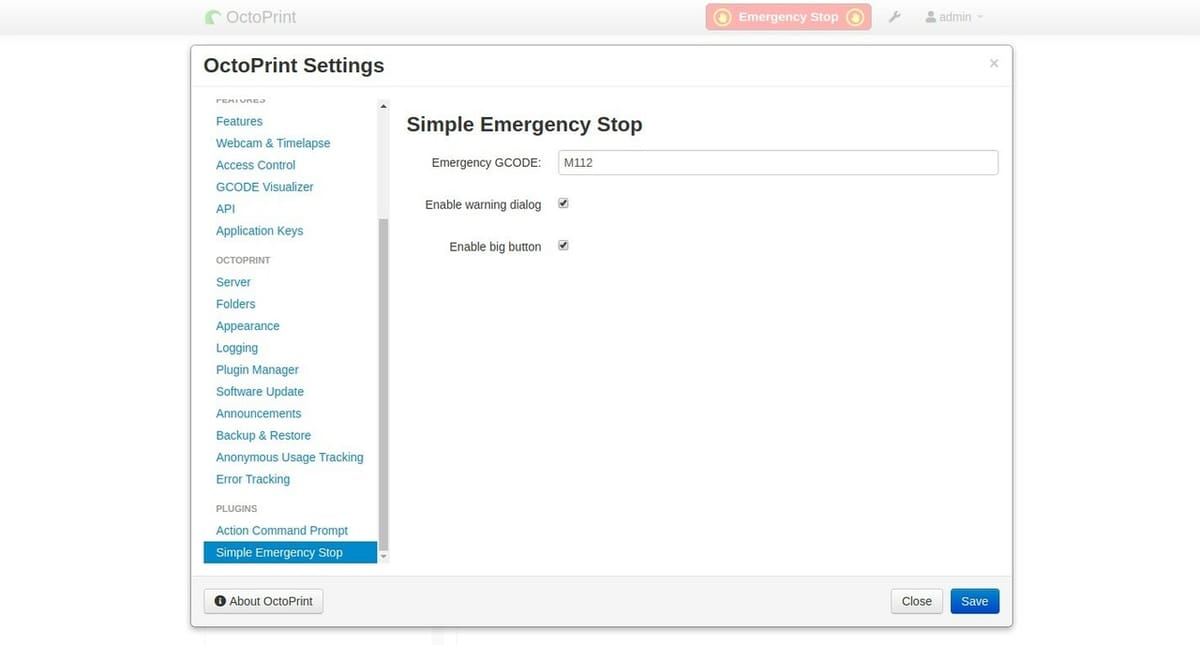
Now for something… simple. (Sorry, we had to.) Simple Emergency Stop is a plug-in developed by Sebastien Clement that adds an emergency stop button to the NavBar on your OctoPrint interface. You can choose from two styling options, depending on how big (and red) you want the button to be.
- Why you need it: If your print goes awry, smash the button to stop printing immediately.
- Complexity: Low
- Active instances: ~10,500
- Developed by: Sebastien Clement
User Interface
Often overlooked, simple user interface (UI) changes can drastically alter the user experience. And that goes double for OctoPrint since it’s basically a management tool. The following plug-ins tweak OctoPrint’s UI either by adding new elements or by changing how they’re displayed.
Themeify
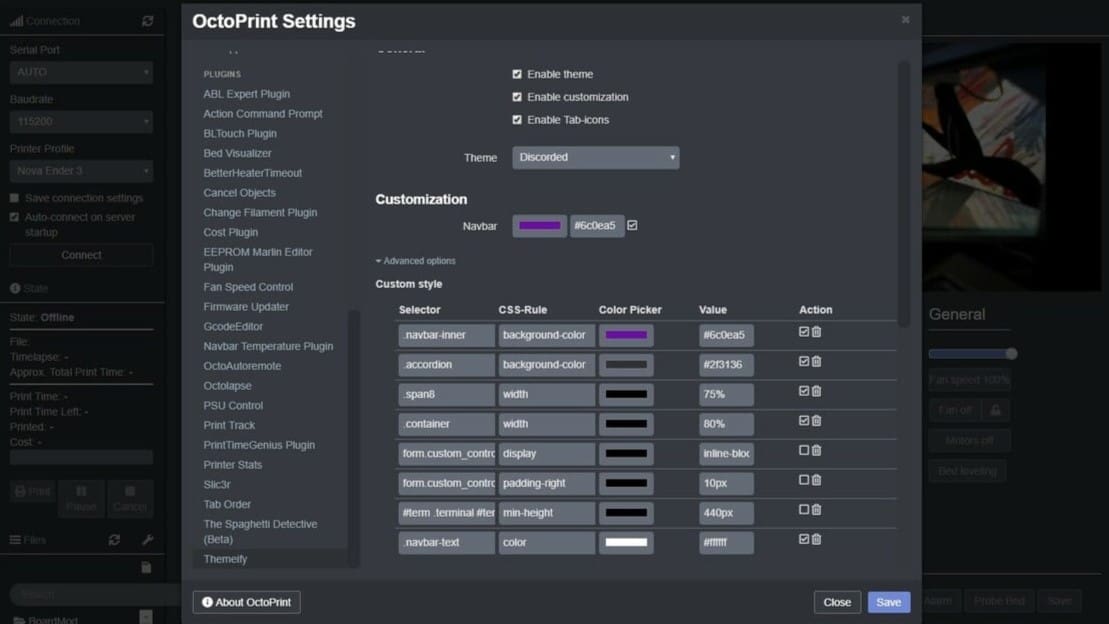
To continue expanding on the UI, try Birk Johansson’s incredibly popular Themeify. This plug-in has no functionality on the printer’s side, but it does grant you liberating control of the OctoPrint interface. You’re free to pick specific colors and themes to your heart’s content!
- Why you need it: Themefiy enables you to highlight frequently-used features, improve the overall aesthetic, and more!
- Complexity: Medium
- Active instances: ~17,900
- Developed by: Birk Johansson
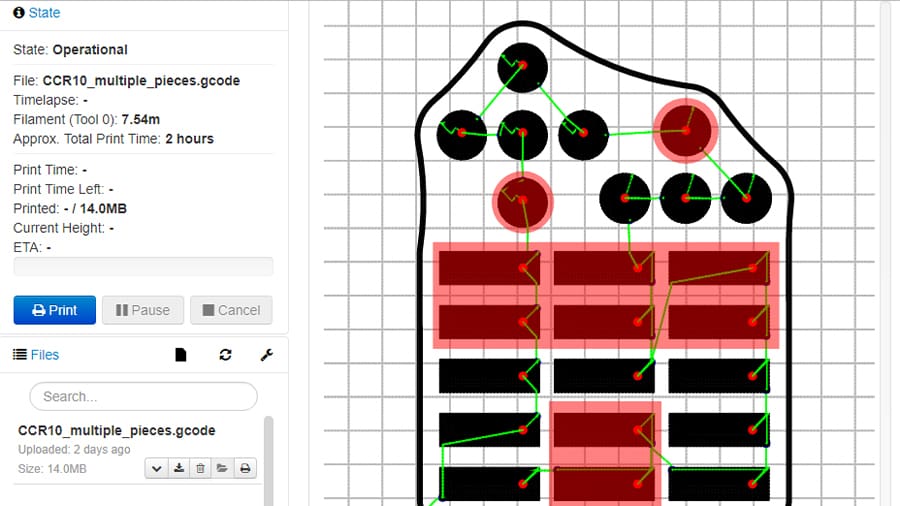
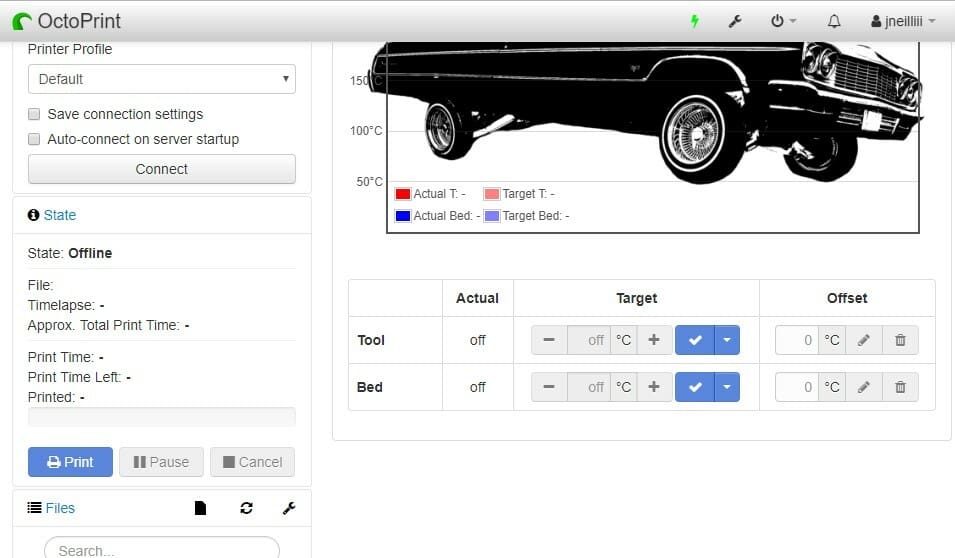
Slicer Thumbnails
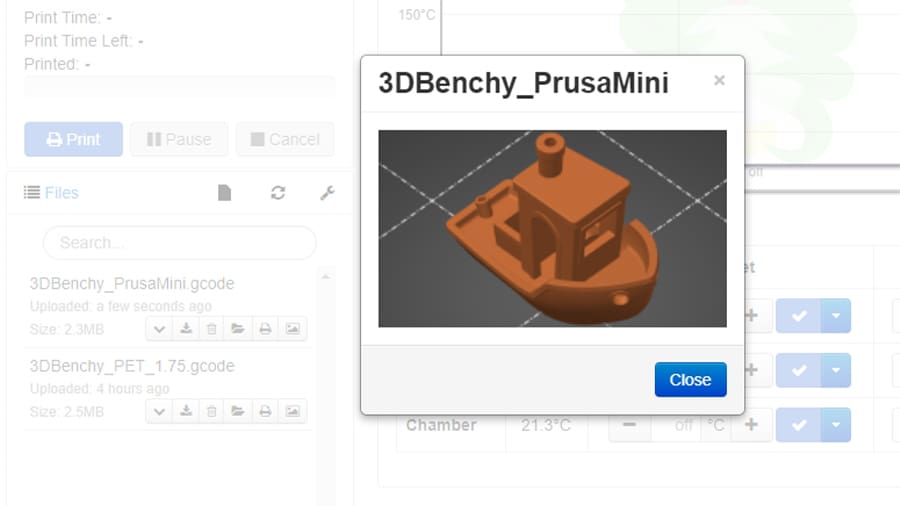
It can be hard to remember what a specific G-code file looked like when it was uploaded to OctoPrint some time ago, especially when it has a rather generic name such as “Body1”, for example. The Slicer Thumbnails plug-in by jneilliii makes your life much easier by adding an image of the simulated G-code output uploaded to OctoPrint.
A new button is added to the G-code file list, showing a thumbnail preview generated by the 3D slicer. The plug-in is compatible with PrusaSlicer, SuperSlicer, Cura, and Simplify3D, and the instructions to create the thumbnails are available on the plug-in page.
- Why you need it: You can easily identify the uploaded G-code files through a thumbnail generated by your 3D slicer.
- Complexity: Medium
- Active instances: ~17,000
- Developed by: jneilliii
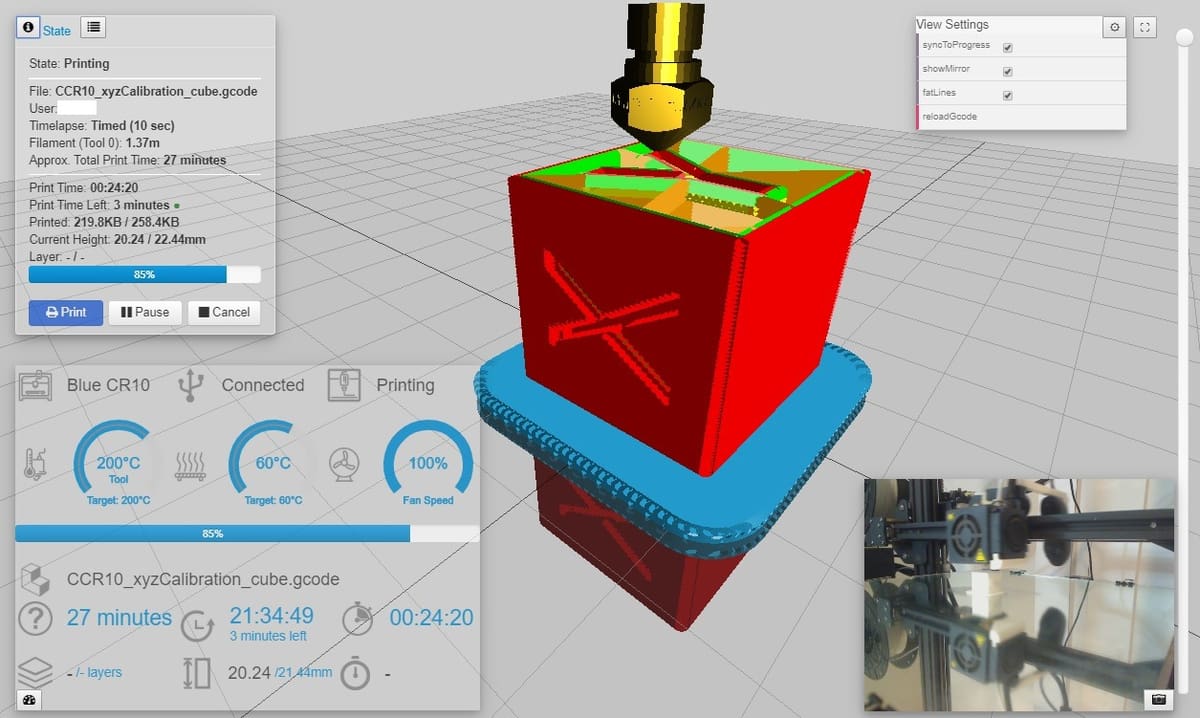
DisplayLayerProgress
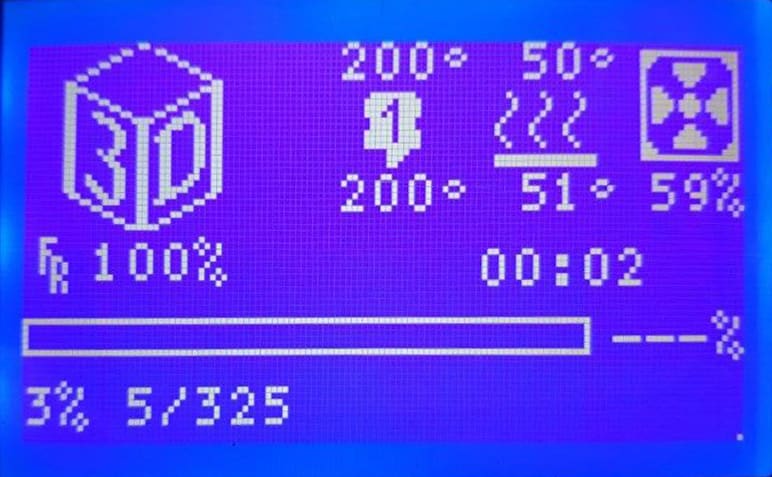
Where PrintTimeGenius focuses on accuracy, Olli’s DisplayLayerProgress flexes its versatility. It shows your print’s layer progress, estimated end time, and a host of other handy data on the printer display. You can also choose to have the information displayed on your NavBar or a pop-up window.
- Why you need it: DisplayLayerProgress offers valuable at-a-glance information about the progress of your print.
- Complexity: Medium
- Active instances: ~18,800
- Developed by: Olli
PrettyGCode
This next plug-in adds a 3D G-code visualizer that animates your printer’s progress. G-code visualizers display the printing progress of a 3D model, and this one uses colored lines to distinguish different parts, such as the infill and the outer wall. The progress of the animation is synced to the print job.
This plug-in can be useful if you’re curious about what your printer is doing at a specific time or if you need to troubleshoot issues with a print.
- Why you need it: Helps you make sure your printer is on track and diagnoses problems you might be experiencing mid-print.
- Complexity: Low
- Active instances: ~15,200
- Developed by: Kragrathea
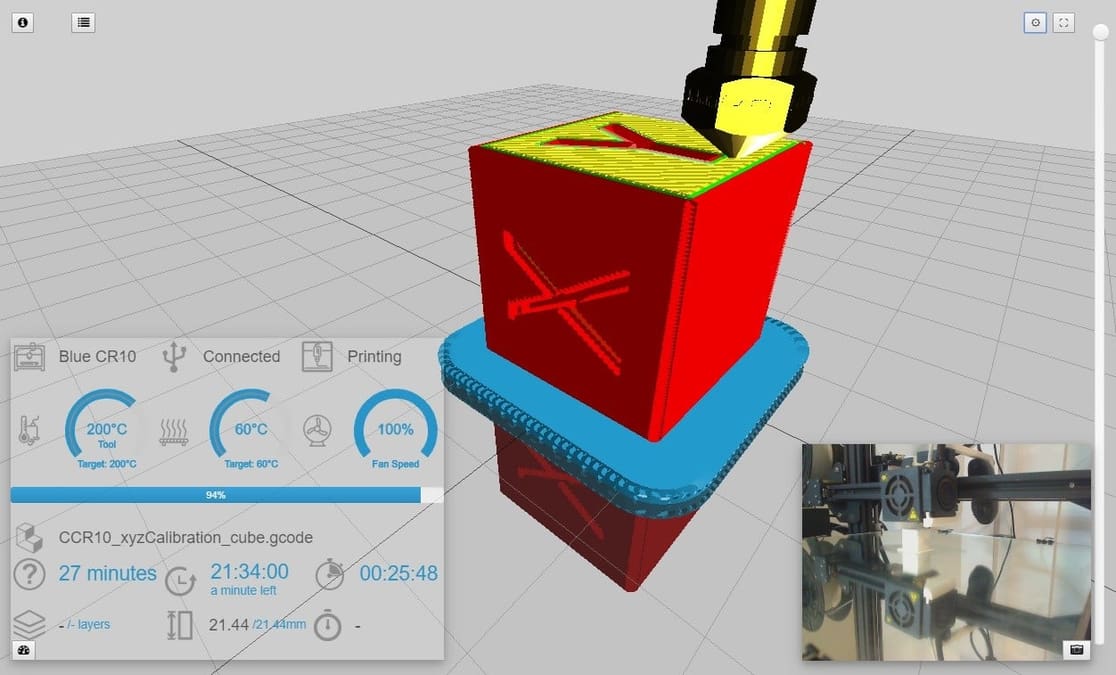
Fullscreen Webcam
As the name of this plug-in suggests, it allows you to double-click on your webcam image and view it in fullscreen. When the webcam is fullscreen, the top of the window will show the time and date. There will also be a bar at the bottom of the screen that displays the total print time, how much time is left for a print, the hot end temperature, and a pause button.
To exit fullscreen mode, simply click the minimize button on the bottom of the screen, located to the right of the pause button.
- Why you need it: View your print in better detail and identify a failed print more quickly and accurately.
- Complexity: Low
- Active instances: ~9,500
- Developed by: Paul de Vries
NavBar Temp
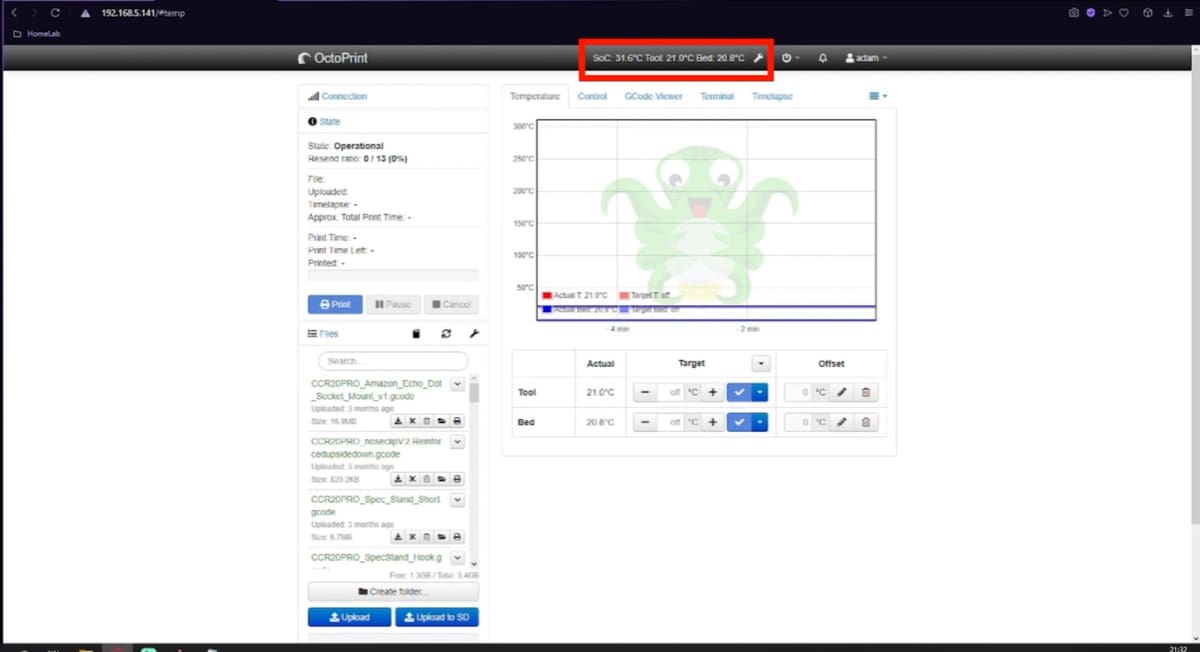
To add further functionality to your NavBar, try the NavBar Temp plug-in. NavBar Temp was developed by Cosik and Jarek Szczepansk. It adds basic 3D printer temperature information directly to your NavBar; simple, but convenient!
- Why you need it: All of your 3D printer’s temperature information will be available at a glance, so you can keep tabs on everything that’s going on.
- Complexity: Low
- Active instances: ~13,200
- Developed by: Cosik and Jarek Szczepanski
Floating NavBar
With so much functionality added to your NavBar, you’ll probably want to have quick access to it. Developed by jneilliii, Floating NavBar locks the NavBar to the top of your OctoPrint window, regardless of where you scroll.
- Why you need it: Your NavBar will always be right there for you when you need it, whether to check temperatures or smash the emergency stop button.
- Complexity: Low
- Active instances: ~4,400
- Developed by: jneilliii
TouchUI
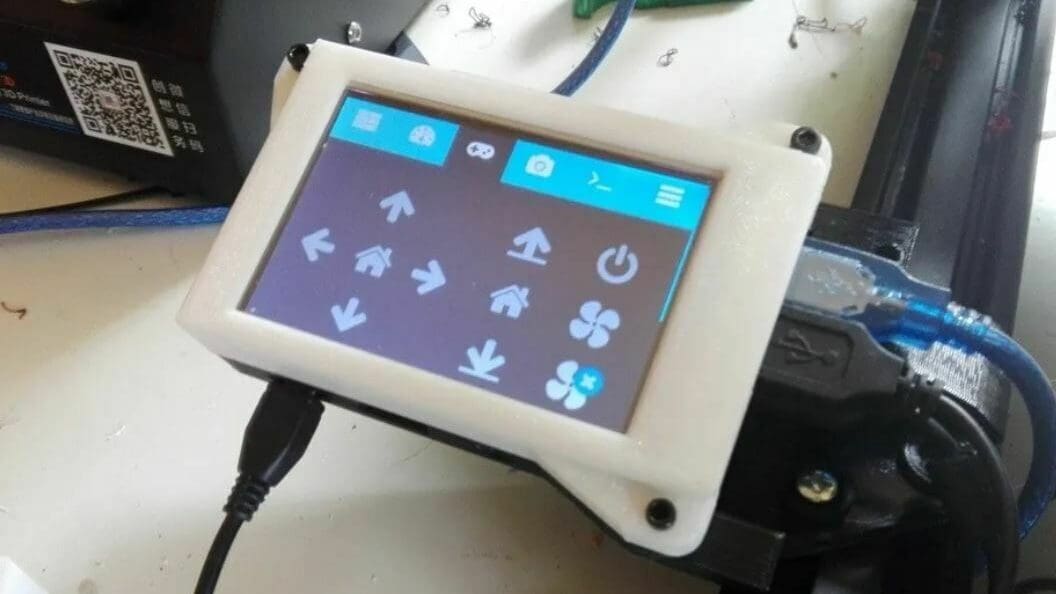
TouchUI is a graphical user interface (GUI) OctoPrint plug-in for external touchscreen displays (e.g. Raspberry Pi displays) that allows you to control your printer directly with an easy-to-use interface. TouchUI has an organized and simplistic layout and offers many control features, like homing your printer’s axes, adjusting the feed rate, controlling the fans, and more.
To install TouchUI, you have to use a compatible display (with a width smaller than 980 pixels) and send terminal commands through the connected single-board computer running OctoPrint.
- Why you need it: TouchUI enables you to control your printer directly with a GUI.
- Complexity: High
- Active instances: ~6,600
- Developed by: Paul de Vries
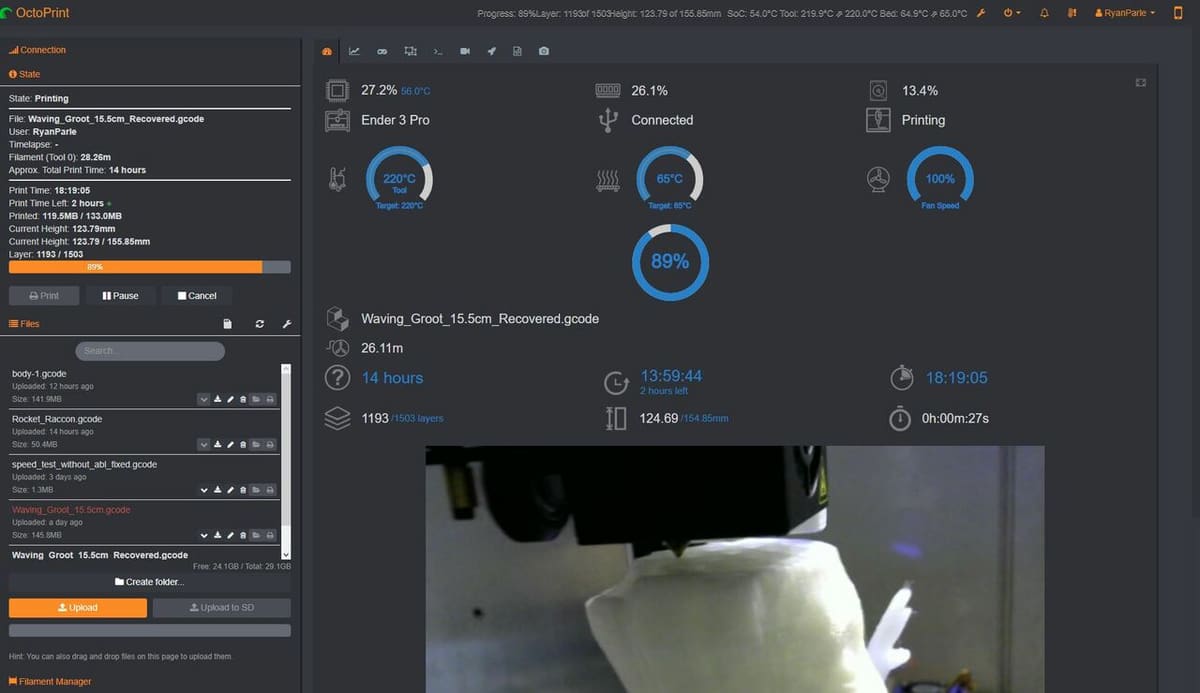
Dashboard
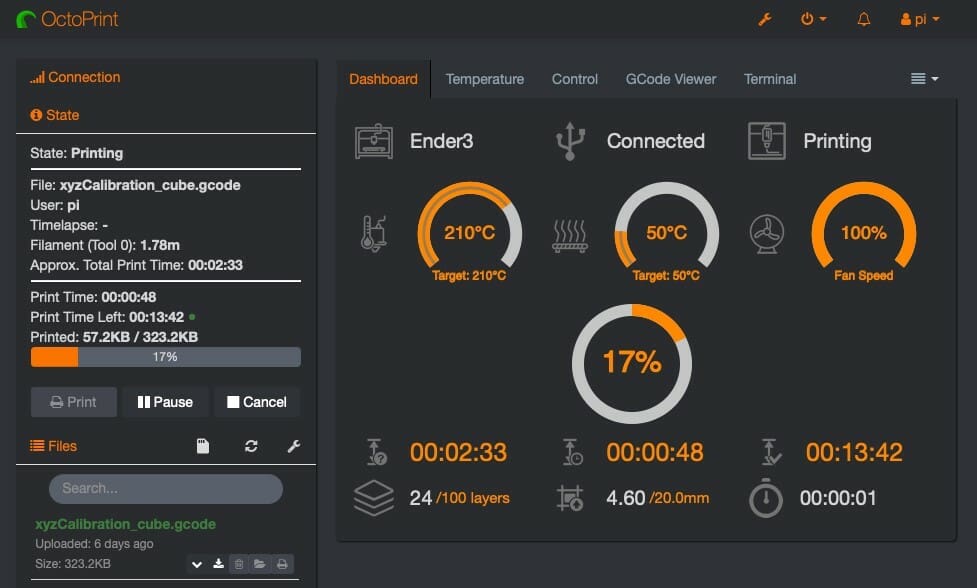
For even more at-a-glance functionality, try the popular OctoPrint Dashboard plug-in. This upgrade puts information about ongoing prints onto a clean, visually-organized dashboard, matching your OctoPrint UI theme.
The Dashboard works with PrintTimeGenius and DisplayLayerProgress for accurate time estimates and layer data. You’ll also find some job control buttons (e.g. start/stop) and an optional webcam widget.
- Why you need it: OctoPrint Dashboard gives you key information in a quick visual, with a host of optional widgets and additions.
- Complexity: Medium
- Active instances: ~29,300
- Developed by: Stefan Cohen, j7126, and Willmac16
Remote Control & Monitoring
Many users utilize OctoPrint primarily for remote controlling and monitoring their 3D printers. While it offers some great features to that end, there will always be better and more advanced tools. Here are some of the best plug-ins focused on remotely controlling and monitoring 3D printers.
BedCheckAI
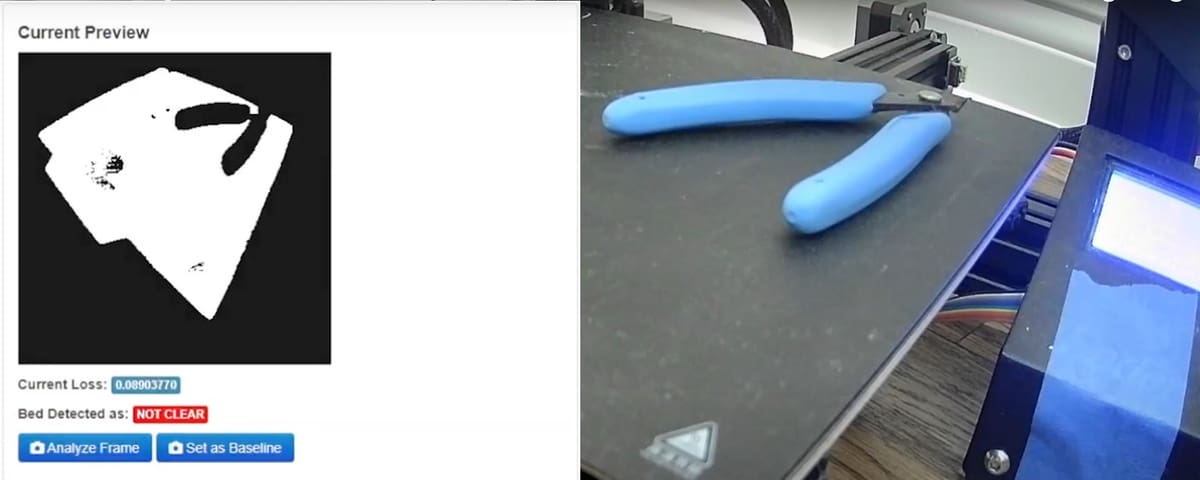
If you’d like to see how AI can help with daily tasks, this plug-in is for you. BedCheckAI helps ensure your prints are starting on a clean slate!
By using a machine learning model to compare a baseline image of your print bed to the current view of the print bed, it can identify if the printer is ready to start a print. If the bed is not clear, a simple read-out lets you know there is an object on the print bed. This plug-in is extremely handy for those regularly starting prints remotely or for use in a print farm where it’s easy to lose track of the status of all your devices.
- Why you need it: To ensure the bed of the printer is clear before starting a print remotely.
- Complexity: Easy
- Active Instances: ~500
- Developed By: printpal.io
Obico
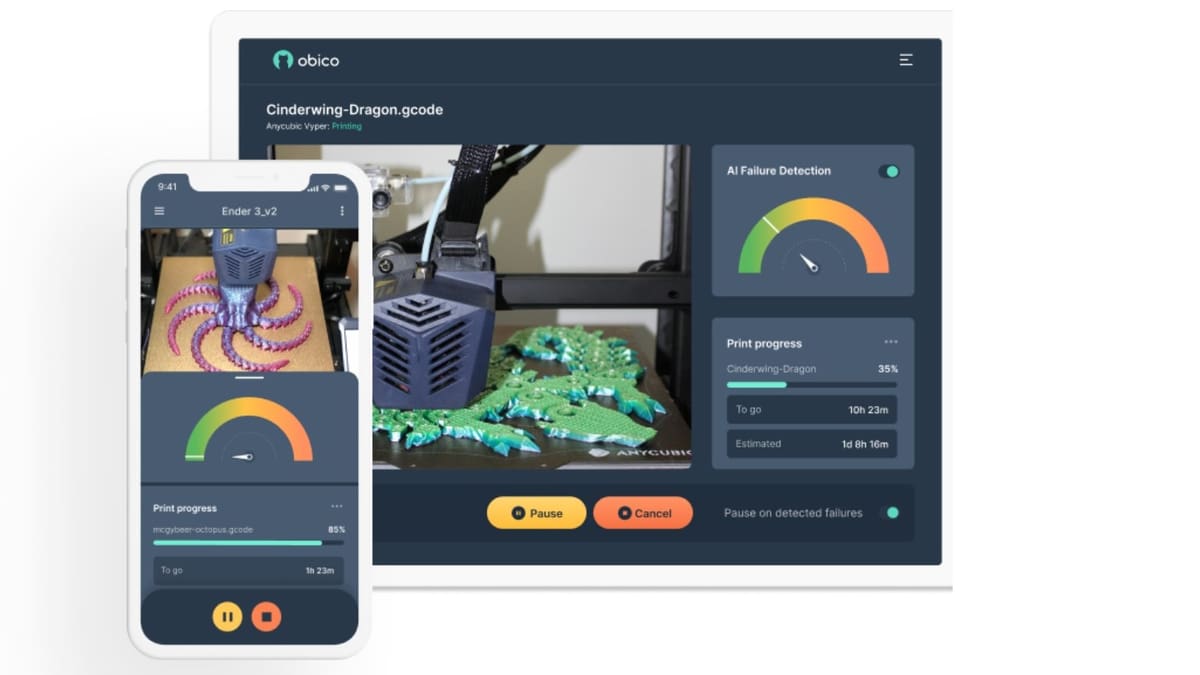
Formerly known as The Spaghetti Detective (TSD), Obico combines improved webcam streaming with AI-driven print failure detection. You can access your printer’s webcam feed from any device, and time-lapses of all your past prints are available on Obico’s dashboard. An additional beta feature is a secure tunnel through which you can access your entire OctoPrint interface from any device.
For AI detection, Obico can either notify you when things go wrong or intervene directly. Users report, however, that this feature is still slightly limited; increased time and training may help with the AI’s accuracy. The free plan gets you some AI watch time, and you can pay for more hours as you need them.
Note that OctoPrint Anywhere is an earlier version of TSD and Obico, and it’s from the same developer. While it used to be free, it’s now kept alive on a paid-only plan, causing some users to make the switch from OctoPrint Anywhere to Obico. Select users may benefit from OctoPrint Anywhere’s longer video lag, which makes it more resilient to spotty network connections.
- Why you need it: Obico allows you to access your webcam from anywhere, on any device! You can also get the AI to watch over your prints and notify you or intervene if anything goes wrong.
- Complexity: High
- Active instances: ~16,100
- Developed by: The Obico team
Telegram Notifications
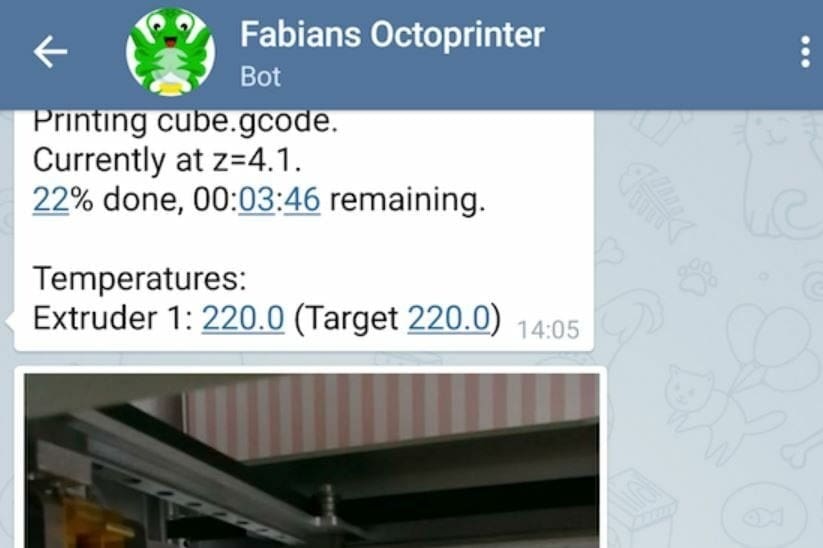
Want to get live updates on your print’s status? This Telegram OctoPrint plug-in will notify you of the current status in time or print height intervals, based on how you configure the bot. Information in each status message includes the height, percentage completion, time remaining, extruder temperatures, and an image of the print if a webcam is attached.
- Why you need it: Get updates about your print’s status directly via Telegram.
- Complexity: Medium
- Active instances: ~4,200
- Developed by: Fabian Schlenz
TP-Link Smartplug
Developed by jneilliii, TP-Link Smartplug is a useful plug-in that lets you control your 3D printer using voice commands. This plug-in also allows you to shut off your printer after a specified amount of idle time. The plug-in includes a thermal runaway monitoring feature that will turn off the printer if it detects that the temperature is getting too high.
While it was designed specifically for a 3D printer, the home automation plug-in can control anything you plug into the smartplug. Keep in mind that this plug-in requires a later model TP-Link Smartplug to run, and the HS100 and the HS110 are not compatible.
- Why you need it: Allows you to control your TP-Link Smartplug from OctoPrint’s interface and switch on your printer using voice commands.
- Complexity: High
- Active instances: ~3,300
- Developed by: jneilliii
OctoApp
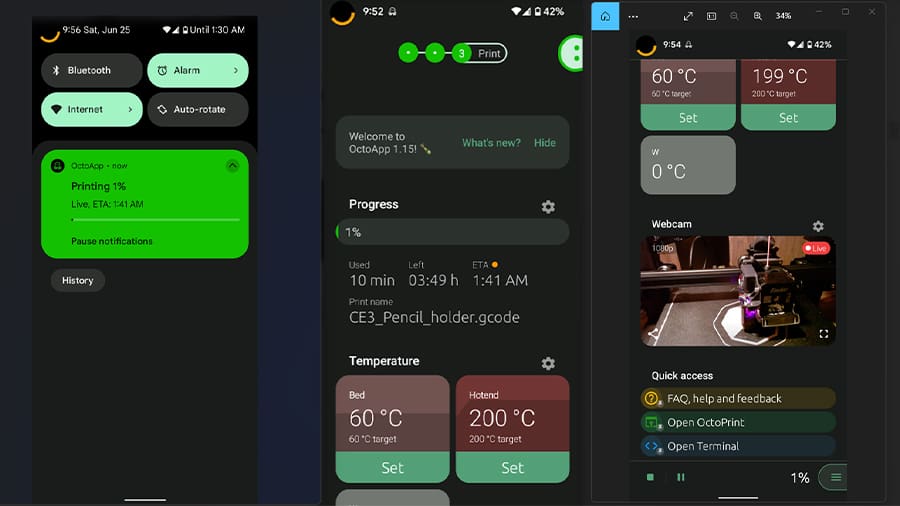
Speaking of smartphone monitoring apps, OctoApp is an extremely popular one for Android devices, with more than 50,000 downloads so far.
If you are one of the many OctoApp users, you’ll be interested in its companion plug-in, also named OctoApp. It adds more functionality to the app with enhanced push notifications: print completion, filament change, and even live print progress information.
- Why you need it: OctoApp’s plug-in provides more functionality to the remote monitoring Android app OctoApp.
- Complexity: Low
- Active instances: ~6,700
- Developed by: Christian Würthner
OctoEverywhere
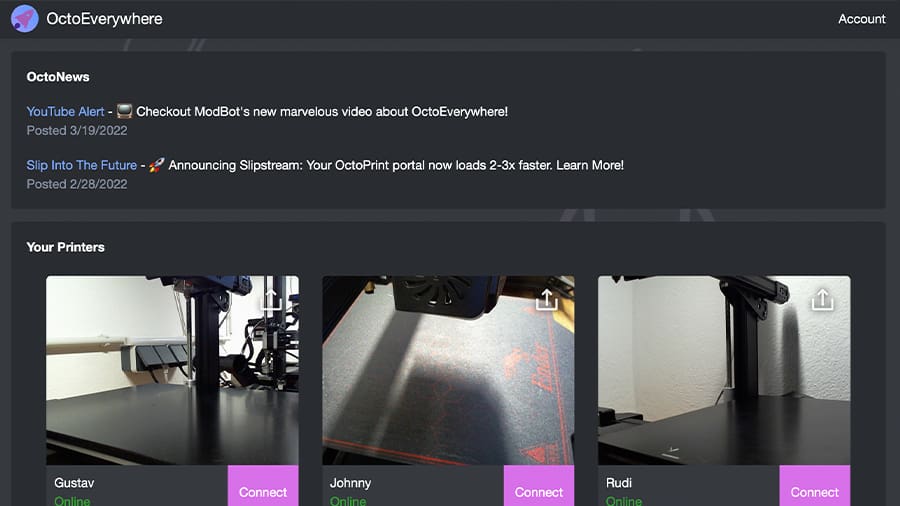
OctoEverywhere is an entirely free plug-in that provides access to your OctoPrint instance from everywhere (yes, we did it). It allows full framerate and resolution streaming from your webcam and can be easily installed according to the instructions on their dedicated website.
This plug-in can also be integrated with some smartphone monitoring apps, such as OctoPod and Printoid for Android. You’re required to create an account, though.
- Why you need it: OctoEverywhere gives you access to your webcam from everywhere for free. It’s also compatible with many smartphone monitoring apps.
- Complexity: Low
- Active instances: ~50,200
- Developed by: Quinn Damerell
Enhancements
For many, OctoPrint is great as it is. Still, not everyone uses the platform for the same reasons, and a little customization can go a long way. The plug-ins in this category enhance the tools and features already in OctoPrint, so you can tailor them to suit your needs.
Camera Settings

Whether the the camera is for time-lapses, monitoring your print, or both, Camera Settings is essential. Camera Settings supports changing the focus, exposure, contrast, and many other parameters of your image. The live feed of your camera lets you see the adjustments in real-time, which can even be done mid-print to avoid interruptions or restarting prints.
This plug-in can support many types of cameras, such as RaspiCam, ArduCam, or a standard webcam, and all types of connections from USB to ribbon cable. Additionally, this plug-in can be integrated with the MultiCam plug-in to support adjusting the settings on many cameras at once.
- Why you need it: Enables fine control over several aspects of your camera image to improve your 3D printer live video feeds, recordings, and time-lapses.
- Complexity: Easy
- Active Instances: ~9,600
- Developed by: Taylor Talkington
Preheat Button
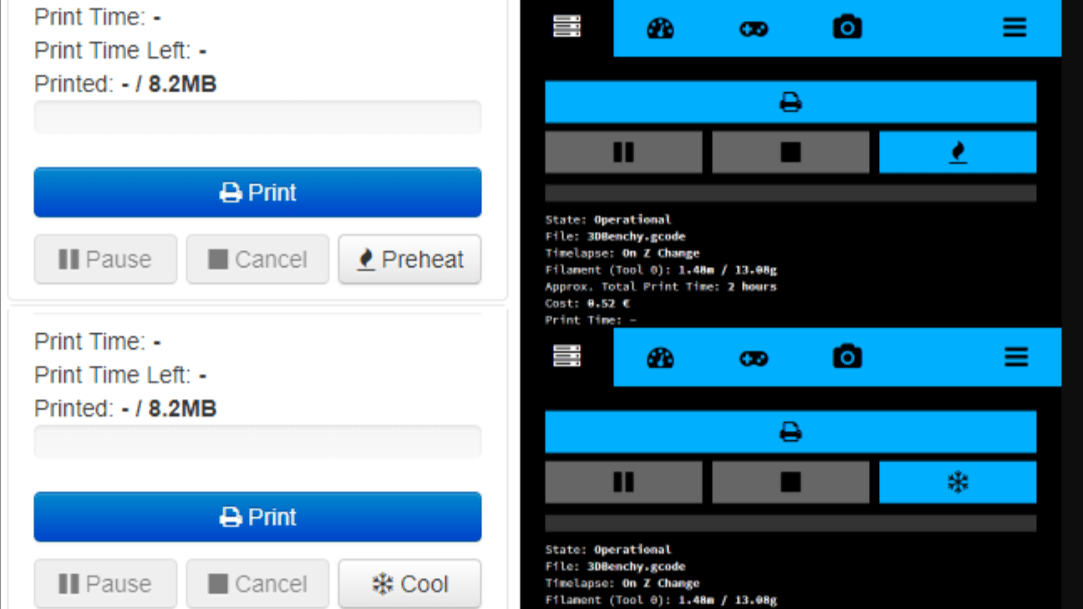
The Preheat Button plug-in adds a preheat button that sets the temperature of the hot end and the print bed to the temperature specified in the selected G-code file. This makes it much easier to set up and prepare your 3D printer. If the target temperature is already set, the button will turn into a cooldown button for easier access post-printing.
This plug-in checks the first 1,000 lines of the G-code file for the temperature. For most printers, this should be more than enough to find the set temperature. However, if your printer adds image data to the beginning of the G-code, such as the Prusa Mini, you may need to increase the number of lines the plug-in checks for temperature data. This change can be made in the plug-in settings under “Max number of lines to look for preheat commands”.
- Why you need it: It makes print setup easier by automatically heating the nozzle and bed to the temperature in the selected G-code file.
- Complexity: Low
- Active instances: ~12,000
- Developed by: Marian Kleineberg
Arc Welder
In any print, there are usually many curvatures involved in the model’s design. The OctoPrint Arc Welder plug-in helps your machine print these curves smoother and with less stutter by replacing standard G0 and G1 commands (straight movement) with G2 and G3 commands, which are meant for curves. The result is smoother curved surfaces on prints that make your models look nicer!
- Why you need it: Achieve smoother curved prints.
- Complexity: High
- Active instances: ~7,700
- Developed by: Brad Hochgesang
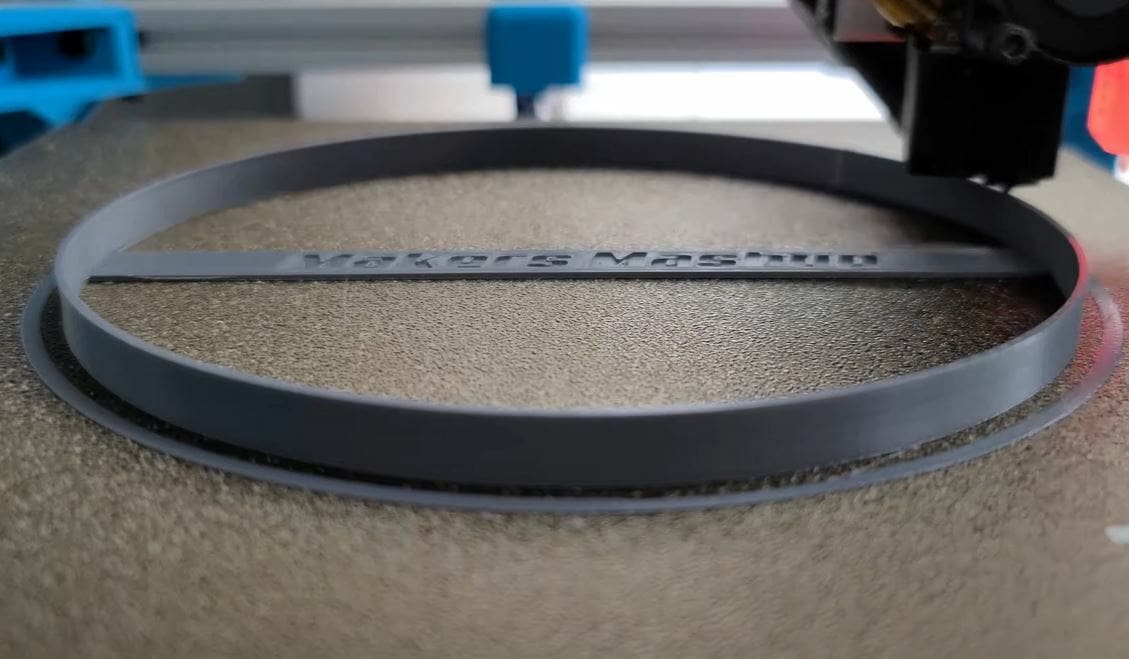
PrintTimeGenius
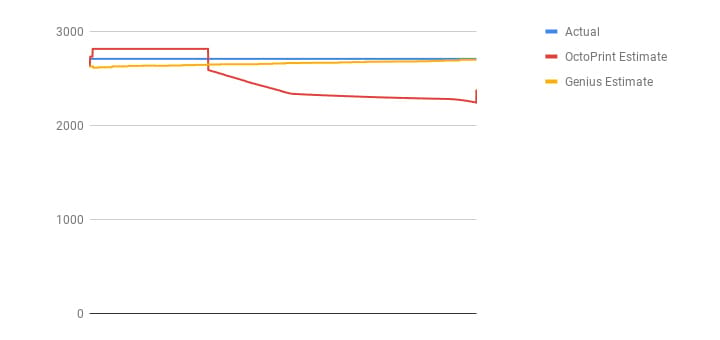
Accurate print time estimates are always appreciated. Eyal’s PrintTimeGenius runs advanced G-code analyses, updated as the printer runs, to provide estimates within minutes or seconds of the correct time. The above graph highlights just how accurate this can be, as compared to the default OctoPrint estimate.
- Why you need it: You’ll be able to tell, accurately, when your prints will finish. Eyal claims that it often strikes within 0.2% of the actual print time!
- Complexity: Medium
- Active instances: ~40,700
- Developed by: Eyal
BLTouch
A BLTouch device is a popular automatic bed leveling (ABL) sensor that runs a measuring sequence to keep your nozzle the same distance above the build plate to yield a higher-quality first layer. Compatibility between your printer and the ABL sensor needs to be built into the firmware, meaning that to control your BLTouch device from your OctoPrint interface, you’ll have to use the BLTouch plug-in.
The BLTouch OctoPrint plug-in allows you to control certain features of your BLTouch device remotely, such as self-testing the probe, telling the device to put the extension probe up and down, and releasing the probing alarm. These features are accessible through the four buttons that the plug-in adds to your OctoPrint web interface.
- Why you need it: You can control your BLTouch device through OctoPrint.
- Complexity: Low
- Active instances: ~9,800
- Developed by: jneilliii
License: The text of "The Best OctoPrint Plug-ins" by All3DP is licensed under a Creative Commons Attribution 4.0 International License.