Orca Slicer: Retraction Settings – Simply Explained

Retraction settings are some of the most important values to tune for a great print. Let's check out Orca Slicer's retraction settings!
Having a good model isn’t enough when 3D printing objects. There are many factors involved in this manufacturing process that can lead you to great or mediocre print quality. One of the main aspects of the workflow is the slicing process. A good slicer makes a ton of difference in the part output, so we have to choose it wisely. One of the best options at the moment is Orca Slicer. This software, which is less than two years old, has skyrocketed in popularity in 2023 and it is now one of the most popular slicers among all.
Originally developed by SoftFever, it has now become a community project that it’s constantly updated with new features. It has inherited all the tools of Bambu Studio, of which it is a fork, and now it also offers unique tools that you can’t anywhere else. Orca Slicer is one of the best choices out there, especially if you’re already an advanced or expert user.
As we have said, together with distinctive features, this software offers all the settings that are available on the oldest slicers. One of the main settings that you will run into is retraction, which is very important for quality parts. Retraction settings are available on all the slicers in circulation, but Orca Slicer offers some great tools for yielding the best possible printing experience and results.
So let’s start and dive deeper into what retraction is!
Why Use Retraction
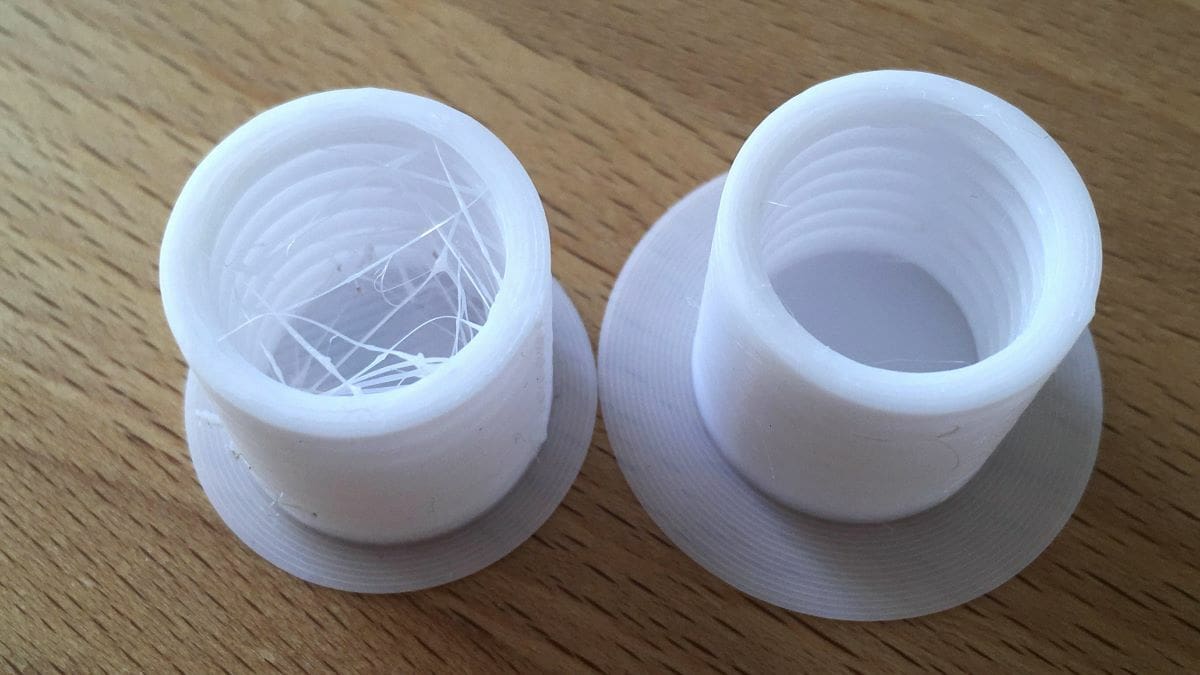
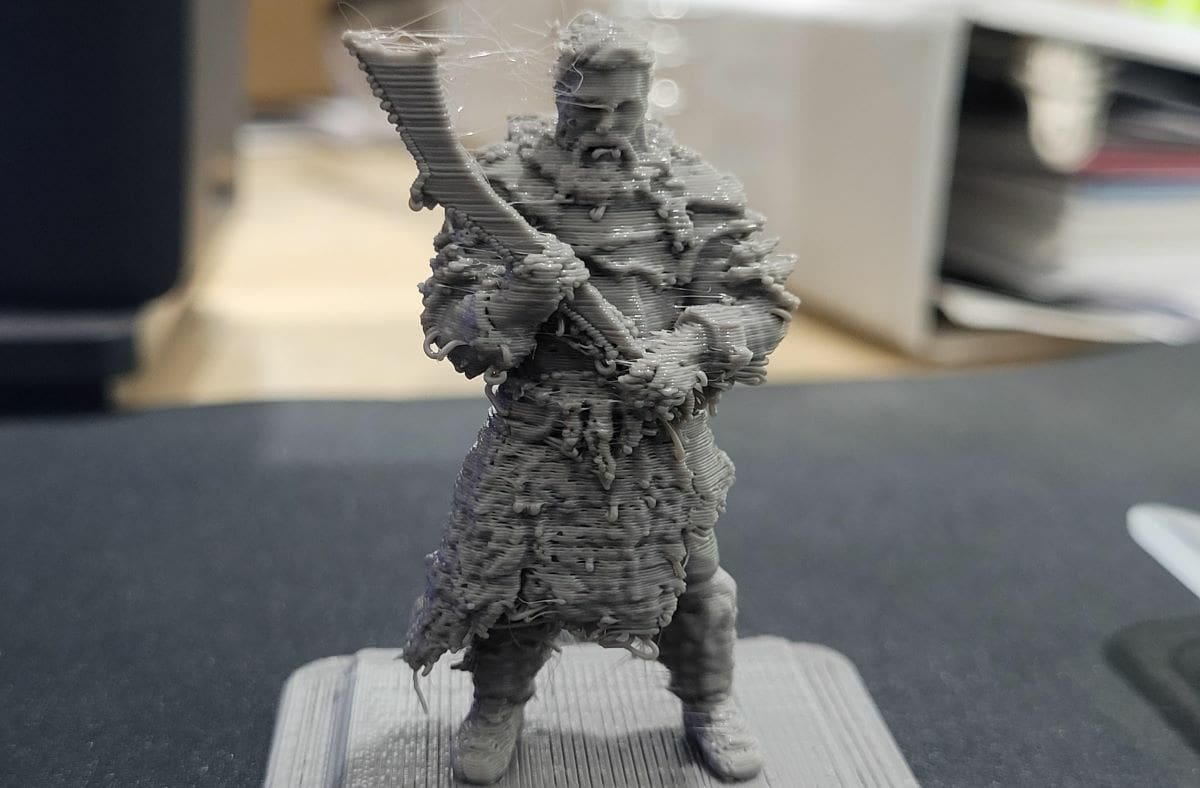
Fused deposition modeling (FDM) 3D printing works by extruding melted plastic in layers that fuse together and create a 3D object. Depending on the object geometry, the toolhead can move between different points during the printing process, for the so-called travel moves. During this period, the melted plastic continues to flow, leading to strings of materials attached to the print. To avoid this unpleasant artifact called stringing, we need to use retraction.
During retraction, the extruder slightly retracts the filament by pulling it back before moving to the next point of extrusion. When it gets there, it carries out a deretraction to get the filament flowing again. This process is extremely important to avoid the build up of pressure in the hot end, but it has to be tuned properly to get the desired results. Otherwise, it can cause other types of unwanted defects on the surface of the model, such as under-extrusion or blobs.
While retraction can be useful, there are cases where it shouldn’t be enabled. When printing flexible filaments like TPU or TPE, retraction can cause lots of problems. Due to the elastic nature of the material, retracting it would affect the diameter of the plastic, leading to filament jams or other extrusion problems. For other materials such as PLA, PETG, or ABS, retraction will generally help increase the quality of your prints.
Settings
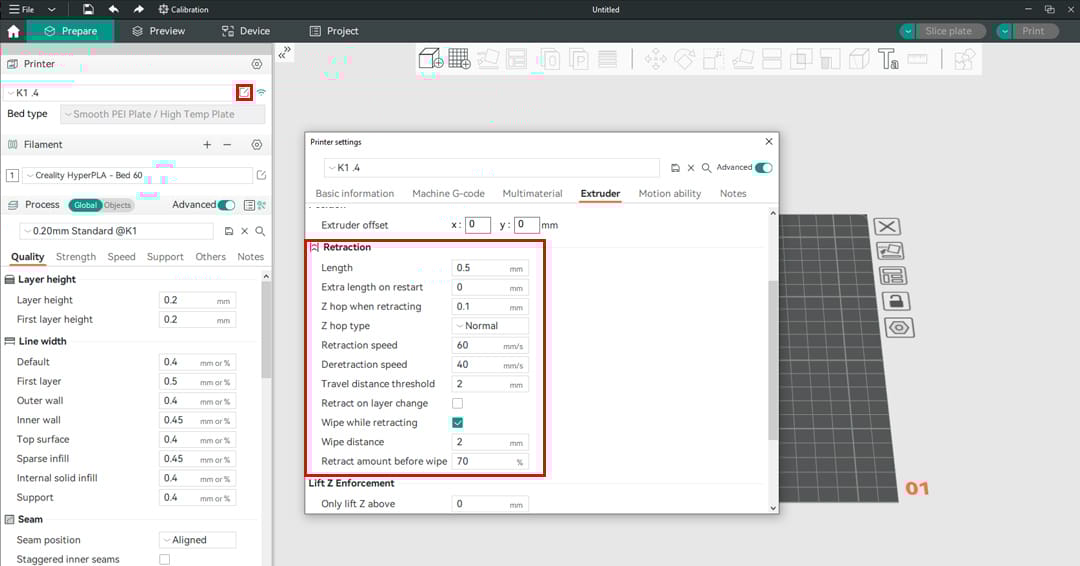
Orca Slicer offers many settings that you can tweak to get the perfect retraction values. There are two places where you can find the “Retraction” menu. To access the first one, enter the “Printer settings” menu by clicking on the pencil icon under the “Printer” section (“Click to edit preset” should appear if you hover over the symbol). From there, move to the “Extruder” tab and scroll down to view the entire “Retraction” menu. These are the generic retraction settings for your printer.
If you’re printing with challenging filaments or materials that need dedicated retraction settings, you can hop to the “Filament settings” window by clicking on the pencil icon under the “Filament” section. From there, move to the “Settings Overrides” tab to access the “Retraction” menu. Keep in mind that the retraction settings will be the default ones as seen in the printer profile, unless changes are made in the Filament settings tab.
You can use some general values that should get you good results and then experiment with the different settings to improve the quality even further. Here are some suggested settings that you can start with:
PLA
- Retraction distance: 0.5-2 mm for direct extrusion setups, 5-7 mm for Bowden extruders
- Retraction speed: 40-60 mm/s for direct extrusion setups, 30-50 mm/s for Bowden extruders
PETG
- Retraction distance: 0.5-3 mm for direct extrusion setups, 4-6 mm for Bowden extruders
- Retraction speed: 20-40 mm/s
ABS
- Retraction distance: 0.5-2 mm for direct extrusion setups, 6-8 mm for Bowden extruders
- Retraction speed: 40-60 mm/s for direct extrusion setups, 30-50 mm/s for Bowden extruders
Now let’s dive deeper into the available settings!
Length
The first main setting for retraction is length. This option can be found in any slicer and is measured in millimeters. It controls the length of the filament that is pulled back during the retraction process.
In general, higher retraction length values are better for preventing stringing because the more filament you pull back, the less pressure builds up in the hot end. On the other hand, an excessive distance usually leads to under-extrusion or filament grinding.
To set the right value, the first thing to do is distinguish between Bowden and direct extrusion setups. While with the Bowden setup, the extruder is placed away from the toolhead and the filament needs a Bowden tube to reach the hot end, with the direct setup, the extruder is placed on the toolhead, so the filament path is shorter. For this reason, when using a Bowden configuration you have to increase the retraction value, usually setting it to 4-5 mm, and decrease it for direct extrusion setups, using a value that ranges between 0.5 mm and 2 mm.
If you’re planning on tweaking the distance values, try 0.5 mm steps for Bowden machines and 0.2 mm increments for direct extrusion setups.
Speed
The other key setting when talking about retraction is retraction speed. This is the speed at which the filament is pulled back during retraction. As mentioned, a higher speed generally reduces the chances of stringing – but it increases the probabilities of under-extrusion and filament damage.
In this case, there isn’t much difference between Bowden and direct extrusion configurations. The standard value for retraction speed is set to 60 mm/s, whereas for deretraction the speed is usually 40 mm/s. Although deretraction speed doesn’t influence stringing much, an excessive value can cause problems. Keep it in a safe range for the max volumetric flow rate of your nozzle, because otherwise you’ll encounter extruder skipping.
As for distance, if you want to test different values, try 5 mm/s steps. If stringing is excessive, increase the speed by 5 mm/s, whereas if you notice filament grinding or inconsistent extrusion, decrease the retraction speed by 5 mm/s.
Z Hop

When retracting, you can instruct the printer to lift the toolhead slightly above the printed piece. This movement is called Z hop and is particularly useful when printing pieces that are thin or which present a small contact area with the print bed. Unfortunately, it increases printing time, especially when printing large models, so make sure to enable it only in warranted cases.
You can choose both the amount of lift of the toolhead as well as the type of Z hop. The default values should be fine, but you can also experiment with the slope and spiral options for the latter, or let the software evaluate the best mode for your print by setting it to “Auto”.
Types of Z Hop
With normal Z hop, the toolhead will lift up vertically, move to the next point, and get back down. Its main con is that can lead to some stringing, especially if the material has absorbed moisture.
Slope and spiral Z hops are relatively new in the game, but they’re rather interesting. With slope, the nozzle will simultaneously move up and right or left, reaching over the next point in a diagonal move. This option can save you some time and avoid stringing. On the other hand, it’s more prone to hit your piece than the normal Z hop.
Spiral type tries to combine the advantages of both the previous modes by lifting the toolhead in small spirals. This decreases both the chances of stringing and of hitting the piece, but it’s the mode that takes more time between the three, so choose wisely!
Other Settings
There are some other minor settings that you can tweak to create the perfect retraction profile. For example, you can decide when you want the retraction to happen during layer changes by enabling “Retract on layer change”. As we said before, this can be useful with models that have a thin base or body, as it decreases the chances of taking off the print from the plate.
You can also tune the “Travel distance threshold”. With this setting, you can decide to trigger the retraction only when the travel distance is greater than the value you have set. This can help you save time on larger prints.
Finally, another useful set of items that Orca Slicer offers is the wipe tools (“Wipe while retracting”). If you enable it, the toolhead will retrace the last few movements before the retraction to clean the material that can ooze out from the nozzle. You can tweak the distance of the movement and the length of fast retraction before the wipe (“Retract amount before wipe”).
Tuning
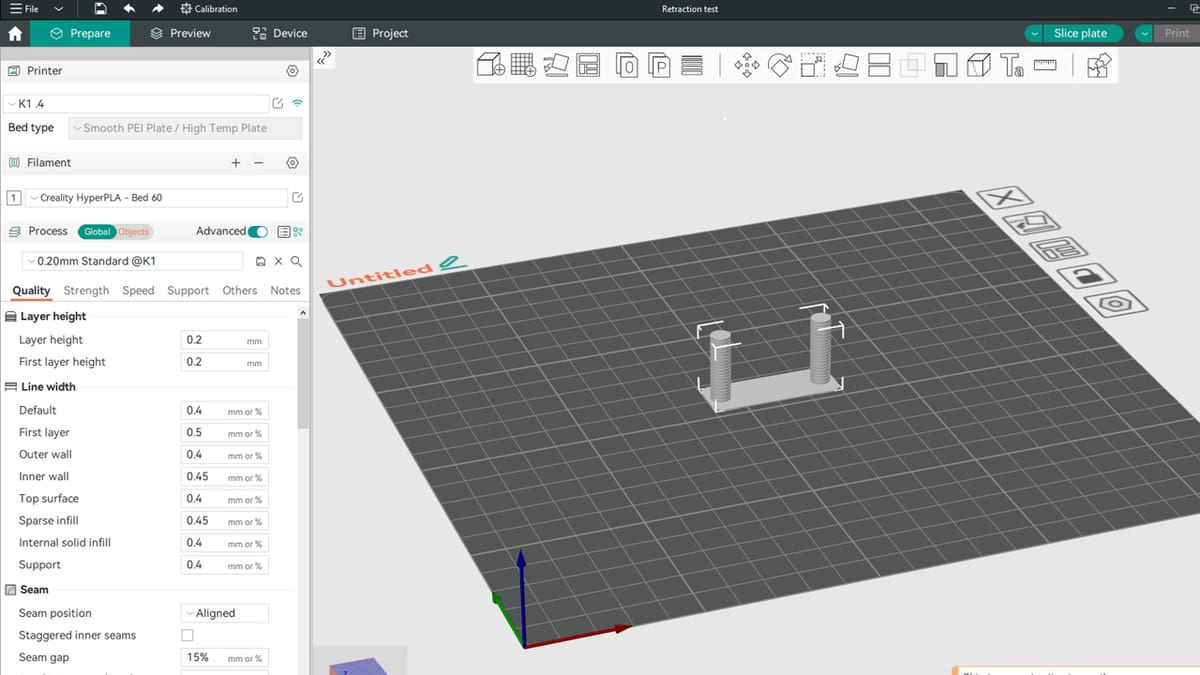
Now that we know what every setting influences, you can tune them with Orca Slicer’s calibration tool. To access it, click on “Calibration” and choose “Retraction test” from the drop-down menu. It’s important to note that you should follow the calibration hierarchy before tweaking retraction. It’s appropriate to perform the tests that precede the retraction tower before printing it.
When you click on the right item, a window will pop up. Here, you can set the range of length values that you want to test, together with the step value. The default numbers are perfect for a direct extrusion setup test. If you want to perform the test for a Bowden setup, you can set the start and end length to 1 mm and 6 mm, with 0.2 mm steps.
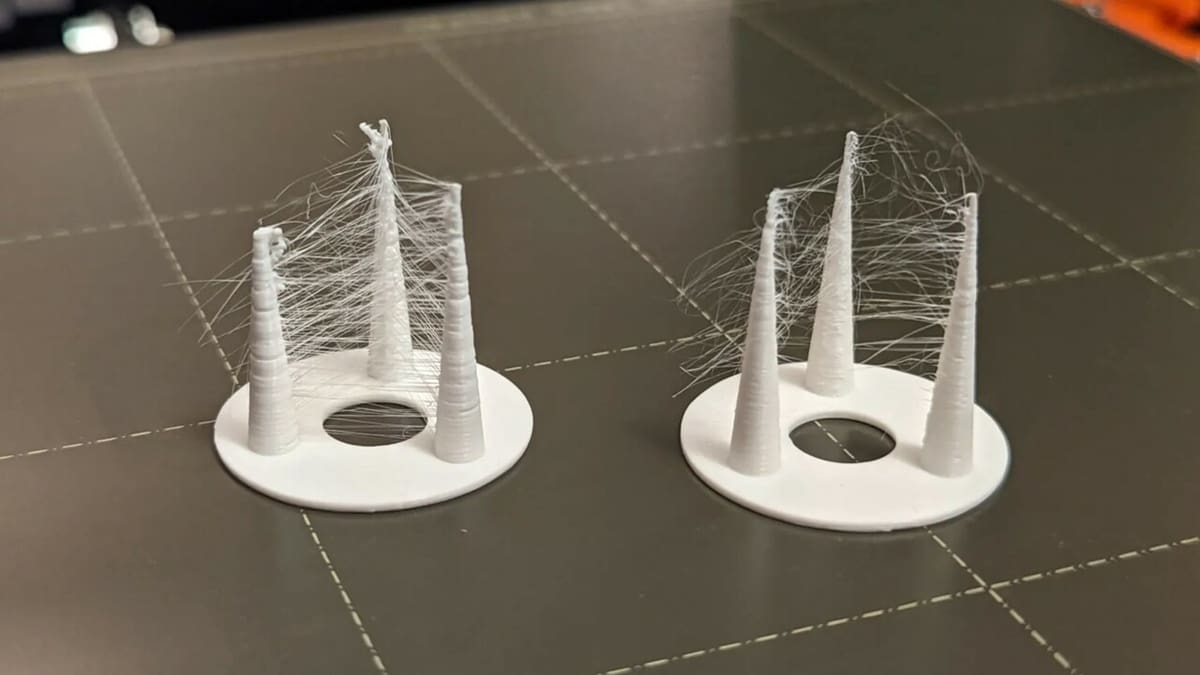
Once you hit “OK”, the test will automatically be generated. You can find a detailed guide about the tuning process under “Calibration > Tutorial“. The workflow is fairly simple. Look out for the areas where stringing is absent and set the corresponding value on the profile. Set the lower value to save time and some work to the extruder.
For materials that are hygroscopic, finding the right value can be more difficult. If the stringing persists with the highest retraction values, dry your filament before printing the test once again.
License: The text of "Orca Slicer: Retraction Settings – Simply Explained" by All3DP is licensed under a Creative Commons Attribution 4.0 International License.