
PrusaSlicer: Text Embossing – Simply Explained

Together with the Cut Tool, the PrusaSlicer Text Tool is one of the most convenient features to speed up your design workflow. Check it out!
PrusaSlicer is without a doubt one of the most famous slicers in the 3D printing world. Developed by Prusa Research, it offers a long list of profiles for all kind of machines, making it really versatile. Free and open source, this software is one of the most appreciated by makers not only because of its customizable nature but also due to the company behind it.
PrusaSlicer has gained a lot of popularity in the last seven years since its release thanks to the variety of adjustable parameters, which constantly increase, as well as the new updates and releases, which respond to users’ needs and suggestions.
One of the most recent features released is text embossing. Introduced in PrusaSlicer 2.6, this handy tool was created to speed up customization, allowing you to create text directly in the slicer and easily add it to an existing model if needed.
Let’s take a closer look at what PrusaSlicer text embossing is and how it can speed up your workflow!
What Is PrusaSlicer Text Embossing?

PrusaSlicer’s Text tool allows you to easily add text onto your 3D models. Labels, notes, signs, and numbers can now be added directly in your slicer. In this way, no CAD software is required to customize your objects!
This feature offers a lot of options to bring your text exactly how you want it, as we’ll see shortly. You can even save the project and edit your text further when you re-open the file.
The major advantage of this tool is the possibility of using it on any kind of surface, including planar and curved ones. If you have experience with CAD, you know that on some complicated shapes it can be difficult to add text, so this tool can simplify your designing life.
Let’s check out how to use it!
How to Use It

You have two options with this tool: you can either use it to modify an imported object or you can create a text model from scratch and export it. Let’s see how to do both.
Modify an Existing Object
- In the “Plater” workspace, select the object that you want to modify (it will be highlighted in green).
- Right-click on the model and under “Add modifier”, select “Text”. Shortcut alternative: press ‘T’ on your keyboard.
- A text modifier will appear on your object. You can choose to emboss (add) the text with the “Join” option or to deboss (carve) it with “Cut”. Now you can customize your label with some settings we’ll look at further below.
Once you’ve got the design you’re after, you can slice it and send your G-code to your machine to 3D print your text model, or you can select it, right-click, and export the customized object as STL or OBJ.
This option can be useful for customizing your models with labels, as seen in the image above.
Create a Standalone Object
- With no model selected, again in the “Plater” workspace, right-click on the PrusaSlicer build plate. Under “Add Shape”, select “Text”. Shortcut alternative: with no model selected, press ‘T’ on your keyboard.
- A model of your text will appear on your plate. The same parameters panel of the previous option will be available and you can customize your label.
With your text design finished, you can slice it and send the G-code to your machine to 3D print your text model. You can also select it, right-click, and export your creation as STL or OBJ.
This option can be useful for creating logos or labels quickly without CAD software. For example, you can recreate the Prusa Research logo.
Settings

Now, let’s take a look at some settings you might want to tweak to obtain the perfect result.
- Font: This is a really intuitive option; with this setting, you can select the font of your text. A long list is available to choose from, and for most of the fonts there is a handy preview of what the characters will look like.
- Height and Depth: With the height, you can choose the dimension of the character in 0.1-mm increments, making the text as big or as small as you want. With the depth, you can set the thickness of your text.
- Character gap (“Char gap”): From the advanced options, which you can see by clicking on the triangle next to “Advanced”, you can find this setting that allows you to increase or decrease the distance between the characters, moving them extremely far apart or squeezing them together.
- Boldness and Skew ratio: After setting the text as bold, with the first option you can control the strength of this effect. On the other hand, with skew ratio, you can set a custom inclination of Italic text.
- Rotation: Another intuitive option, it allows you to rotate your text.
Tips & Tricks

Now that we know how to customize our text, we can move on to some tricks to get the most out of this tool:
- Text on curved surfaces: A major advantage of this feature is that the text can follow curved surfaces. As we’ve said before, if you have experience with CAD, you know that it can be challenging to add text to some shapes. Now it’s really simple; the only thing you have to do is expand the Advanced options and activate “Use surface”. The text will automatically follow the object’s curve, as seen in the image above.
- 3D print small text: Sometimes text can be a challenge to print. A useful option in those cases is the “Detect thin walls” setting in PrusaSlicer. You can activate it in the Advanced or Expert views. Under the “Print Settings” tab to the top left, in the section “Layers and perimeters”, you’ll find the “Quality” category. Here you can activate the “Detect thin walls” option, so PrusaSlicer will create a single perimeter feature for small text.
- Addition/subtraction: Being able to emboss and deboss a text directly on the slicer is really convenient and simple. In this way you can customize objects, assign a serial number, a prototype code, and so on. To realize the goal, the only thing that you have to do is to choose either “Join” or “Cut” under the “Operation” section of the Text tool menu that will pop up when you’ve created it.
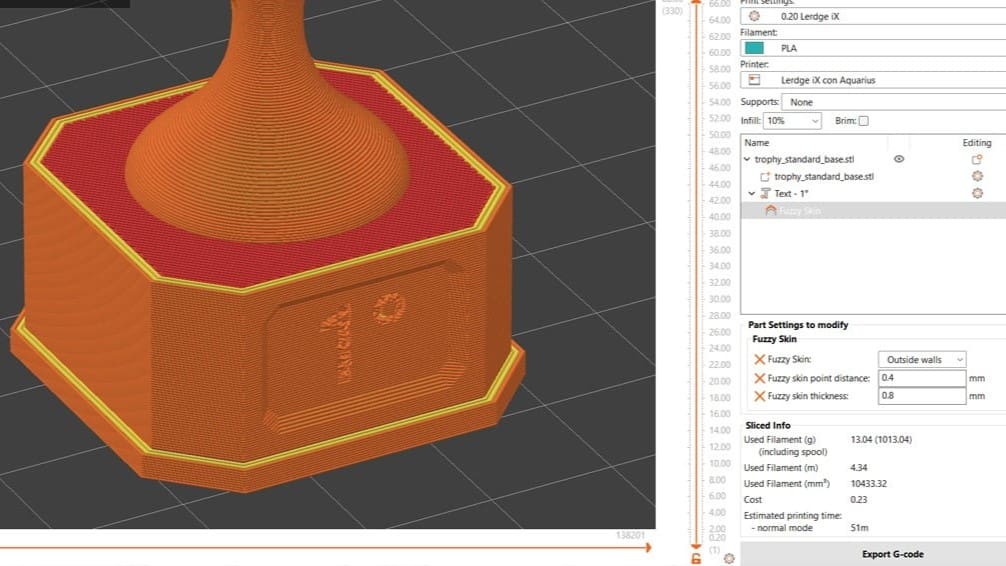
- Modifier: With this feature, you can obtain really cool results. In fact, using text as a modifier allows you to customize the slicing settings only for that specific region, creating stunning effects. For example, you can turn on Fuzzy skin or turn off walls to show the infill only for the text, as for this trophy by flowalistik. To do this, you have to select the Expert mode tab on the top right and the specific object you’re modifying. You simply right-click on the text that you created and select “Add settings”. From there, you can change quite a few aspects of your text.
License: The text of "PrusaSlicer: Text Embossing – Simply Explained" by All3DP is licensed under a Creative Commons Attribution 4.0 International License.