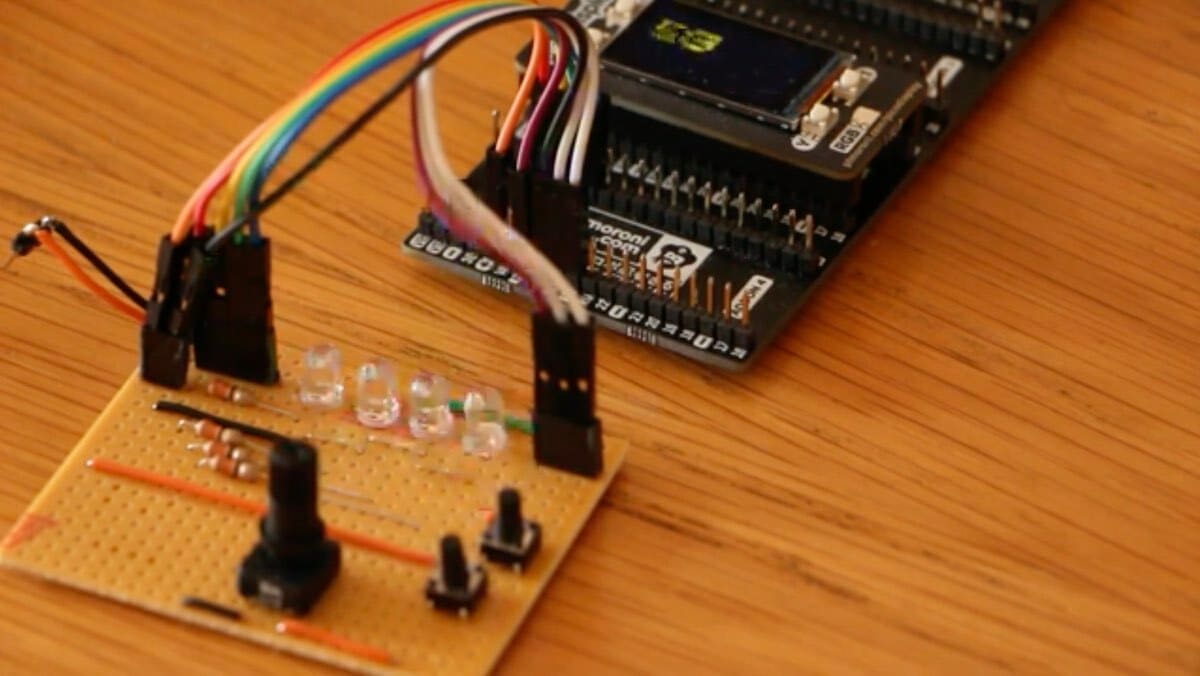
The launch of the Raspberry Pi Pico and the RP2040 processor it’s based on injected new energy and interest into the world of microcontroller development boards. Until the Pico, Raspberry Pis were fully fledged single-board computers capable of running an operating system.
The diminutive Pico is designed to interface with and control physical, real-world projects. It’s a modern take on an established class of devices – including the venerable Arduino – and it’s at a price point of less than $10 (subject to change with availability).
Despite its low cost, it’s an enormously capable device. Combined with the Raspberry Pi Foundation’s well-earned reputation for world-class support materials and the backing of virtually every relevant component and parts manufacturer, the Pico is set to unleash a wave of creativity in the microcontroller space.
And with the release of the Raspberry Pi Pico 2 in August 2024, which replaces the RP2024 processor with the RP2350, even more can be accomplished!
Before we check out the assortment of projects we’ve gathered, let’s go over the Raspberry Pi Pico’s specs.
Specs & Usage

The specifications of the Pico are impressive. It has a fast dual-core processor, 2 MB of onboard flash memory, 26 I/O pins (3 of which are analog inputs), 2 each of UART, SPI, and I2C controllers, 16 PMW channels, and an impressive 8 PIO (programmable input/output) “state machines”. In other words, it supports a huge variety of peripheral sensors and devices.
Some were disappointed that it has no onboard Wi-Fi and Bluetooth, but these consume power that’s not always necessary and can be easily added if required.
Expert users can squeeze a lot of performance out of this device, but it’s also ideally suited to beginners. Newbies can program their Pico in the easily accessible CircuitPython or MicroPython, while coding rockstars can still use C or C++.
All these components sound very exciting, so let’s jump in and check out some great projects to give you a taste of what you can achieve with this board! Keep in mind that the list includes projects that were created specifically for the Pi Pico, so compatibility with the Pico 2 can’t be guaranteed depending on the specs required.
Getting Started
These simple projects are perfect for beginners, allowing you to get familiar with the Raspberry Pi Pico.
Flashing LED
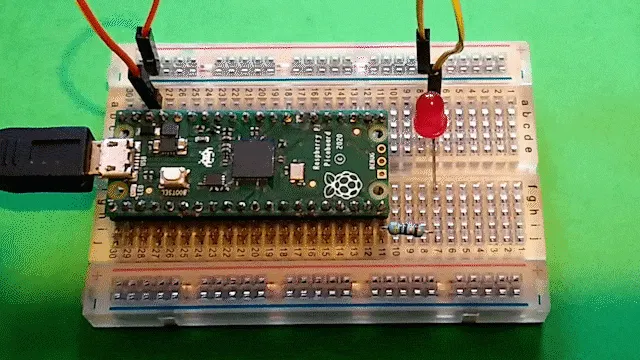
For those new to microcontrollers or who want to see how the Pico differs from an Arduino, we recommend following a few simple projects described directly by the Raspberry Pi Foundation.
Flashing an LED or responding to a simple analog input may not sound very exciting, but projects like this are quick and easy to get running. Additionally, these small projects are the best introduction to setting up and using MicroPython on the Pico.
- Difficulty: Easy
- Designer: Raspberry Pi Foundation
- Project page: Raspberry Pi Foundation
- Core components: Breadboard, 330-Ω resistor, micro button, LED diode
Low-Power Wi-Fi & Blynk Integration
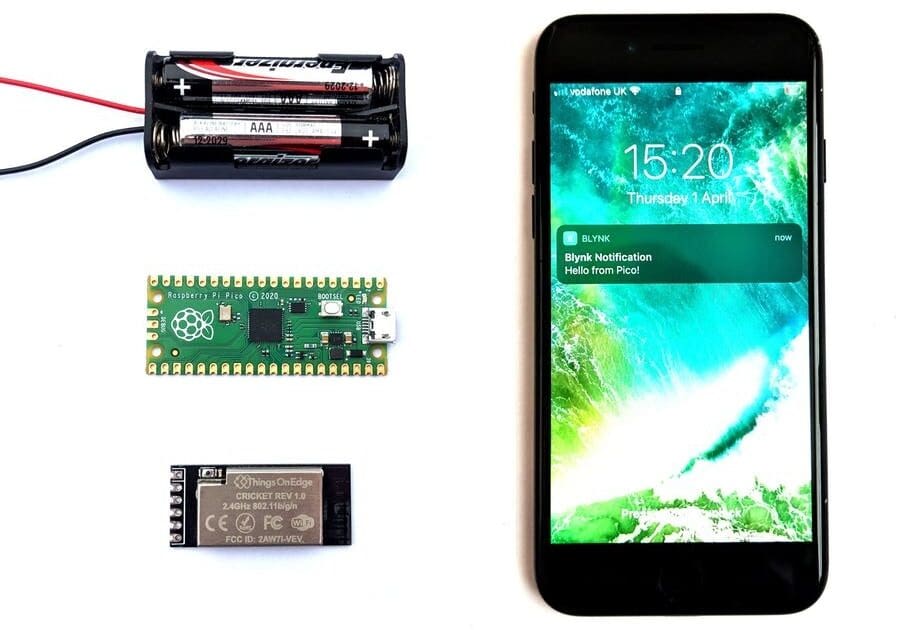
There’s a lot of interest in the best way to add simple (and low-power) Wi-Fi to Pico projects. This is a really great example that also includes integration with Blynk to send text messages.
It uses an ultra-low-power Cricket Wi-Fi Module and can be thought of as a base platform for building other IoT applications. To help, the instructions include ideas on how to expand and modify the basic design.
- Difficulty: Easy
- Designers: Sylwester Bala, Piotr Lewandowski
- Project page: Hackster
- Core components: Cricket Wi-Fi module, connecting wires, Blynk software (optional)

Controlling a Stepper Motor
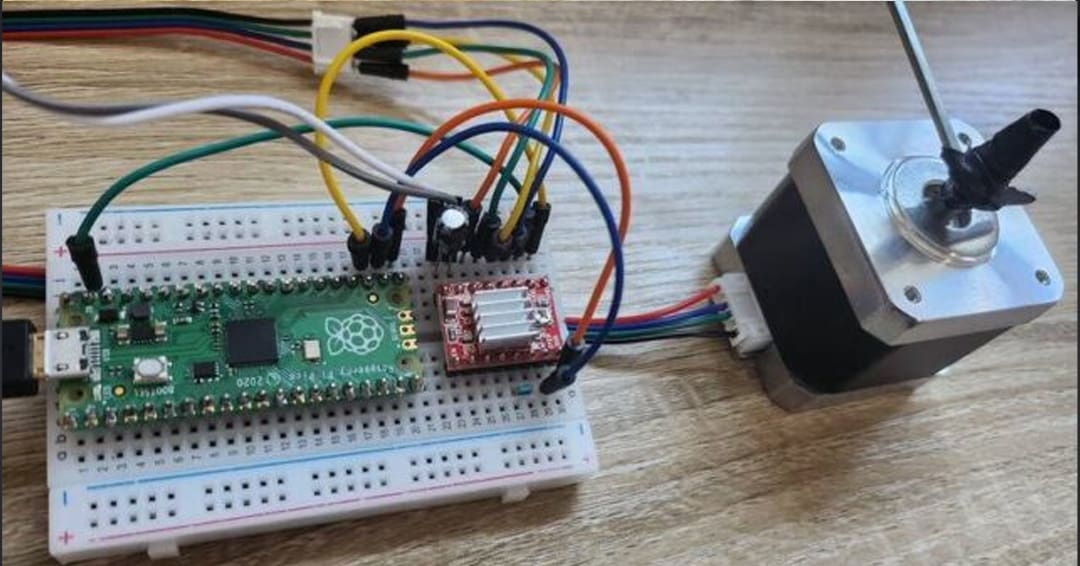
Stepper motors are one of the most common motors used in electronics projects. They’re also used in 3D printers! For this reason, learning how to control them can be really useful for various types of applications. Plus, it’s a perfect project to dip your toes into the Raspberry Pi world.
The two main components of this project are the stepper motor and its driver. The driver allows you to easily control the stepper motor, choose the microsteps resolutions, and adjust the current limiting. The latter should be done first, as it’s essential to avoid damaging the motor.
You can follow the detailed guide to do it and to access the wiring diagram and code for the project. And if you’re just getting started in MicroPython, don’t sweat it – there’s a detailed explanation as well on what the different lines of script refer to and do.
- Difficulty: Easy
- Designer: How To Electronics
- Project page: How To Electronics
- Core components: A4988 stepper motor driver module, Nema 17 stepper motor, breadboard, capacitors, voltage regulator
Interfacing LCD Display
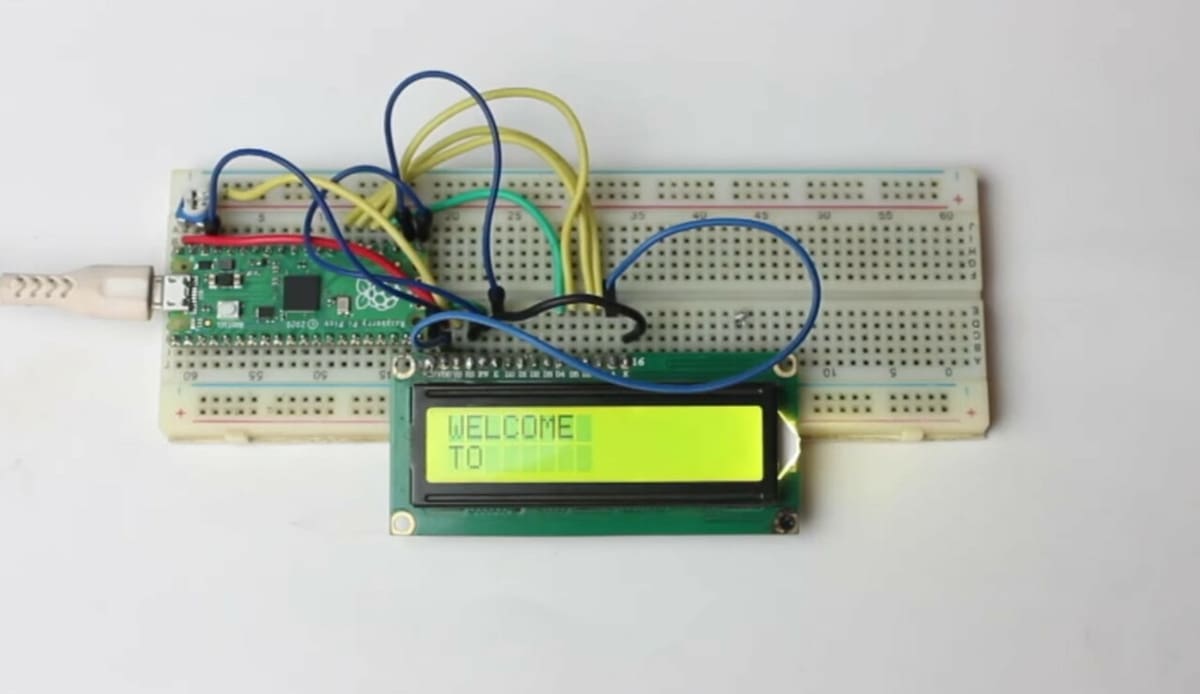
In this practical upgrade, you’ll use MicroPython programming to interface an LCD display with your Raspberry Pi Pico. It’s a pretty useful addition to your microcontroller since you can use LCD displays for any number of projects.
While this isn’t a Raspberry Pi Pico project per se, it’s an LCD interfacing upgrade that can lead to even more projects. There are clear descriptions of the pins and circuit diagrams with lots of color photos as demonstrations.
- Difficulty: Easy-intermediate
- Designer: Joydip Dutta
- Project page: Circuit Digest
- Core components: LCD display
Exploring Further
Here are some more projects to help you discover everything the Raspberry Pi Pico is capable of and all of its possibilities!
Color Mandlebrot Set
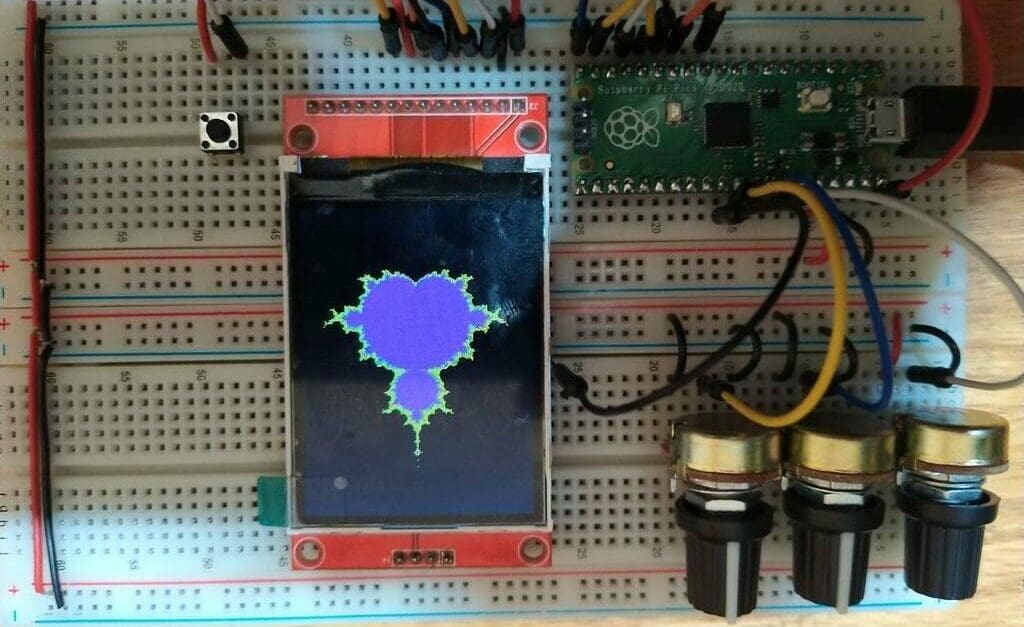
It’s easy to find several simple guides on how to connect a TFT display to a Pico. This version is much more interesting and fun, with lots to learn about driving TFT graphics, analog input control, and mathematical programming.
A featured design on Instructables, the wiring guides can be found embedded in MicroPython software. The potentiometers are used to control zoom and pan. To take it a step further, you could get creative and replace these with other input devices to explore the Mandlebrot set.
- Difficulty: Easy
- Designer: ruchitel
- Project page: Instructables
- Core components: TFT display, 3x potentiometers
LED Lamp with Various Modes

If you’ve got a glass container and LED lying around, this low-budget and interesting LED lamp project to make with your Raspberry Pi Pico is a great option for providing a fun little light for your living space.
After learning how to configure Arduino IDE, you’ll install and download libraries and firmware, and then format the RPI’s flash. Finally, you’ll upload the codes into your Pi Pico and assemble the lamp. Be careful – it can be tricky to get all the parts into the glass container! The photos are particularly helpful for reference, and the creator of this project included all the files and steps on how to do things, so you don’t need to worry about writing code yourself.
As for functionality, the push button allows you to change the lamp modes, making for some lovely colorful light displays.
This is an ideal project for those starting out into the world of Raspberry Pi and a nice way to reuse a container.
- Difficulty: Easy
- Designer: Nick Programmer
- Project pages: Instructables, GitHub
- Core components: RGB LED strip, capacitor, button, resistor, accumulator
Matrix Touchscreen Keyboard
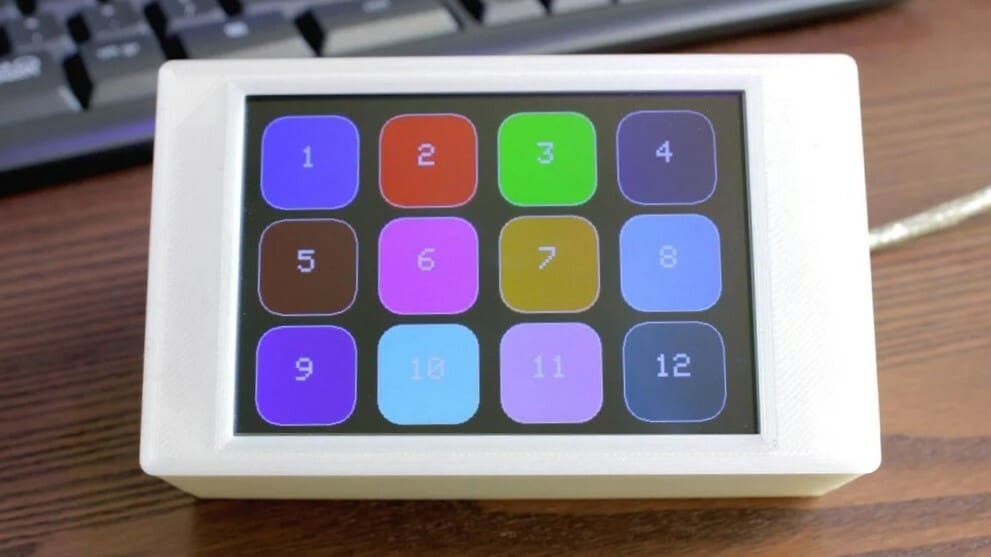
This project uses a TFT LCD touchscreen with a Pico to build a matrix keyboard. You can use matrix keyboards as a quick-access collection of hotkeys or a DIY stream deck.
After you finish all the connections, packages, and library installations, fire up the touchscreen and give it a go. In addition to all this, the maker of this project has shared a 3D printed case for keeping all the components and wires tidy.
- Difficulty: Easy-intermediate
- Designer: DustinWatts
- Project page: Instructables
- Core components: TFT LCD touchscreen display, wires
USB Foot Pedal
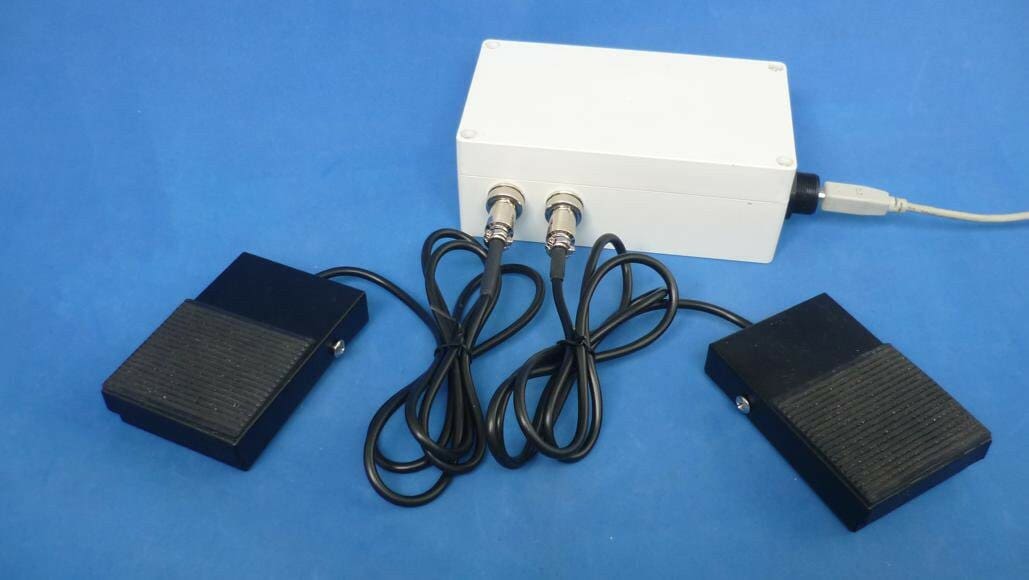
This handy project is great for a quick hands-free pause when using software. Sometimes you just need to go sans hands, and for those purposes, this Raspberry Pi USB foot pedal is practical for your home computer needs.
The project is straightforward in design and an excellent pick for all levels of Raspberry Pi users since it’s relatively basic in nature. The pedal setup is well explained by the creator, with all necessary code, photos, and schematics included.
- Difficulty: Intermediate
- Designer: alberto nunez
- Project pages: Hackaday, GitHub
- Core components: USB cord, internal pull-up resistors, aviation connector, foot switch, TUSISTEMITA blocks, heat-shrink tube
Persistence of Vision (POV) Display

Projects that light up are always engaging, as are projects that move. This venture combines both!
Persistence of vision (POV) displays are mesmerizing, giving the impression of a solid illuminated screen of light from moving components. The technical implementation utilizes the Pico’s PIOs and is coded in C. You may have to read between the lines of the instructions a bit, but experienced makers should have few problems recreating this fun device.
- Difficulty: Advanced
- Designer: HomeMadeGarbage
- Project page: Hackster
- Core components: DotStar LED strip, reflectance sensor, DC motor
Entertainment & Games
Next up, we’re looking at a few creative projects that’ll let you indulge in nostalgia, kill time, or create an entertainment system. One thing is for sure, building these projects will undoubtedly be as fun as using them.
Music Box

We love this! Playing sounds and MP3s is a recurring microcontroller application, and this is a unique, creative, and easily adaptable take on that idea.
We also like that the implementation uses the Pico’s PIO functionality, so those interested can also delve under the hood and see how all that works.
- Difficulty: Easy-intermediate
- Designer: thisoldgeek
- Project page: Hackster
- Core components: Adafruit audio amp, speaker, NeoPixel stick (optional)
Gaming
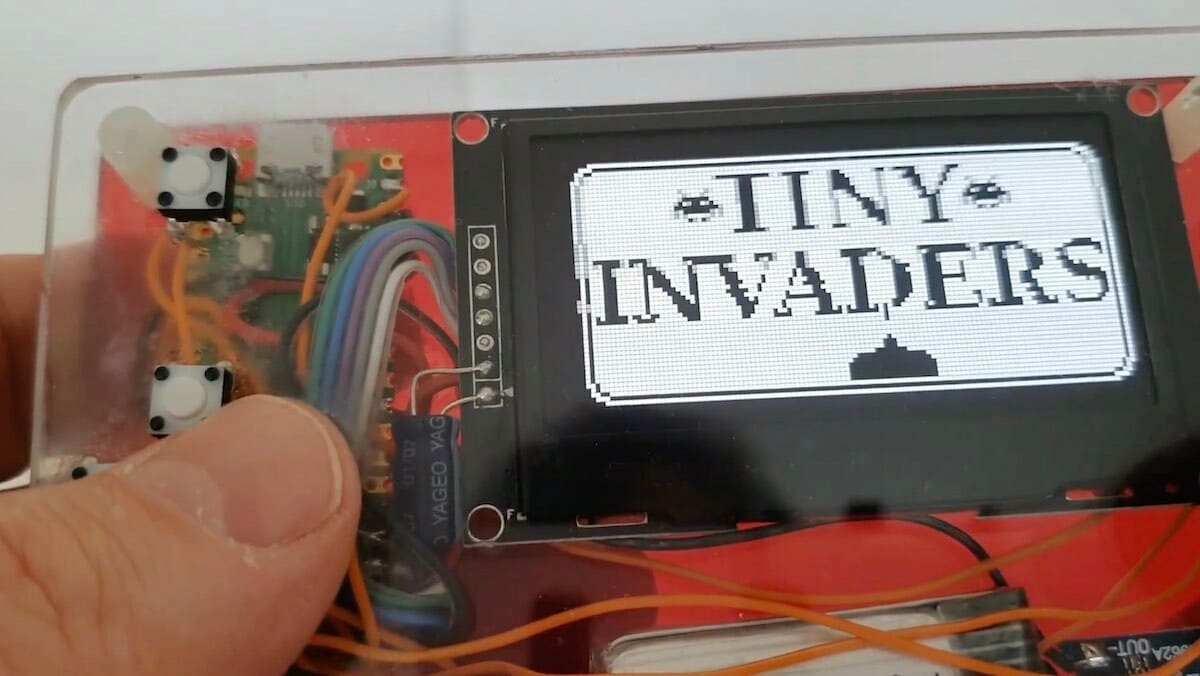
This is a fantastic port of the popular microgames series onto the Pico. The result is a fun project that also serves as a great way to learn about transferring designs from different platforms, such as Arduino.
It’s not going to rival an Xbox, but that’s not the point! Instead, it shows the sort of processing this little device is capable of.
The instructions assume a certain level of familiarity with building projects like this. You can find the main instructions on its GitHub “ReadMe” page. If you have a 3D printer, there are also 3D printed housings you can add.
- Difficulty: Intermediate
- Designer: Roger Bühler
- Project page: GitHub
- Core components: SSD1309 OLED display, electric buzzer, 5x push buttons
Color Mixer
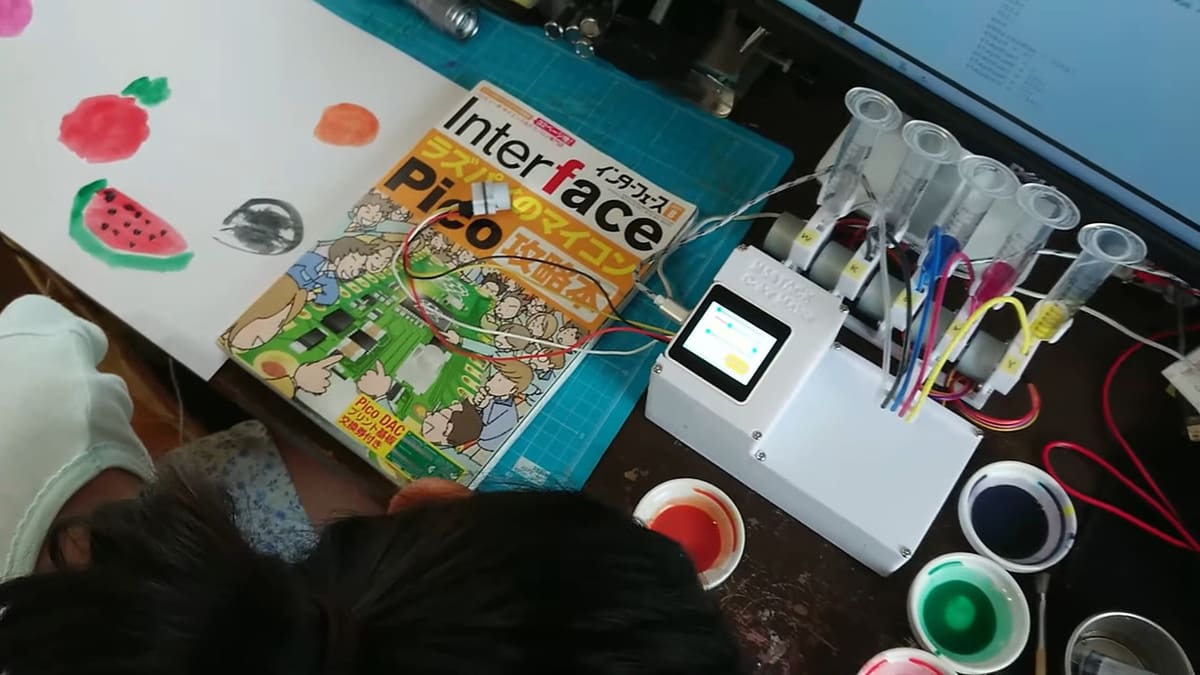
The M5Stack Color Maker is a versatile device designed to create colors. It features an I2C-connected color sensor that allows you to scan the color of an object accurately. Whether you come across a captivating shade or want to replicate a specific color, simply point the Color Maker at it, and it will capture the hue for you. It will then mix the precise amount of each color together to create the desired shade.
For those with programming skills, there is a MicroPython code available specifically for the M5Stack Color Maker. This code is compatible with the Raspberry Pi Pico and allows you to control the device’s five stepper motors, enhancing its customization capabilities even further.
- Difficulty: Intermediate
- Designer: AirPocket
- Project page: Hackaday
- Core components: M5Stack Core2, TCS34725 or M5Stack color sensor unit, stepper drivers and motors
PicoCader
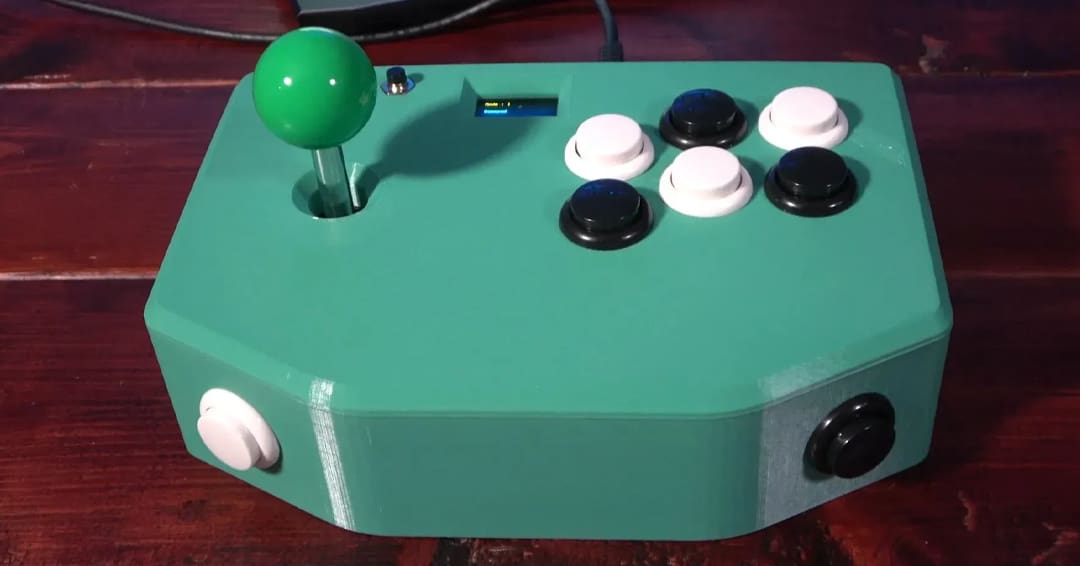
If you lived in the 80s and 90s, you’ve surely used arcade games. This project lets you take a journey back to the past by building an arcade controller with the Raspberry Pi Pico: the PicoCader. But the PicoCader isn’t just an arcade controller, it’s much more! You can use it as a mouse, a keyboard, and it also has a multimedia mode that lets you control the volume of and pause a video, as well as skip back and forth.
This is the perfect project to combine 3D printing and electronics. In fact, to complete the project you’ll have to print parts, solder electronics, and assemble all the components, testing your skills in many areas. If you don’t own a 3D printer, don’t worry, you can still take this project to life using an online 3D printing service such as Craftcloud!
- Difficulty: Advanced
- Designer: Print ‘N Play
- Project pages: YouTube, GitHub, Printables
- Core components: 3D printed parts, custom PCB, OLED display, 24-mm arcade push buttons, 5-pin joystick
Pico Pong
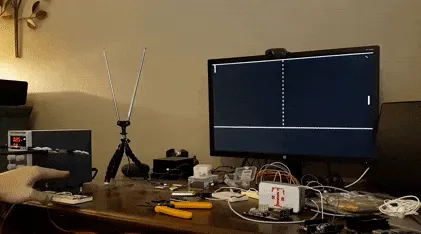
Here’s a super creative idea for fans of gaming and microcontrollers that allows users to play gesture-controlled Pong with a Raspberry Pi Pico. It’s a very detailed project with all necessary materials and instructions provided via GitHub and YouTube.
Note that the game works similarly to a Wii, and its creator recommends a monochrome VGA signal. This is the perfect pick if you want to get retro and have a (somewhat) physically active experience with your Pi Pico!
- Difficulty: Advanced
- Designer: Nick Bild
- Project pages: YouTube, GitHub
- Core components: IR phototransistors, IR LEDs, VGA breakout adaptor, ohm resistors, breadboards, small disc mirrors

Doom Emulator
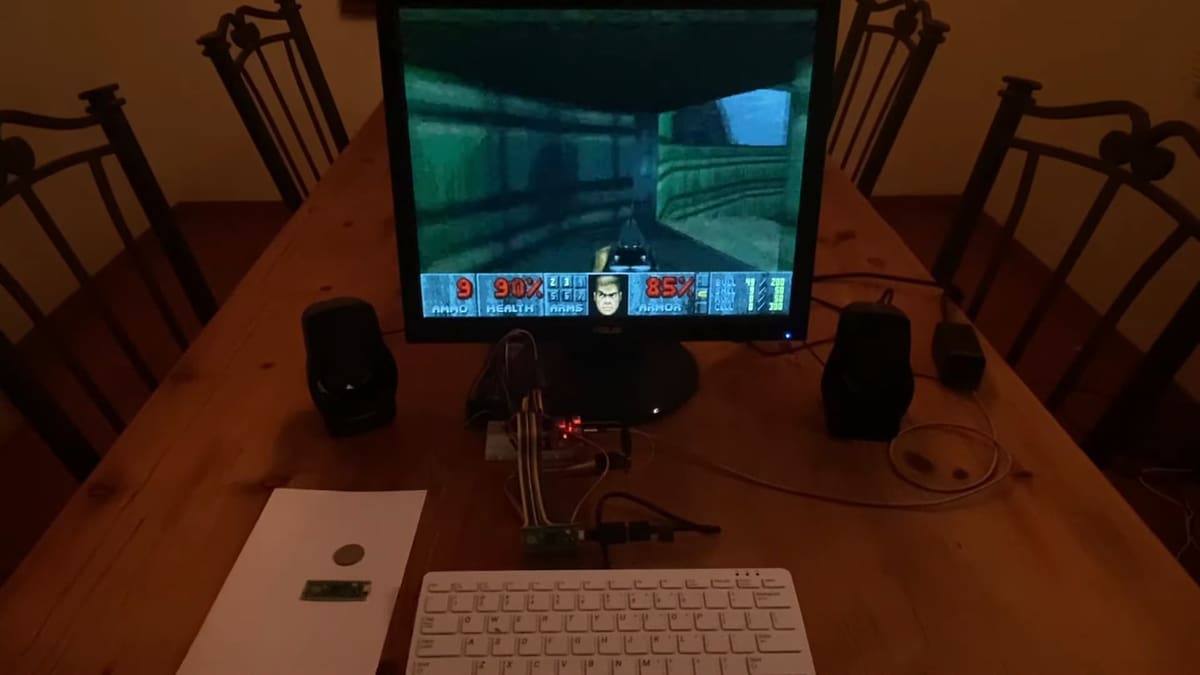
One of the most popular uses for small computers is retro gaming. It’s become popular to transform something like the Raspberry Pi Pico, an incredibly inexpensive item, into a powerful retro game emulator that can run classic titles such as Doom with ease.
Due to the Pico’s small size and form factor, it’s a challenge to make it work. However, as shown in this project, it’s very possible! The creator managed to fit essentially all the original functionality of the game onto the tiny Raspberry Pi Pico’s Flash memory, all the while making it run fast and fit in RAM.
- Difficulty: Advanced
- Designer: Graham Sanderson
- Project page: GitHub
- Core components: RP2040 stamp with 8M Flash, RP2040
Robotics & Automation
This category covers all things robotics, including simple line-following robots, modular robots, and even a few machine learning-based projects.
SMARS Robot

Robotics is a big area for microcontrollers. The Pico’s extensive I/O and processing capabilities make it ideal for this, and there are already many Pico-compatible add-ons, so the building is even easier.
The enormously popular modular SMARS robot series has embraced the Pico wholeheartedly, and this is a great example of how to build a robot from scratch.
In addition to the instructional YouTube video, you can find many more sources of inspiration and help on the dedicated SMARS Fan website.
- Difficulty: Intermediate
- Designer: Kevin McAleer
- Project pages: YouTube, Thingiverse
- Core components: 3D printed parts, sensors and motors depend on what SMARS robot modules you choose

Line Follower Robot
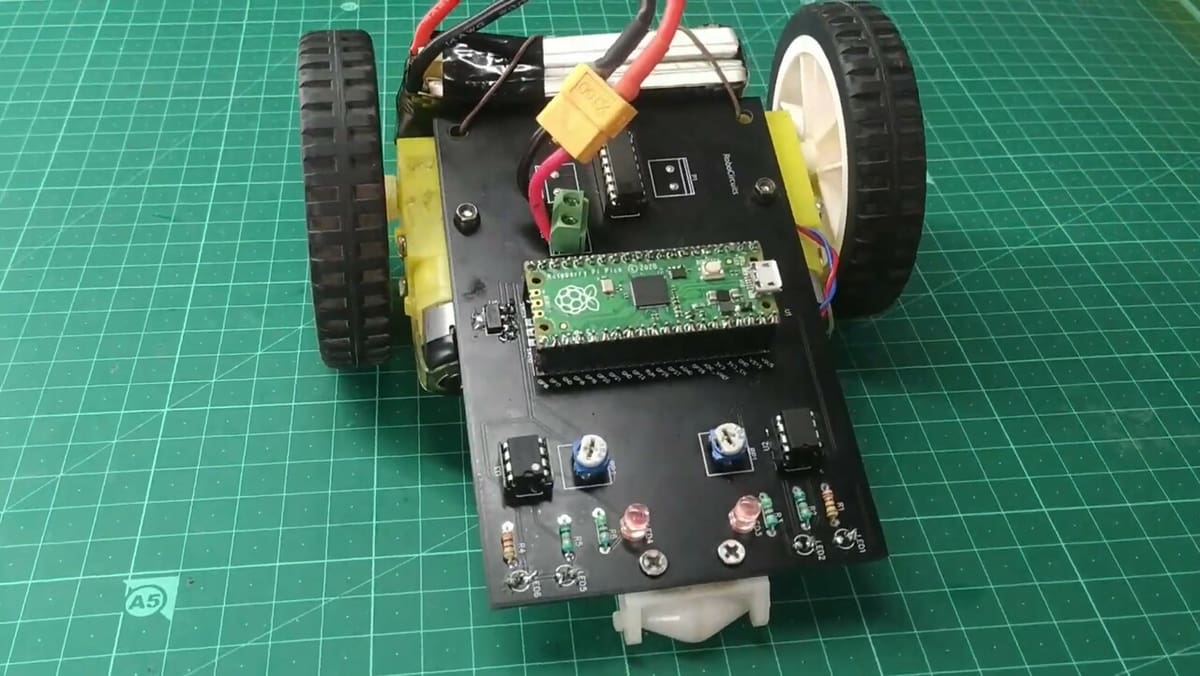
This interesting project is an ideal choice for those starting out with Raspberry Pi or possibly for educators. It allows users to create a simple line-following robot with both a Raspberry Pi Pico and Arduino Uno microcontroller. The robot will, as promised, follow lines on the floor thanks to its sensor!
It’s a fairly low-budget project as it doesn’t require much in the way of parts, but keep in mind that there’ll be quite a lot of soldering when it comes to the physical assembly of the robot. The creator has included helpful links to code and schematics.
- Difficulty: Intermediate
- Designer: RoboCircuits
- Project pages: YouTube, Hackster
- Core components: Arduino Uno, sensor, soldering iron, soldering wire, soldering flux
Bluetooth-Controlled Car
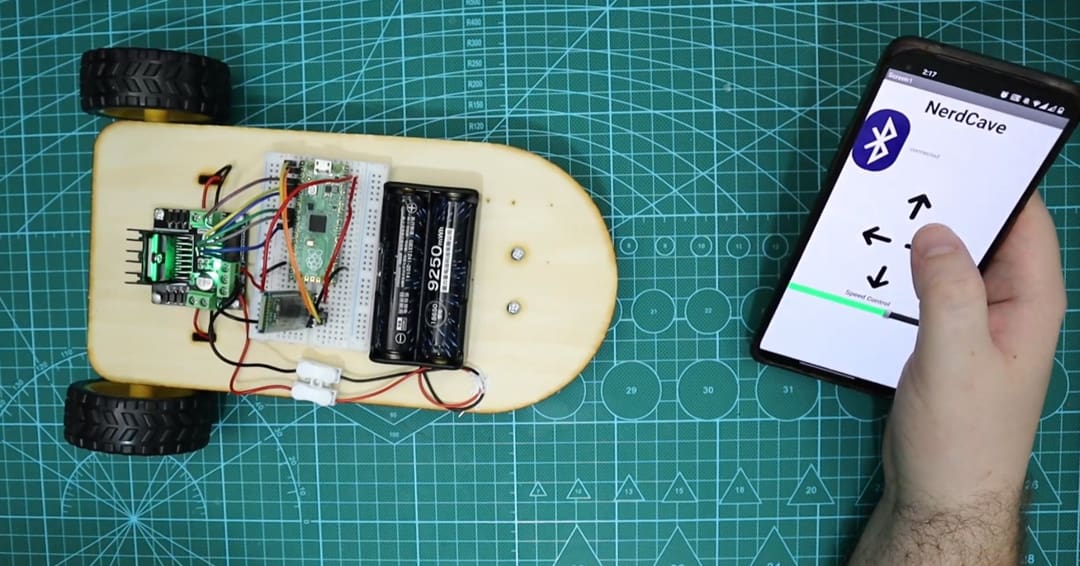
Remote-controlled cars are cool and are really popular among kids. But when you grow up and you decide to become a maker, you can take it a step further and build a Bluetooth-controlled car using a Raspberry Pi Pico! It’s a perfect intermediate project for when you have collected a little bit of experience with this board and you want something more exciting and complicated to try out.
The creator has uploaded a detailed tutorial that you can follow during the build process. The first step is assembling the main body of the car, then you can solder the electronic components together, and you complete the project by placing the parts on the car body. Once you’ve completed the physical part, you can move to the software.
You can find the code on the project’s GitHub page. To control the device, the designer created an app with MIT App Inventor that has a simple interface and features four buttons for the four different directions, and a slider for speed control.
Obstacle Avoidance Robot

In this educational robotics project, you’ll program a robot with your Pi Pico that’s capable of avoiding obstacles in its path, using a LilyBot robot kit. It’s a good way to learn about and practice using sensors with a Raspberry Pi.
You’ll assemble circuit elements with wires and motors and use PlatformIO Visual Studio to configure the necessary code (included in the project).
The project’s creator has made a YouTube video that helps clarify any issues you might have with your little bot in terms of the circuit operating accurately. You can also check out another LilyBot and Raspberry Pi Pico project from the same creator, with which you can learn about programming with MicroPython in Platform IO Visual Basic.
- Difficulty: Intermediate
- Designer: Carlotta Berry
- Project pages: Hackster, Instructables, GitHub
- Core components: Drone, LilyBot robot kit, motor driver, Arduino IDE, DC motor, sensors, resistor, LED
Plant Waterer

Most houseplants require watering, but sometimes it’s impossible to do so regularly. This project ensures your plants will stay hydrated while you’re traveling or away from home.
One version of this project is a bare-bones setup, while the other uses an OLED display and a rotary encoder. Using this encoder, you can set a value for the moisture level and display information with the OLED.
In the basic setup, the Pico uses a soil moisture sensor to identify how much and when the plant needs water. With this, your plants won’t get too much or too little water, keeping them lush and happy!
- Difficulty: Intermediate
- Designer: Veeb Projects
- Project pages: Raspberry Pi Blog, GitHub
- Core components: Capacitive soil-moisture sensor, fish tank pump, relay switch

Intruder Detector
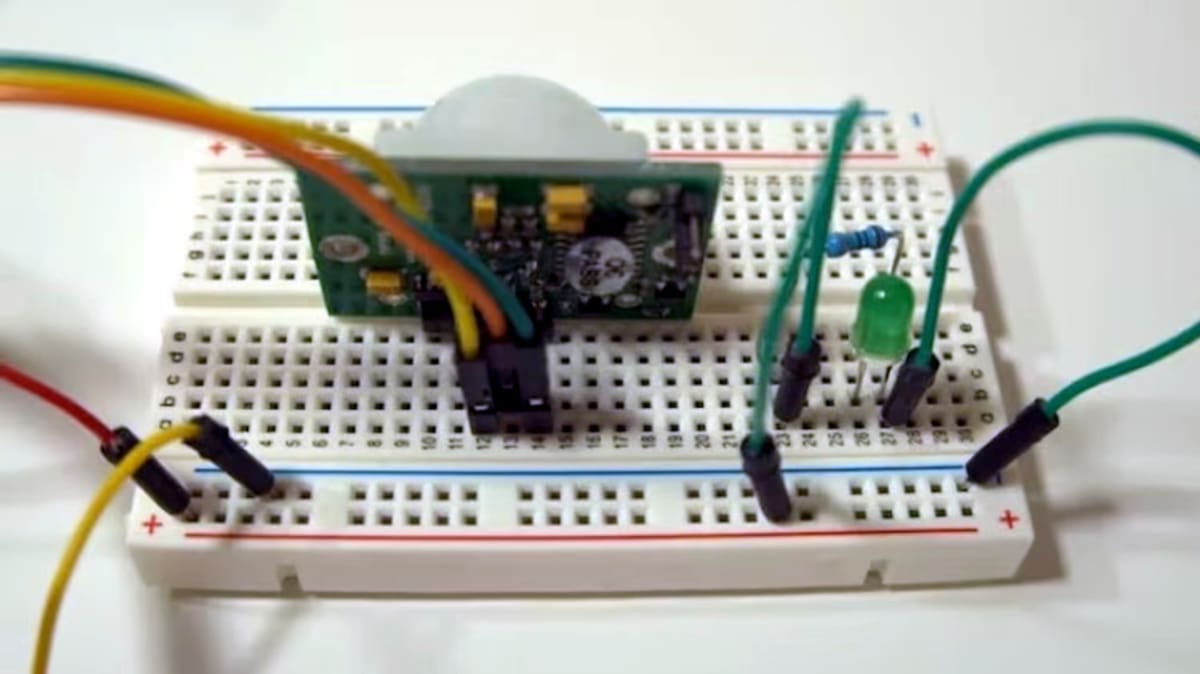
This is a low-power IoT project that detects intruders. Motion sensors, computer vision (CV), and machine learning (ML) all come together in this project to send an alert when it detects a stranger or movement.
In this project, the Raspberry Pi 4 and Pico have to work together. When Pico’s sensor detects motion, the Raspberry Pi 4 uses CV and ML to recognize the face of the person who triggered the sensor (using a database of stored faces on the Pi). If the Pi doesn’t recognize you, it sends an alert using IFTTT.
This project might seem complicated, but with the project guide, you can easily follow along!
- Difficulty: Intermediate
- Designer: Carlo Pecora Grisafi
- Project pages: Hackster, GitHub
- Core components: Raspberry Pi and camera module, PIR motion sensor, LED diode, breadboard
TinyML Gesture Recognition
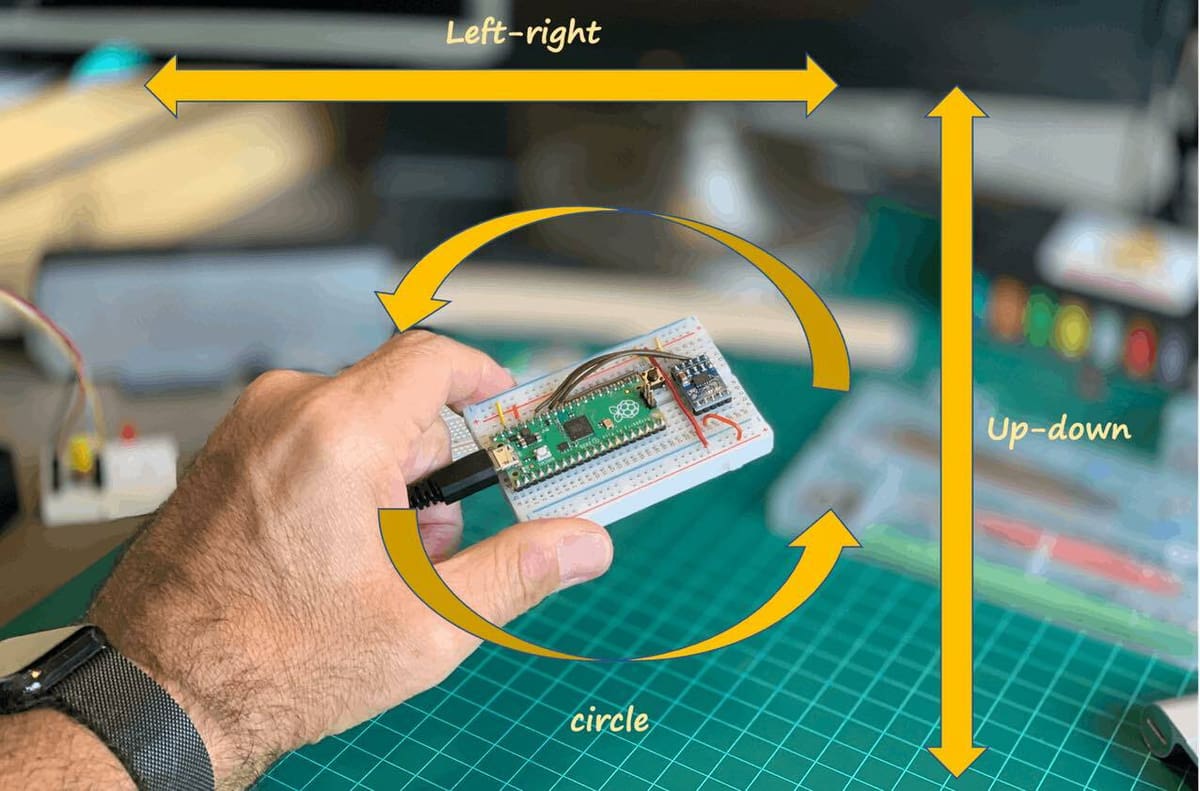
Who says a microcontroller is too weak to run machine learning or artificial intelligence?
This is a very impressive example with well-written and informative build instructions. The end result is a project that provides an excellent base for adapting and expanding the use of TinyML on the Pico (or upscaling into other, more-powerful hardware).
- Difficulty: Intermediate-advanced
- Designer: MJRoBot (Marcelo Rovai)
- Project page: Hackster
- Core components: Triple-axis accelerometer, push button
Productivity Boosters
If you’re looking to make your workflow more efficient and increase productivity, these tiny desktop accessories will be a big help. You can put these together in no time, so build and plug these peripherals into your computer or add them to your overall setup!
Multifunctional Knob
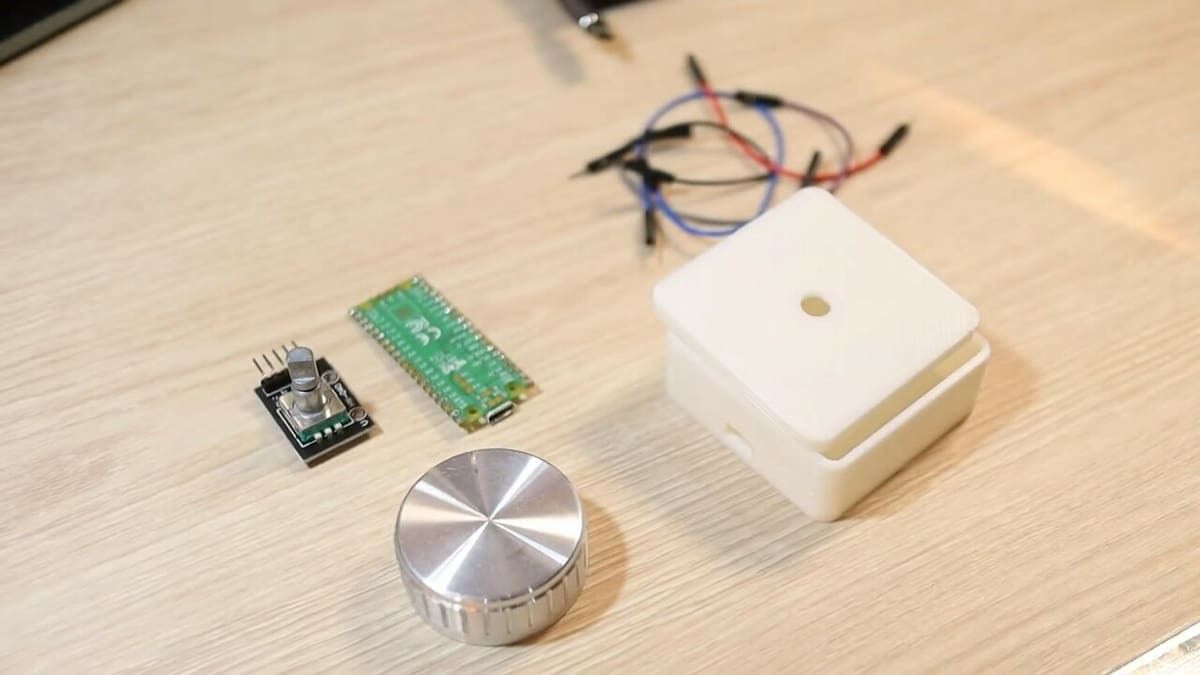
This project is a simple knob that you can program using the Pico for quick controls on a PC. These include basic controls such as volume, brightness, scrolling, and sliding. Hence, the name “multifunctional knob”.
In addition, you can also program special commands such as shutting the PC down or putting it in sleep mode. Like the maker, you can first test a prototype. Then, once everything is up and running, you can put together the control knob. You just need a couple of electronic components and a 3D printed case.
- Difficulty: Easy
- Designer: magi
- Project pages: YouTube, Thingiverse
- Core components: Rotary encoder, 3D printed case
Cyclometer
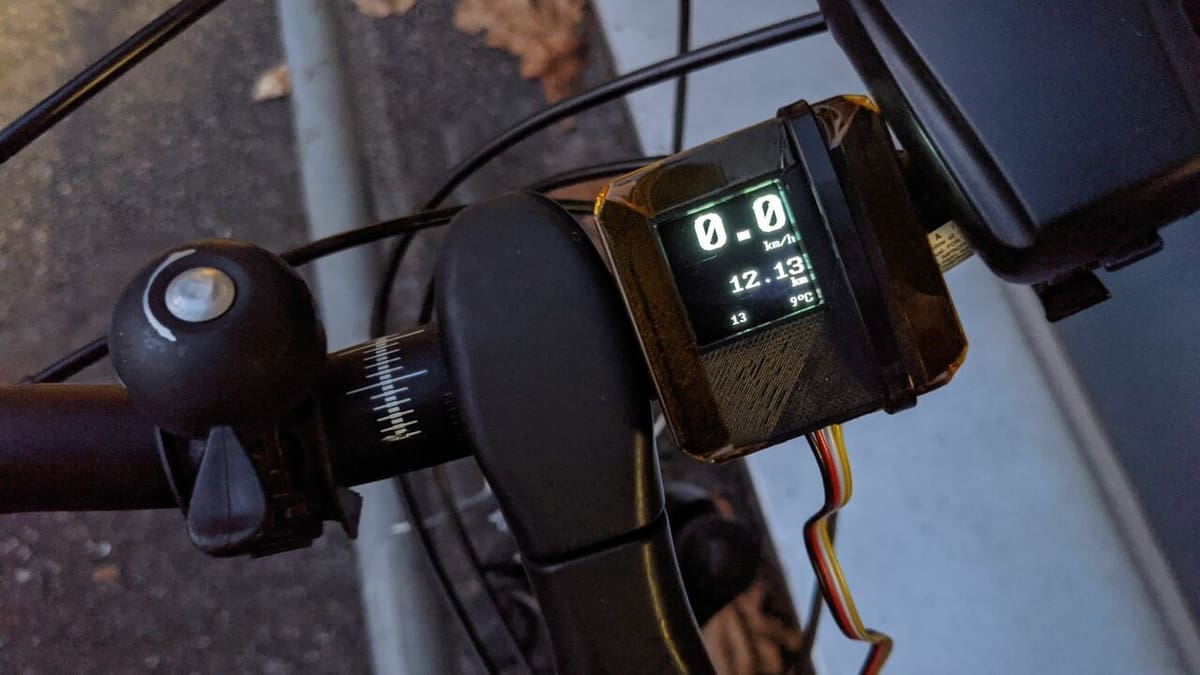
Who doesn’t love to cycle? It’s a great way to stay in shape and even have fun with friends. If you’re really into it, you might be interested in buying a cyclometer, which gives you plenty of information while you ride, such as speed, heart rate, and GPS position. However, these gadgets tend to be on the pricier end of things.
But not to worry, because you can make one for cheap with a Raspberry Pi Pico! This awesome, simple project allows you to enjoy all the benefits of a cyclometer without the hefty price tag.
- Difficulty: Easy
- Designer: Martin Cejp
- Project page: Hackaday
- Core components: OLED display 1.12″, weatherproof magnetic reed switch, GX16 8P connector, 3D printed casing
Macro Pad

After a while, it gets tiresome to perform tasks and commands that require multiple keystrokes and mouse clicks. You can achieve some of these functionalities with a macro pad.
Macro pads, in a sense, are hotkeys that make tasks easier on the PC. These house mechanical switches with keycaps. One maker printed the keycaps in PETG to allow the LED to shine through for a one-of-a-kind macro pad. Many use it for basic shortcuts, but you can put it to use for gaming, video editing, streaming, and much more!
- Difficulty: Easy-intermediate
- Designer: sepro
- Project page: Thingiverse
- Core components: Mechanical switches, keycaps, resistors, LEDs
Oscilloscope from an Old Mobile Phone
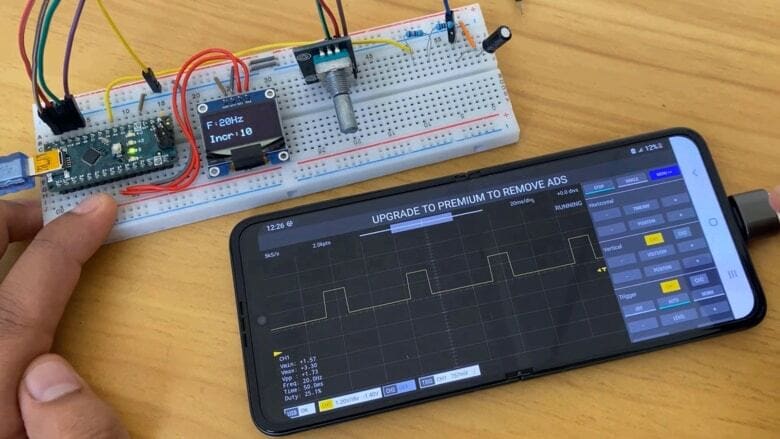
Have you got an old mobile phone lying around that you’re not quite sure what to do with? Here’s your answer: Turn it into a nifty oscilloscope with the power of Raspberry Pi Pico. It doesn’t need a lot of materials, and overall it’s a good beginner project.
What you’ll initially need to do is download the Scoppy Android app as well as install Scoppy firmware. In the YouTube tutorial, you’ll be walked through the steps of installation and adding the resistor. Last but not least, the Pi Pico gets connected to the old Android and voilà – you’ve got a very neat oscilloscope, which is a device used to display voltages over a period of time. The oscilloscope can be utilized for tasks such as troubleshooting equipment or to check up on circuitry.
- Difficulty: Easy-intermediate
- Designer: Yellow Purple
- Project page: YouTube
- Core components: Current-limiting resistor, USB cable, wires, Android device
LED Progress Bar
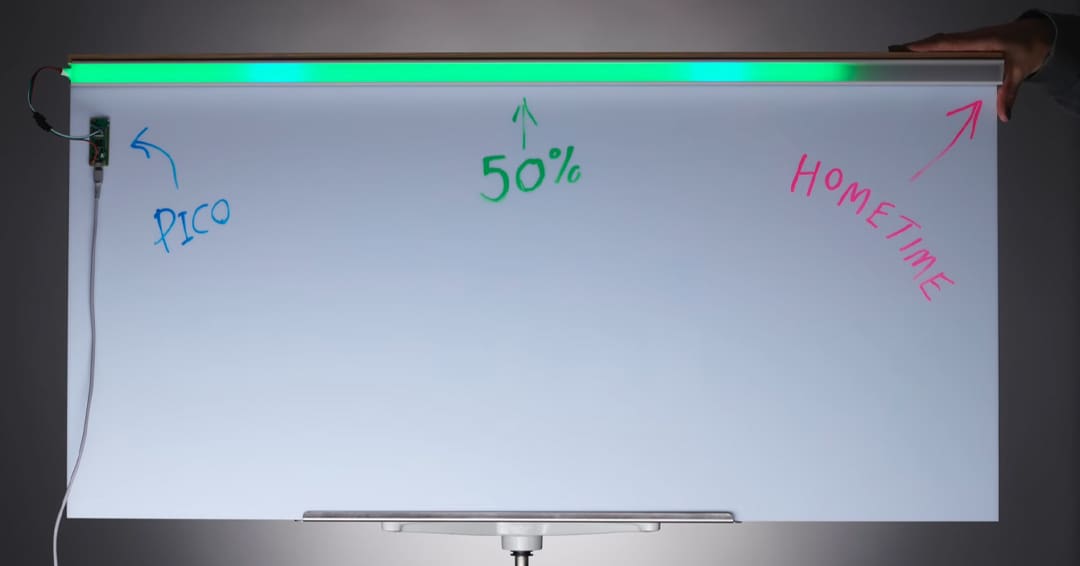
Remembering everything we have to do during our days can be challenging with busy schedules. This project is here to help you! With an RGB LED strip, you can create a progress bar that helps keep track of time and reminds you of important events by connecting to Google Calendar. The LED is programmed to “advance” with the passing hours and to change color to remind you of a scheduled activity, and it also shows a cute rainbow when your workday finishes! To save energy, it turns off until the start of the next workday.
The mechanism behind it is simple yet brilliant: the Raspberry Pi Pico connects to the Wi-Fi, checks the time from the time server, and confirms your schedule from Google Calendar. Then it adds a colored line so you can know at a glance how much time remains before a certain event.
You can find a detailed guide to the project on Medium and the code on the corresponding GitHub page.
PiCalc

We all know what calculators are and have used them at one time or another. With this project, you can create your own calculator and make it tiny so you can carry it around with you! (Yes, we know our smartphones have calculators, but if you need to check info there while adding, subtracting, dividing, or multiplying, won’t it be easier to have a different setup?)
There are two main areas of the calculator: the keypad and the display. The keypad is made up of 20 momentary switches soldered in a 4×5 matrix, while the display consists of an OLED screen.
Soldering will be the most involved part of the project. Once you’ve completed it, it’s as straightforward as it gets. You have to load the provided code onto the Raspberry Pi Pico and assemble the electronic components in the 3D printed enclosure. Finally, cut the stickers for the buttons and you’re ready to go!
- Difficulty: Intermediate
- Designer: Makertronics
- Project pages: YouTube, Instructables
- Core components: LiPo battery, momentary switches, slide switch, OLED display, 3D printed parts, custom PCB
More Ideas
Here are a few projects that don’t fall into any of the other categories but are still interesting to build and explore using the Raspberry Pi Pico.
Automatic Dog Ball Launcher

It’s fun to play catch with your canine friend, but throwing a ball over and over again can leave your arm sore. This project is here to help!
Project designer Brankly has created a helpful YouTube tutorial that explains how to use a Pi Pico in collaboration with DC motors to construct a ball launcher that can release multiple balls at a time for your dog to fetch. It’s a good project for experienced users, as it involves quite a bit of hands-on assembly work when putting parts together.
And for a twist, its fun design also adds means that your 3D printing skills will come in handy (unless you’re opting for a service).
Everything you’ll need to put the launcher together is provided, including sensor code, the 3D printable models, and CircuitPython code. The project creator has also answered questions and concerns about the launcher, so be sure to check the comments section of the video should you come across any doubts.
- Difficulty: Advanced
- Designer: brankly
- Project pages: YouTube, Thingiverse, GitHub
- Core components: Motors, motor couplings, balls and ball sensor, connectors, servo, power adapter, converters, power jack socket, cables

Wood Burning Plotter
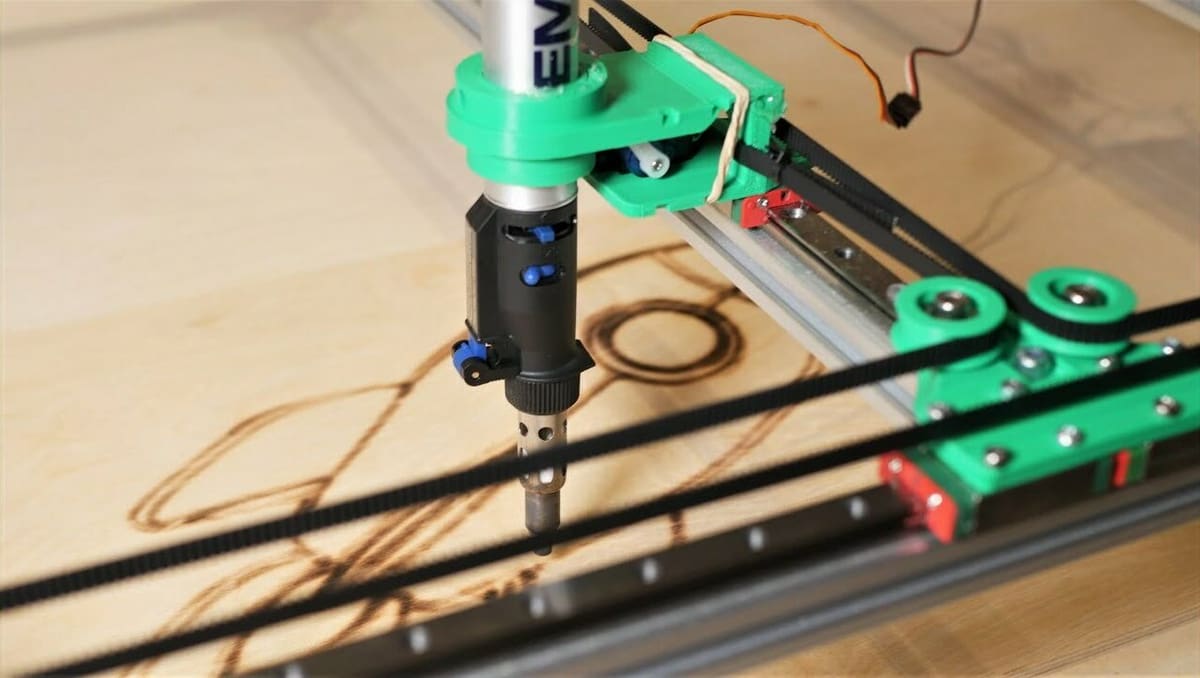
Those who like to combine woodworking and electronics will find it thrilling to create a cool CNC plotter that draws on and burns wood. It’s all done with the help of your small yet mighty Raspberry Pi Pico microcontroller.
This project requires a 3D printer and a CNC machine, although you could certainly outsource the 3D printing work. The project creator offers all necessary files and codes via GitHub and a guided video where they explain the entire creation process.
- Difficulty: Advanced
- Designer: Nikodem Bartnik
- Project page: YouTube
- Core components: Motors, stepper drivers, power supply, USB converter, micro servo, soldering iron, pulley
Bonus: Two Cores
This isn’t really a project as such. Our examples above make use of most of the Pico’s hardware features but not explicitly the two available cores. Experienced users of microcontrollers may be interested in trying to do so, so below are links to a couple of builds that explore this topic:
- The brilliant Andreas Spiess project is on YouTube.
- The Instructable by the excellent tonygo2 gives a thorough written overview.
Both projects are oriented towards intermediate-to-advanced makers and point the way to many exciting new project ideas in the future!
License: The text of "30 Cool Raspberry Pi Pico Projects We Love" by All3DP is licensed under a Creative Commons Attribution 4.0 International License.
CERTAIN CONTENT THAT APPEARS ON THIS SITE COMES FROM AMAZON. THIS CONTENT IS PROVIDED ‘AS IS’ AND IS SUBJECT TO CHANGE OR REMOVAL AT ANY TIME.