Raspberry Pi PoE: All You Need to Know

Installing Power over Ethernet (PoE) can improve your Pi setup. Read on to discover how to make Raspberry Pi PoE work for you.
Power to the Cables
You probably know that Ethernet is a widely used standard for passing data across networks. Less well known is that the same cables used to deliver data can also power devices. If your world could benefit from fewer cables and power adapters, then read on!
A Bit of History
Way back in the summer of 2003, the first Power over Ethernet (PoE) standard was published. It defined how to deliver up to 15.4 watts of power safely over a single Ethernet cable. This made it possible to develop new ways to both connect many different devices and deliver power to them using a common standard. The original cable design permits power to be connected with only a minor effect on the network speed and capacity.
The convenience of a communications cable also providing power can tip the balance in choosing when to invest time and effort in creating a cabled network.
Why Use PoE?
Before diving into the practical aspects of equipping a Raspberry Pi with PoE, it’s worth considering the potential benefits for your setup. A Wi-Fi-connected Pi only needs a cheap power supply, one cable, and a nearby power outlet to do its thing. Where PoE provides the most benefit is where power outlets are not nearby or when multiple devices need to be individually powered.
In this article, we’ll be delving more into PoE, how you can use it, and how to set it up. Let’s take a deeper look!

Pros & Cons
Only you can decide if PoE is right for your setup. Hopefully, knowing more about the advantages and disadvantages will help you decide.
Pros
- Easier to install: Network cabling is usually much less hassle to install than new power outlets.
- Easier to upgrade: If there’s already network cabling in place, then upgrading it for PoE is easy.
- Simplified setup: PoE makes for a much tidier setup. For many applications, power adapters and their unwieldy connectors just disappear. (Your coffee machine can be plugged in again!)
- Faster connection: In 2020, it would be rash to say that a wired network is faster and more reliable. Devices using Wi-Fi 6 and 5G could easily prove us wrong. However, it may take a little while before we see a Wi-Fi-6-equipped Raspberry Pi. Until then, wired is faster and more reliable.
- Scalable: You can install it for a single node (device) or for a whole Ethernet LAN.
- Energy savings: Removing multiple adapters will reduce energy lost in converting the supply. The savings will depend on a range of factors, including the cabled distance from the PoE power source to the device.
- Better power delivery: PoE can intelligently deliver power to match the needs of the device.
- Backup solution: If the power grid fails, and you have installed battery backup for the network, then all your connected devices will keep going.
- Option to be used in combination with wireless: You have the option to use both wired and wireless on some devices. This may be useful for projects like WAPs and clusters. (More on these in the following section.)
Cons
- Add-ons are needed: The Raspberry Pi and most other single-board computers need add-ons to work with PoE. Devices that were previously fine without active cooling may now need a fan.
- Expensive: Swapping from Wi-Fi to a wired network can be expensive. Typical home or office LANs are configured in a star topology. Since every device needs an individual network link, that soon adds up to a lot of cable. As few as five devices could require at least 50 meters (164 feet) of cable, plus connectors and trunking.
- Upgrading likely necessary: Even if you already have a wired Ethernet LAN, it may need upgrading. The upgrade is likely to include a PoE switch (more on that later) and higher-specification cabling.
- Limited power delivery: IEEE standards set limits for the amount of power delivered over a single network node. In the next section, we describe the devices that benefit most from a PoE connection. (Sadly, it doesn’t include that coffee machine.)
- Can cause device failure: If a PoE network fails, devices without battery backup will fail with it.
Uses
Everyday applications for PoE include CCTV, wireless access points (WAPs), and voice over internet protocol (VoIP) telephone systems. It’s much easier and cheaper to run equipment that doesn’t require a dedicated power outlet. For this reason, most manufacturers now offer alternative product models equipped to work using PoE.
In the past, you may have needed to pay more for PoE functionality. Today, if you choose carefully, it can be included as standard.
Below, we’ve listed a few examples of PoE in consumer products and potential Raspberry Pi equivalents. Less consumer-oriented and arguably much more interesting options are also in the mix. A good example is the increasing popularity of Raspberry Pi clusters that are powering their way into a range of commercial applications.
VoIP
The Grandstream VoIP phone is a popular option offering PoE with 10/100 Mbit/s. It can handle two SIP accounts and costs around $40.
The global communications company 3CX offer a Raspbian install script to get up and running with their hosted PBX service. It’s actually an entire business-grade telephone system, free for personal use with the option to add SIP accounts. Because it works with mobile phones, you may not need any traditional handsets at all.
WAP
TP-Link has a bestseller with the Omada’s PoE-powered WAP. With a long feature list and a free cloud-based management platform, it’s retailing at around $60.
Head over to Raspberry Pi’s website to see how to create a routed WAP using the “hostapd” (host access point daemon) package. With this and a PoE-equipped Raspberry Pi, you can build a WAP and place it in prime location using just a single Ethernet cable for power and data.
CCTV
The highly-rated Reolink IP surveillance camera, available at around $40, is a relatively inexpensive option. Its specification includes IP66 protection, local file storage, a microphone, and night vision. Of course, it would not be featured here if it didn’t also include built-in PoE.
At first glance, it’s difficult to see any real advantage in building a Raspberry Pi equivalent of the Reolink system. However, even though Reolink offers free cloud storage, many people prefer to keep their surveillance recordings behind a firewall on a local area network.
A better plan may be to use Reolink cameras together with NVR (network video recorder) software running on a Raspberry Pi. A suitable candidate for this is Shinobi, an open-source project with active support on GitLab.
Clusters
When one Raspberry Pi is not enough, then just add more! A cluster can be set up to operate in different ways depending on the application.
The primary aim is usually to increase processing speed or capacity for tasks like image processing, data crunching, or responding to lots of network requests. In fact, they host much of the official Raspberry Pi website on a Raspberry Pi cluster. Mythic Beasts, the company behind that idea, now offers Raspberry Pi hosting to everyone.
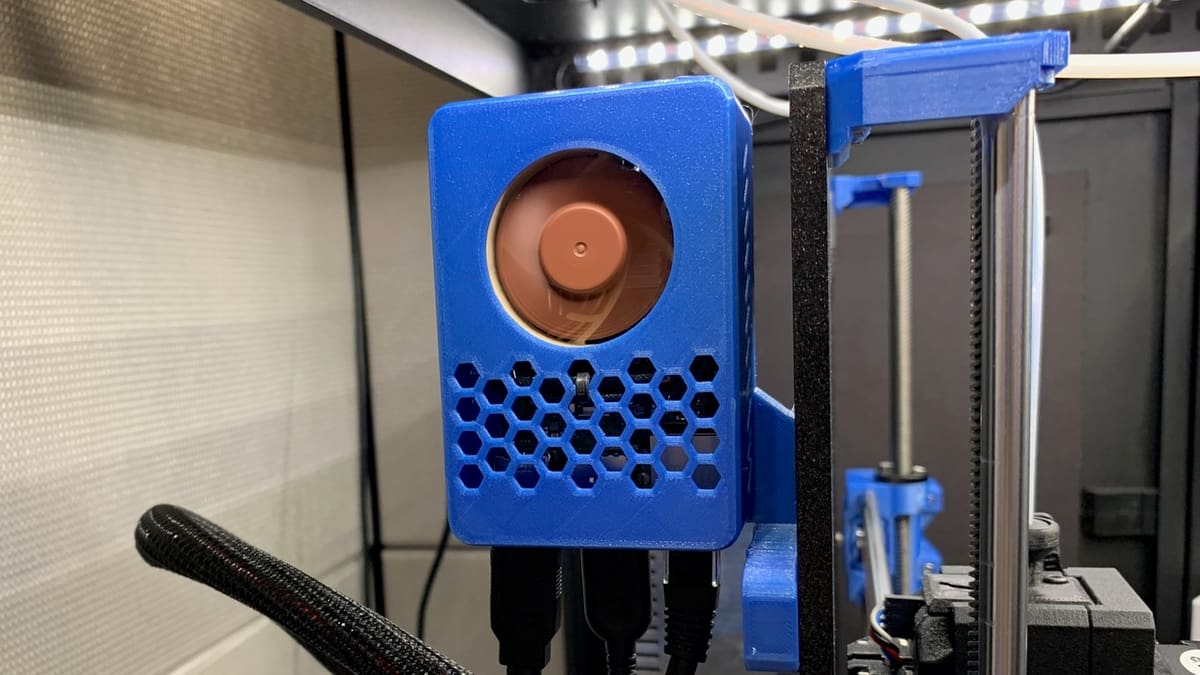
3D Printing
We like Joe Terranella’s clever Pi 4 case for the Prusa MK3 and his decision to use PoE. Not strictly a “necessary” use, but it provides a really neat solution.
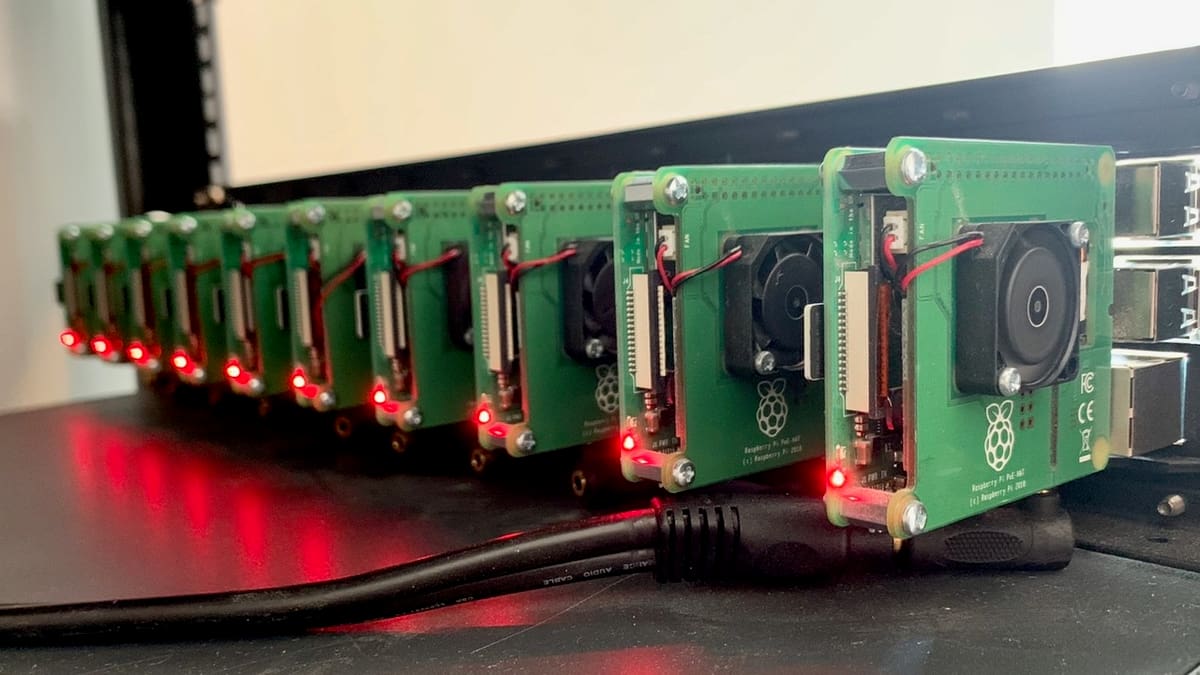
It may not be completely obvious that Tyson Nichol’s ten-pack of Raspberry Pi’s are sitting comfortably in a 19″ rack. The 3D printed shield design is the work of Daniel Reinke.
Read on to discover how to go about connecting PoE using the Raspberry Pi.
Setup
The following information assumes a Raspberry Pi setup, but you’ll find lots of similarities with other equipment, including other single-board computers.
It’s important to avoid using incompatible equipment with powered Ethernet. If a device is not expecting power over its network connection, the results could range from heat and smoke to circuitry damage. If the status of your installation is anything above experimental, use standard parts and methods.
The two basic steps to get PoE working are seemingly trivial:
- Preparing the network to supply power to the device via your wired Ethernet LAN.
- Preparing the Raspberry Pi to access power on the Ethernet connection safely.
In reality, there are factors including cost and compatibility that you may want to consider for your specific project.
Preparing the Network
Understanding IEEE Standards
In setting up your network, we’ll be referring to IEEE standards, specifically 802.3af and 802.3at, as active PoE. This is because devices built to these standards will only accept power if the current and voltage are compatible. There are also non-standard ways to deliver PoE, often described as passive methods. Depending on how and where you use them, passive methods can be a sensible choice.
The fundamental difference between the active PoE standards is that 802.3af can deliver 15.4 watts of DC power, somewhat less than the 25.5 watts that 802.3at (also known as PoE+) can deliver. The voltage supplied ranges between 44-57 volts, and so the connected device must also be capable of converting this to the level it needs. The high voltage is necessary to reduce losses over long cable lengths.
We’re going to focus on the 802.3af standard, as this suffices to power most single-board computers. The Raspberry Pi likes to work at around 5 volts, so it’s going to need a converter to work with an 802.3af installation.
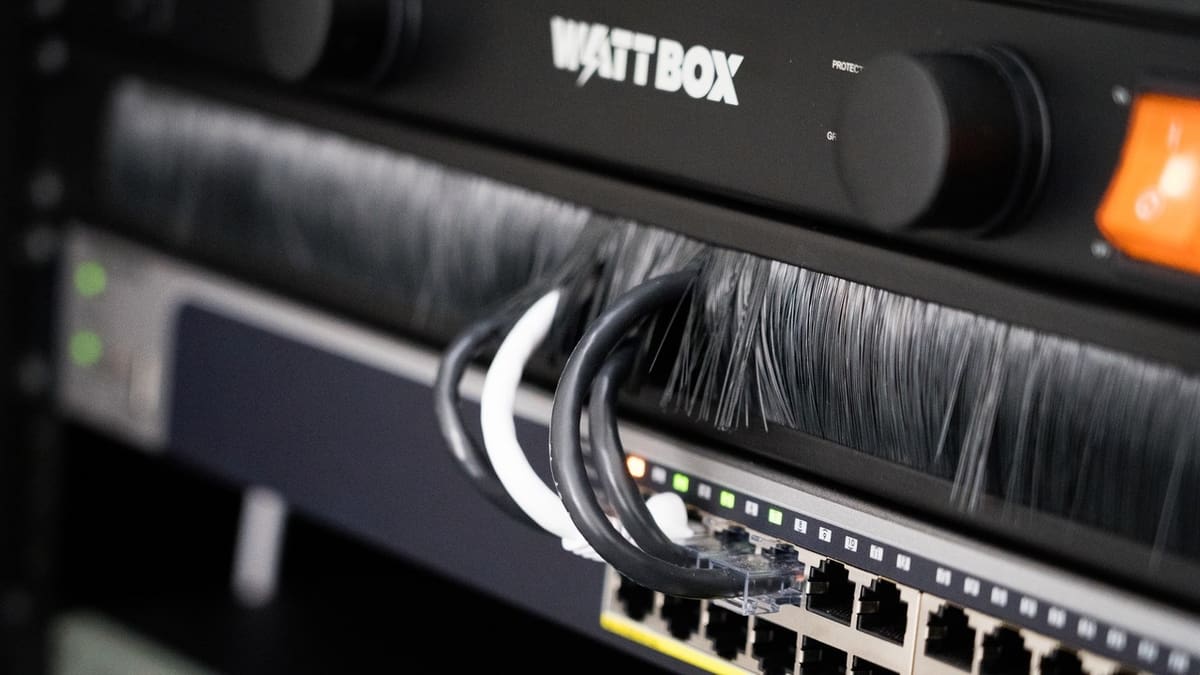
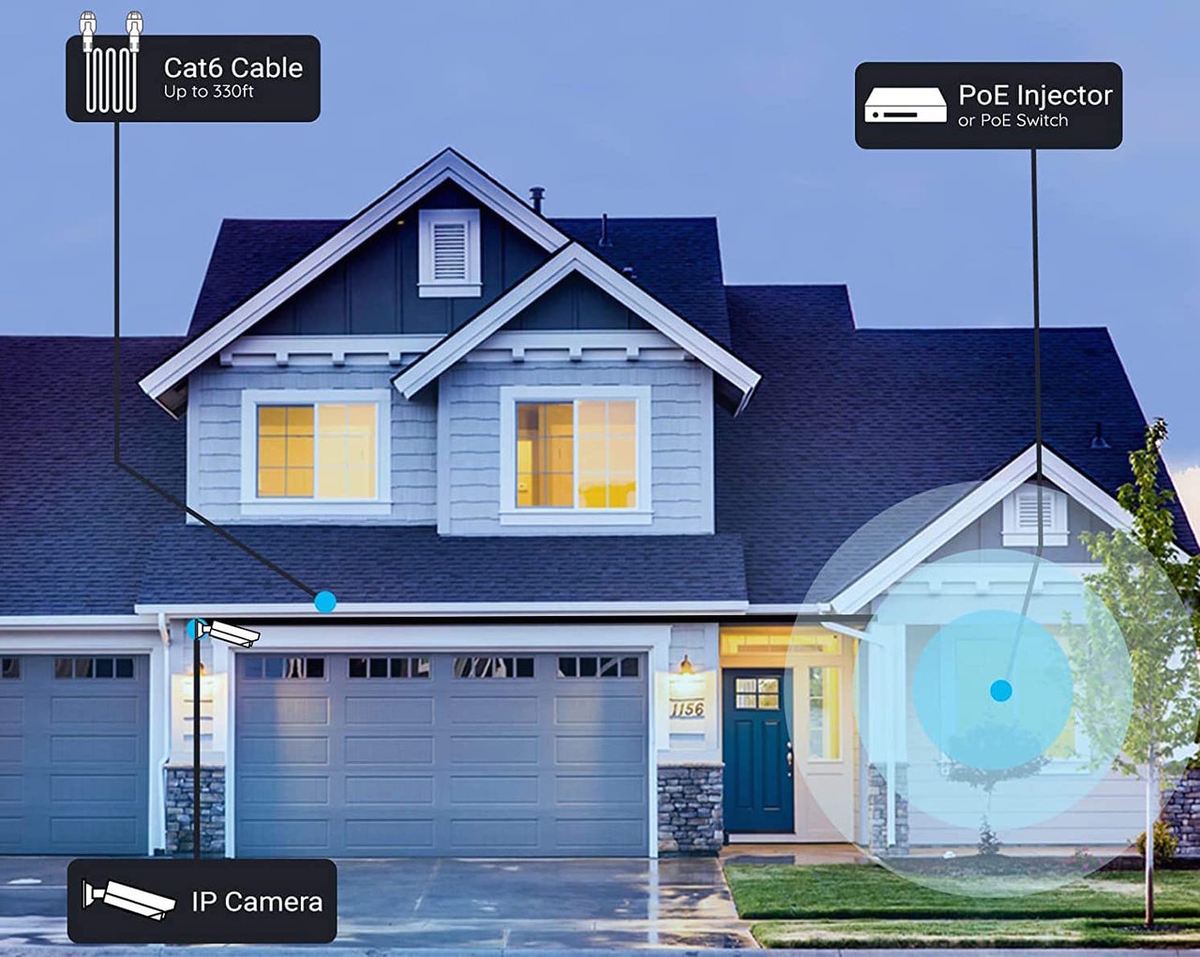
Getting Power: PoE Switch
The simplest and most efficient option for introducing power to your Ethernet LAN is to connect the devices using a PoE network switch. These are available with various port counts and with differing power capacities, expressed as budgets.
For example, a typical five-port PoE switch claiming a 65-watt budget should power multiple devices up to the budget limit of 65 watts in total. A hard-working Raspberry Pi 3 B+ will use up to 5 watts of power, and possibly more if it has add-ons fitted. So in theory, such a device would easily power five Raspberry Pi Model 3 B+ boards, typically using just 25 watts of the 65 watts that the switch can deliver. As the standard supports up to 15.4 watts per port or cable, there’s plenty of headroom for each connected device.
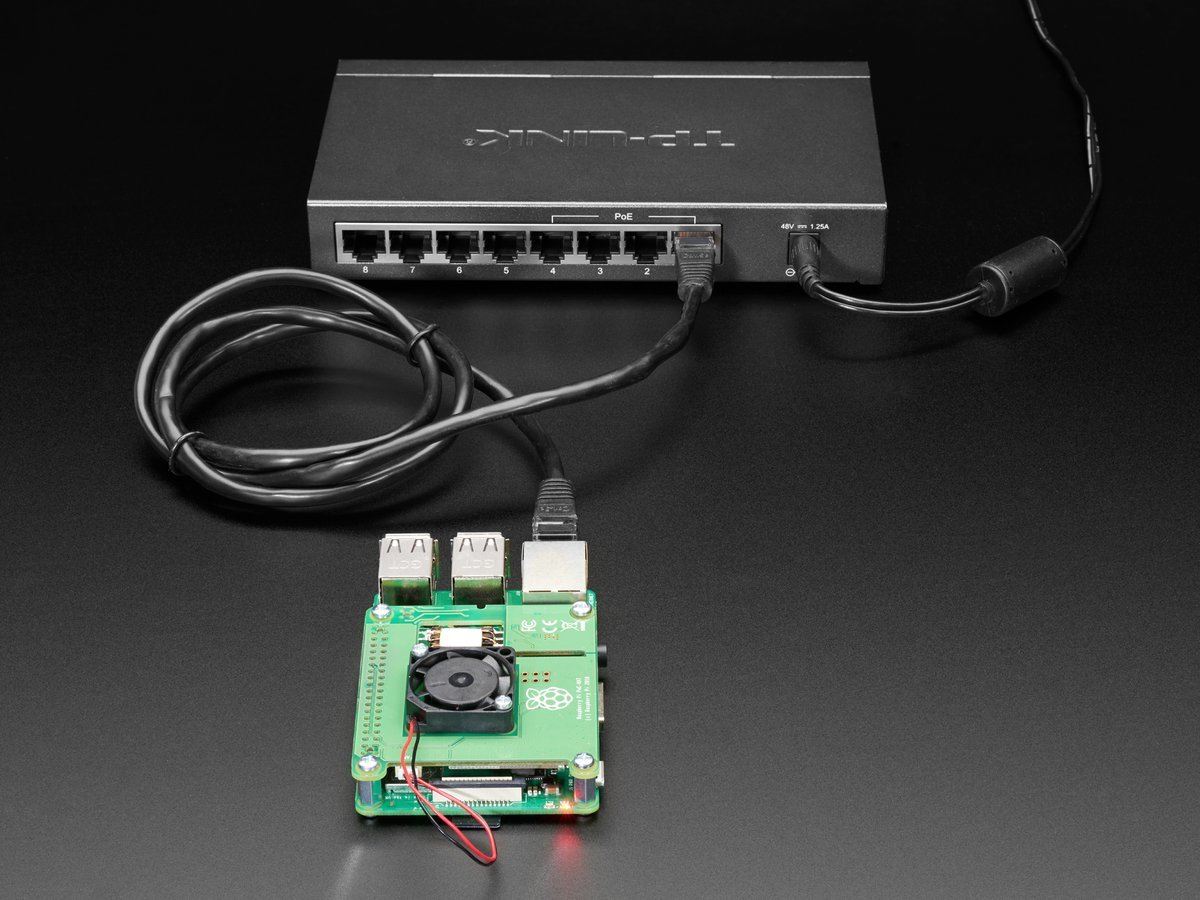
The extremely popular TP-Link five-port Gigabit PoE switch includes one uplink port that connects to your router. At around $50, it conforms to 802.3af and has a power budget of 56 watts split across the remaining four PoE ports.
If you overload this switch, the higher numbered ports are powered-off first, which is a clever approach to overload protection. To achieve Gigabit speeds, ensure that your installation uses a Cat 5e cable cable or better. Go for a Cat 6 cable if your cable lengths exceed 45 meters (148 ft).
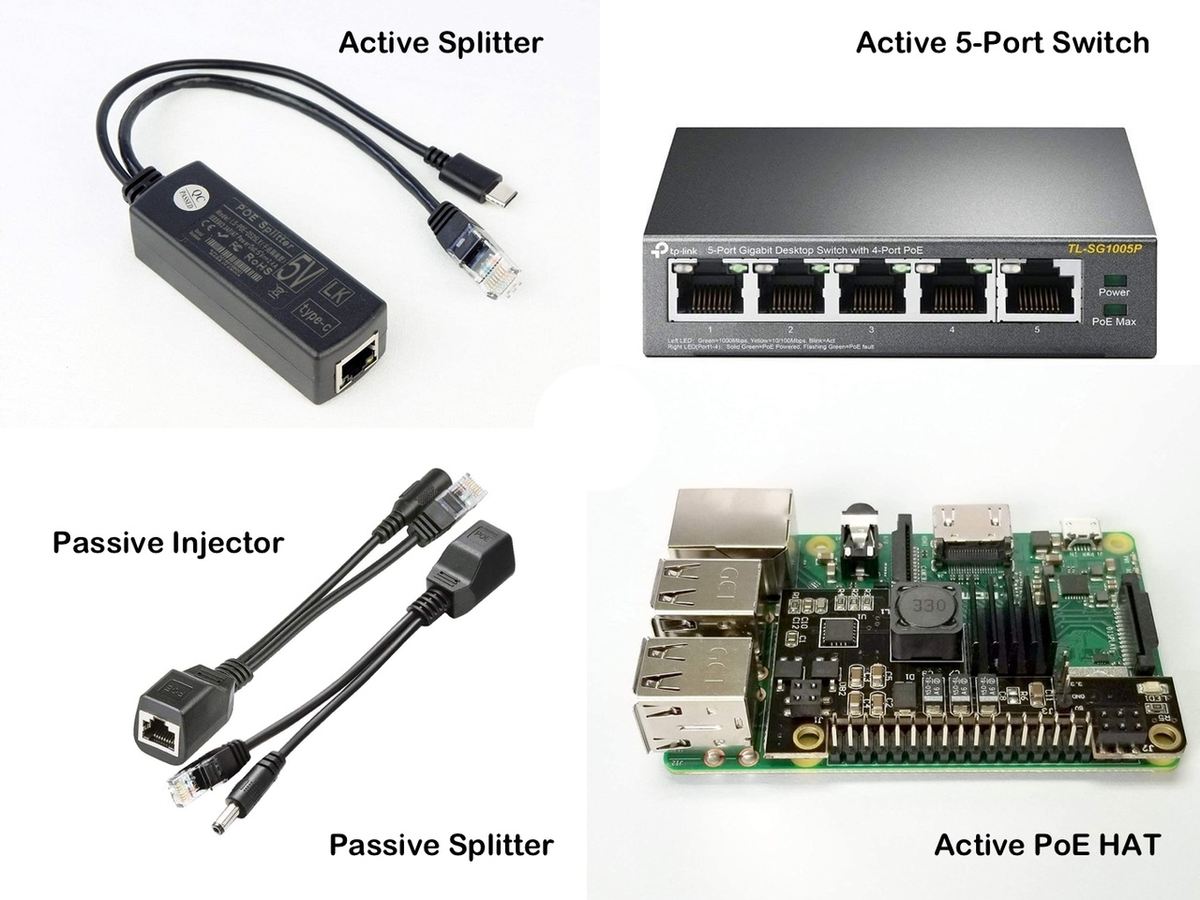
Using an Older Raspberry Pi: PoE Splitter
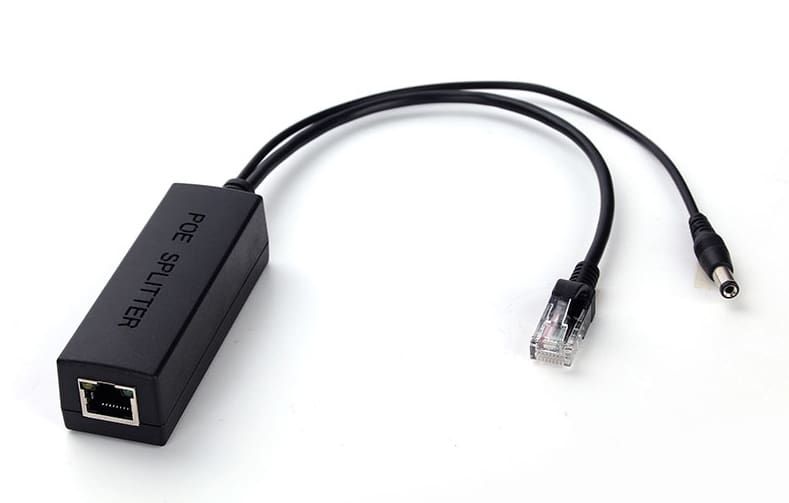
Fortunately, it’s possible to deliver PoE to most types of Raspberry Pi using a PoE Splitter. Here, the splitter does the power management, using a separate cable that plugs into the USB power port of the Pi.
You’ll still need a PoE switch to provide power to the splitter, which steps the voltage down to 5 volts before it reaches the Pi. In fact, this adapter could power most devices that can receive power over USB, up to the maximum power rating of the adapter and PoE switch. The 802.3af-compliant Uctronics PoE splitter is around $15 and could be just what you need.
No Switch or Pi: PoE Splitter & Injector
If you don’t have a PoE switch or a PoE-enabled Raspberry Pi, then it’s possible to use a PoE splitter together with a PoE injector. The injector does the job of the PoE switch for a single connection. These are available as 802.3af-compliant devices or as much less expensive passive devices.
Passive PoE
Alternatively, you could use passive devices at both ends of the connection. Just remember that passive PoE devices do not check the voltage of the device you want to power. Without this safeguard, it could easily damage any incompatible device connected to a passively-powered Ethernet connection.
Passive power injectors are available in single voltages ranging from 5 to 48 V. There’s a handy PoE detector available for about $17, which is probably less expensive than testing the connection by plugging in your device!
Preparing the Device
If you plan to use a splitter to manage the power at the point where it reaches the Raspberry Pi, then there’s no need to upgrade the Pi itself. If you upgrade, then it needs no external adapters and you’ll have full compliance with the IEEE standard; Your Pi will work on any active PoE network.
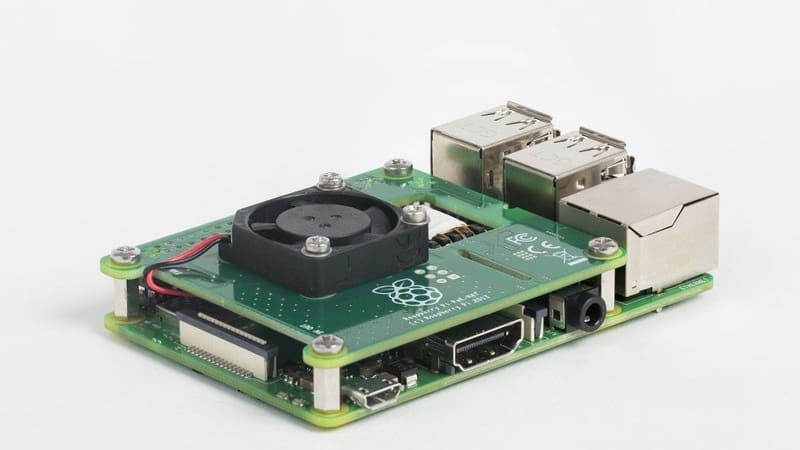
There are several PoE add-on boards on the market for the Raspberry Pi. Note that they are compatible with the Raspberry Pi 3 Model B+ or Pi 4 because only these have the necessary onboard connection pins. A cooling fan is essential to maintain airflow to the processor and keep temperatures within limits.
PoE Hat Options
The official Raspberry Pi PoE Hat is built with the 802.3af standard and it features a fully isolated switched-mode power supply. Initial versions of the board had problems, which the company resolved with a fix, and later with a new design. The supplied fan is essential for safe operation.
An enclosed board needs a larger, ventilated case than standard. Fitting the board makes access to the header more difficult, and so this may require a workaround for some projects. Expect to pay around $38 for it.
Cheaper alternatives to the official PoE Hat are available. The LoveRPi board “compact”, which retails for around $20, requires an 802.3af compliant supply but isn’t itself advertised as standards-compliant. Because it comes without electrical isolation, it may not protect the Raspberry Pi in the event of any power faults. The “professional” version is about $5 more and claims to offer isolation and more power output than the official Hat, though giving no figures for comparison. Buyers are “highly recommended” to use a ventilated case and cooling fan.
Other products are available, and it’s always worth scrutinizing the specifications and the comments from users. The official Hat is an excellent benchmark, being rated with 2.5 amps output and good quality components, including a brushless fan.
The decision to build PoE connectivity into the latest Raspberry Pi Models is definitely a step forward. Good luck with your PoE powered projects!
Lead image source: idgeek via Unsplash
License: The text of "Raspberry Pi PoE: All You Need to Know" by All3DP is licensed under a Creative Commons Attribution 4.0 International License.