SketchUp vs Blender: The Differences

When it comes to 3D modeling of buildings or furniture, SketchUp vs. Blender is a tough call. Read on to find out which one is for you!
SketchUp and Blender are both 3D design software, but how they employ this 3D functionality, and what they employ it for, is what sets them apart.
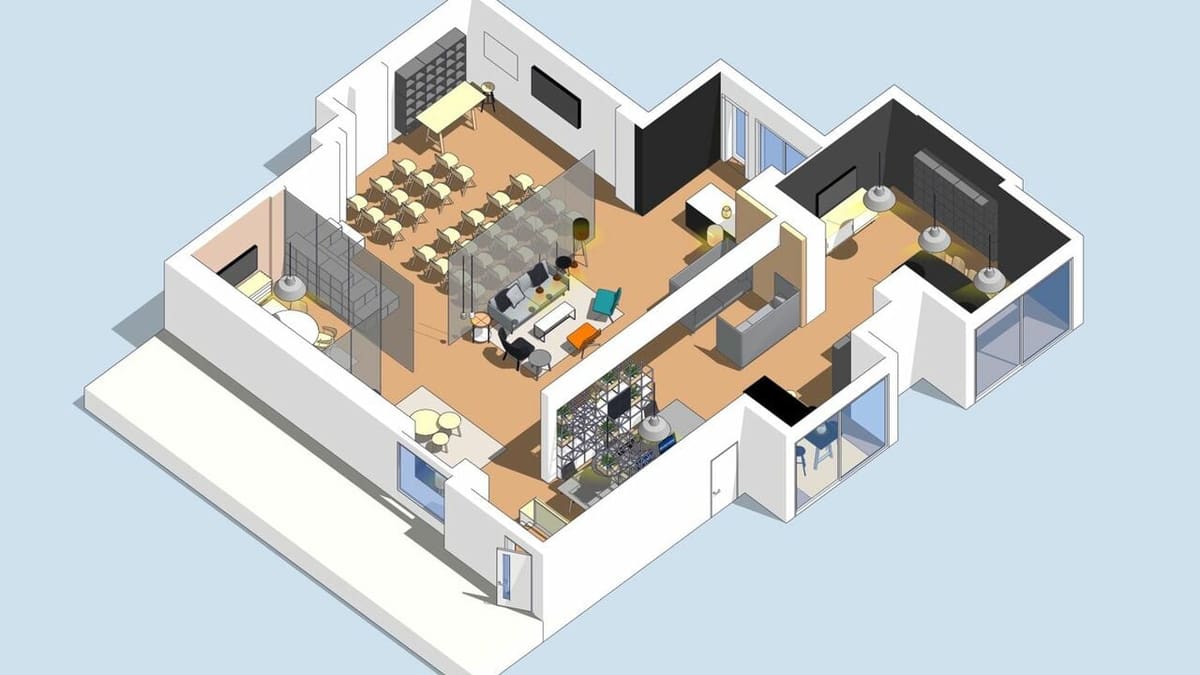
SketchUp is a highly graphical 3D CAD program, mainly focused on architectural modeling, initially developed by @Last Software in 2000 and currently owned by Trimble. Its bread and butter (and patented technology) is direct modeling, meaning you can create new operations just by pulling and pushing on a model’s surfaces. This makes it extremely intuitive to use and a favorite in architecture for designing building façades because of the creative freedom the method allows for.
Blender is a 3D modeling program, originally created by Ton Roosendaal from the Dutch animation study NeoGeo, and is currently developed by many collaborators. Contrary to SketchUp, its main purpose isn’t architectural use, but rather more artistic intentions. Blender is used for character modeling, video game prop modeling, and animation.
To help you get an idea of which is the best choice for you, we’ll look into their similarities and differences regarding price, system requirements, user interface, features, applications, community presence, and official support. Without further ado, let’s dive in!
Prices & Licensing
Both programs offer free versions, and in SketchUp’s case, you can also opt for paid ones with enhanced functionality.
SketchUp
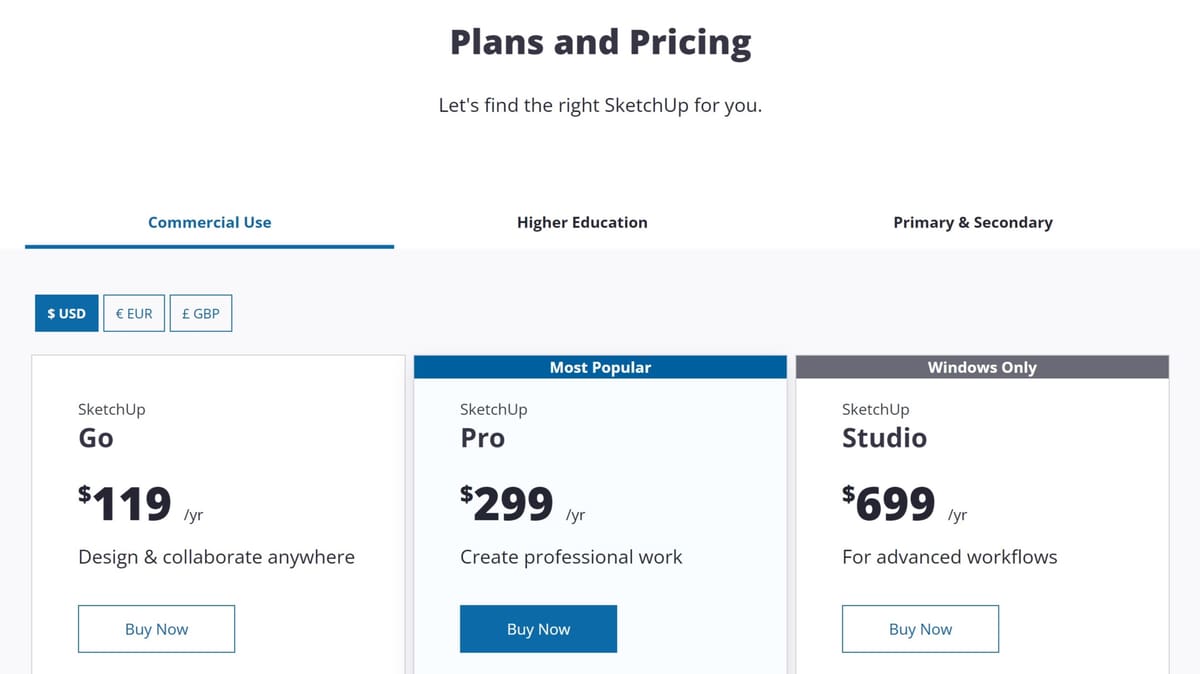
SketchUp’s paid options are subscription-based since 2020; before that, it was possible to get a perpetual license, but that isn’t the case anymore.
- Free: This version of SketchUp is available as a browser app. You can save drawings in the cloud as SKP files, SketchUp’s native files, or export them as STLs. With this version, you can still model with great capability, but you can’t add custom materials, and it’s not licensed for commercial use, meaning you can’t sell any product created with it.
- Pro: SketchUp Pro gets you out of your browser into a desktop program for a cost of ~$300/year. It’s more versatile than the free version supporting features like custom materials, LayOut for 2D plans and documentation, and you can install extensions, which are like plug-ins, for even more features.
- Studio: This is the higher tier of SketchUp’s paid versions. It includes everything in Pro plus some additional features such as the ability to work with point clouds. It costs ~$700 per year.
- Go: A special offer, it includes reduced features compared to SketchUp Pro, and it’s only available for the web and on mobile platforms such as an iPad. The license carries over all browsers and apps, and it’s meant for collaborative work. It costs ~$110 per year.
- Education: SketchUp also offers an educational license for teachers and students. This license includes SketchUp Pro, web, and many more of Trimble’s tools. This license costs ~$55 per year, so it’s a considerable discount when compared to the other subscriptions.
Blender
In contrast, Blender’s price is much easier to explain: It’s free!
Blender is completely free and open source, you can add third-party add-ons, although some may cost a bit extra (but they can be well worth the small investment). Blender itself is more than enough to do any task in the design pipeline without using any add-ons.
System Requirements
Both programs require a three-button mouse (e.g. one with a scroll wheel button) and, even though not necessary, a number pad would be beneficial. While they are both lighter than some other modeling programs, still take into account that if you’re working with a complex and heavy project, it will require more performance to keep the program stable and to prevent lagging.
SketchUp
- SketchUp is available for Windows (Windows 10 or 11) and MacOS (12+, 11+, or 10.15+).
- For hardware, at least a 1-GHz processor, 4+ GB RAM, and 1 GB of hard disk space are suggested.
- A graphics card with at least 1 GB of RAM and OpenGL support is recommended for faster work, but isn’t mandatory.
Blender
- Blender is available for Windows (Windows 8.1, 10, and 11), MacOS (10.13 and up for Intel processors, or 11.0 and up for Arm-based processors), and Linux.
- For hardware, a minimum of 64-bit quad-core CPU with SSE2 support and 8 GB of RAM is suggested.
- A graphics card with at least 2 GB of RAM and compatible with OpenGL 4.3 is highly advised.
UI & Layout
SketchUp and Blender share some similarities in their UI, since they’re both 3D design software. The workspace, where you can visualize the design, is the front and center of the program and occupies most of the window space. They also share the general drawing and modifying tools to select, move, rotate, scale, and draw rectangles, lines, and circles.
SketchUp
SketchUp’s UI is a lot more simplified since its uses are more focused on architecture. While Blender tries to provide many functions all in a single program, like solid modeling, sculpting, animation, and more, SketchUp is parametric modeling software for architecture, through and through, so its tools are optimized for architecture. A simplified UI may be a little daunting, as there’s not too much indication of where to start, but this program is actually quite easy to use.
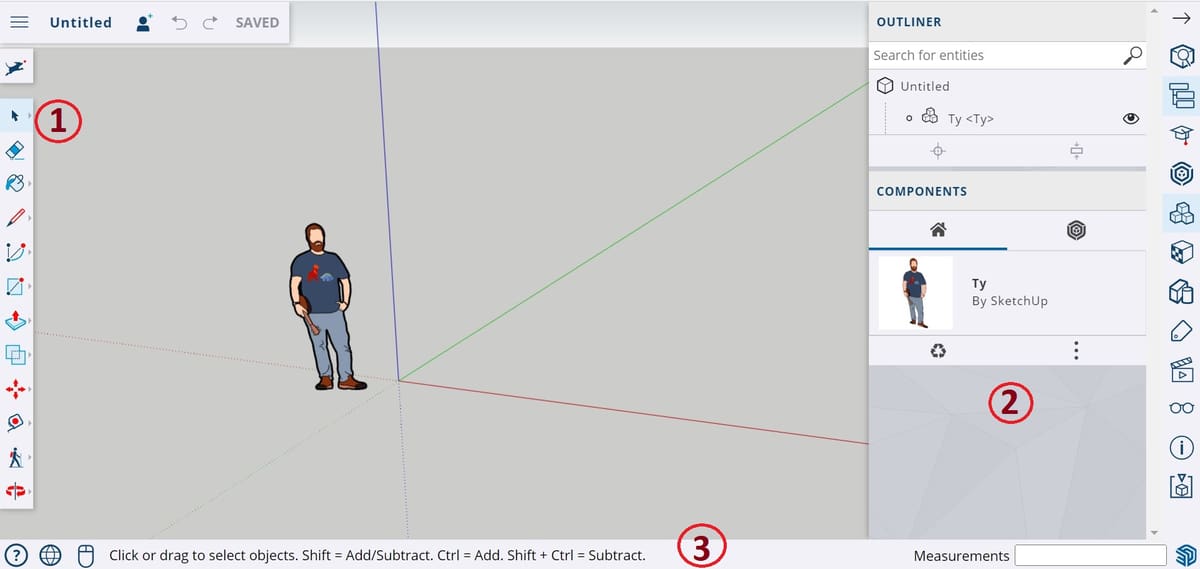
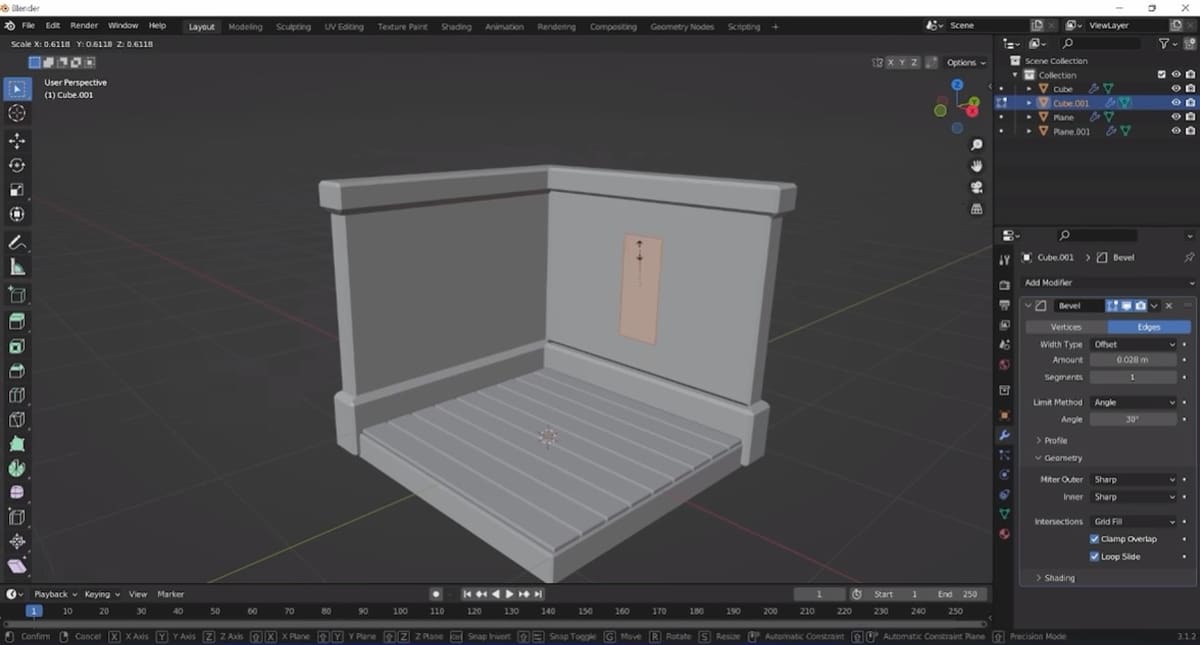
On the left side of the workspace for SketchUp Free, there’s a toolbar (1), and absolutely all tools you could possibly need are found there. When you access some of these tools, the Default Tray (2) panel, which is visible when you first open SketchUp, will display further information and options. You can close it and open it again in the menu under “Window > Default Tray”.
Finally, the status bar (3) shows context clues for using the program. For example, when you hover over an object, the status bar will show you possible actions. You can also view measurement data of edges, surfaces, or objects selected here, which is important when doing parametric modeling.
Blender
Blender’s UI isn’t the most intuitive, as many menus are hidden away in different tabs, different visualization modes, or different hotkeys. Still, once you get to know the UI, you can work pretty fast.
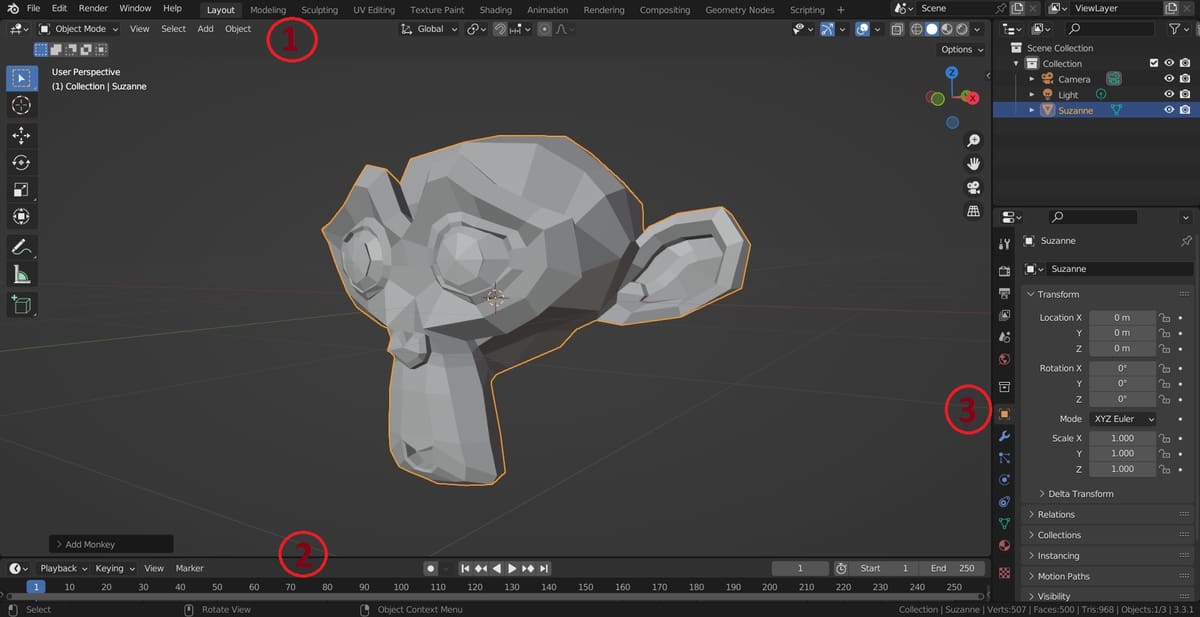
On top of the Viewport (1), you will find a few drop-down menus for many functions as well as commonly used tools for each layout. You also find the Layout tabs, which you use to toggle between different workspaces, meaning going from Modeling to Sculpting to Rendering, and so on.
At the bottom of the window you’ll find the animation timeline (2), even when not in animation mode. On the right side of the window, you can find the Properties menu (3) with tools to analyze and transform your mesh.
There are three very important menu shortcuts in Blender, starting with the Add menu, which you use to add default meshes, such as spheres and cylinders, and which can be accessed with the hotkey “Shift + A”. There are also two sidebar menus, which you pull out by hitting ‘N’ or ‘T’ on your keyboard, and which have transformation and selection tools, respectively. These menus aren’t usually on display by default, but they’re some of the most used in the program.
Features & Functions

SketchUp and Blender are both fully capable programs for their purposes, however, in addition to the features we’ll be discussing in the following sections, they both support the use of plug-ins, official and third-party, so even more functionality can be added.
For SketchUp, plug-ins are called “extensions” and they’re found in the Extension Warehouse. The three most popular SketchUp extensions are Architextures, for creating textures and importing them directly into SketchUp; 3D Bazaar for render-ready house assets; and Skatter, which offers render-ready vegetation, house blocks, and more landscaping utilities. These, and many more extensions, are all free!
In Blender’s case, plug-ins are called “add-ons”, and they’re found in Blender Market. A popular add-on includes Cloth To Shape Keys, which costs $5 and allows you to fix clashes between cloth and bodies. If you’re a late worker, Simple Shutdown lets you automatically power off your computer after a render is complete, and it costs $5 as well. Finally, Quick Camera Fx simplifies the camera setup in Blender, a tricky thing to master, and costs $22.
SketchUp
We’ve been raving about SketchUp’s architectural functionality, so let’s dive into it.
- Cloud storage: SketchUp has cloud storage with Trimble Connect, which Blender does not, making it the better out of the two for collaborative work.
- Model repository: 3D Warehouse is a SketchUp-specific repository where individual designers as well as companies can upload their assets. For example, you may find Ikea furniture there to be able to perfectly predict how it will fit in your home.
- Push and pull technology: Modeling is very intuitive thanks to the push and pull tools, where you draw any shape onto a surface and pull it towards you to extrude or push it inwards to make a cut. There are also more refined methods of working as you advance.
- LayOut: SketchUp is, at its core, a 3D program, but it can also be used to develop 2D blueprints of a design or import 2D blueprints to be interpreted and converted into a 3D model.
- Layers: Even though it’s 3D, much like AutoCAD, SketchUp allows you to organize your model in layers and see the objects and groups present in your model in a hierarchical manner. This is useful for architecture because it allows you to toggle the visibility of entire rooms or floors of a building.
- Rendering: Finally, beyond being able to model beautiful houses, SketchUp is also able to render them in photo-realistic settings, with ambient plants, illumination, people, and more. You can even place the models on Google Earth to see how they fit with the neighborhood.

Blender
Blender is a 3D program that has been conceived to be useful for every stage in the design pipeline, therefore it has many tools and functions.
- Modeling: Blender can do organic modeling, hard surface modeling, low-poly modeling, polygonal modeling, sculpting, retopology, and even curves and surface modeling. It has two main rendering engines: Eevee and Cycles. You can add backgrounds, preset materials, shadows, textures, ambient lights, focused lights, and more.
- 2D animation: Despite being a 3D modeling program, Blender is actually also great for 2D animation. It’s a popular option for storyboarding and for 2.5D effects thanks to the grease pencil, which allows you to draw in 2D within a 3D space.
- 3D animation: As for 3D animation, Blender has full functionality to rig characters, create loop animations, and animate complete stories. It may not always be in the fastest way or the way that disturbs the model the least, but it works for the final result, nonetheless.
- Simulation: In artistic modeling, simulation refers to working with particles and complicated materials, where indicating the position of one individual element isn’t feasible. For example, fire, water, foam, smoke, and even bubbles. You indicate a general trajectory, behavior, intensity, and such, and the movement of these materials gets simulated within your 3D space.
- Scripting: Finally, being open source, anyone can take up scripting in Blender, programming their own movements, animations, and even creating their own plug-ins to add a functionality that isn’t available yet. Blender uses Python programming language for its scripting.
User Experience

SketchUp and Blender are very popular among beginners, although have very different learning curves to overcome.
SketchUp
SketchUp is intuitive to learn, especially thanks to its patented Push/Pull technology. If you’ve ever played with modeling clay, you can create a house in SketchUp. And with the existence of a free browser version, it has become more accessible for beginners and hobbyists. Users say you can start without needing any tutorials, those are more to refine your skills, and one user even calls it as easy as using Microsoft Paint.
Blender
Blender is very popular among beginners and hobbyists because it’s free and resources are vastly available for free online as well, making it so that you can start learning it at any point without any planning or budgeting necessary.
However, despite being popular for beginners, it’s not so easy to learn. Blender works with a lot of technical terms and requires extensive use of hotkeys for even the simplest of tasks. Its learning curve is quite steep and that’s only for modeling – once you want to get into animation it’s a whole other vast ocean. However, this may just be the nature of learning 3D modeling and animation.
Use Cases & Applications
You could use SketchUp to create video game props and scenery, or use Blender to create architectural models. Do take into account, though, that this isn’t where each is the most optimized. Instead, the following are the main applications of SketchUp and Blender.
SketchUp
- Applications: SketchUp is used for architectural design. It can be used for interior design as well as floorplanning and façade design. It also allows you to create and customize roofs and ceilings, which is a limit of many architectural design programs.
- Use Cases: SketchUp is used by professional architects such as Brazilian architect Fábio Rakauskas and the global firm Perkins Eastman. You can check more uses on SketchUp’s Case Studies site.
Blender
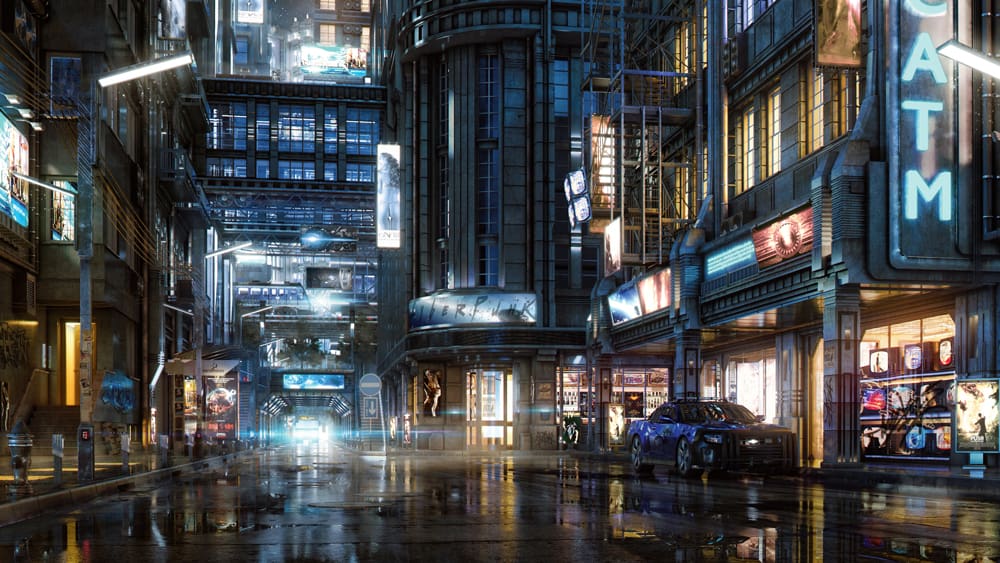
- Applications: Blender’s uses are so extensive, it’s hard to narrow down the list to only a few. It can be used for organic modeling, hard-surface modeling, interior design, rigging, animation, 2D animation, and 2.5D graphics.
- Use Cases: The animation short “Charge” was created using Blender. To contrast architecture, this user shows Blender used for interior design with a more “cartoony” feel, which can be used for animation or video games, while another user demonstrates how Blender may be applied, along with some add-ons, for environmental and architectural design.
Company & Community Support
Both SketchUp and Blender are very well-established software with wide and active communities. There are a lot of resources online for each and new things always popping up.
SketchUp
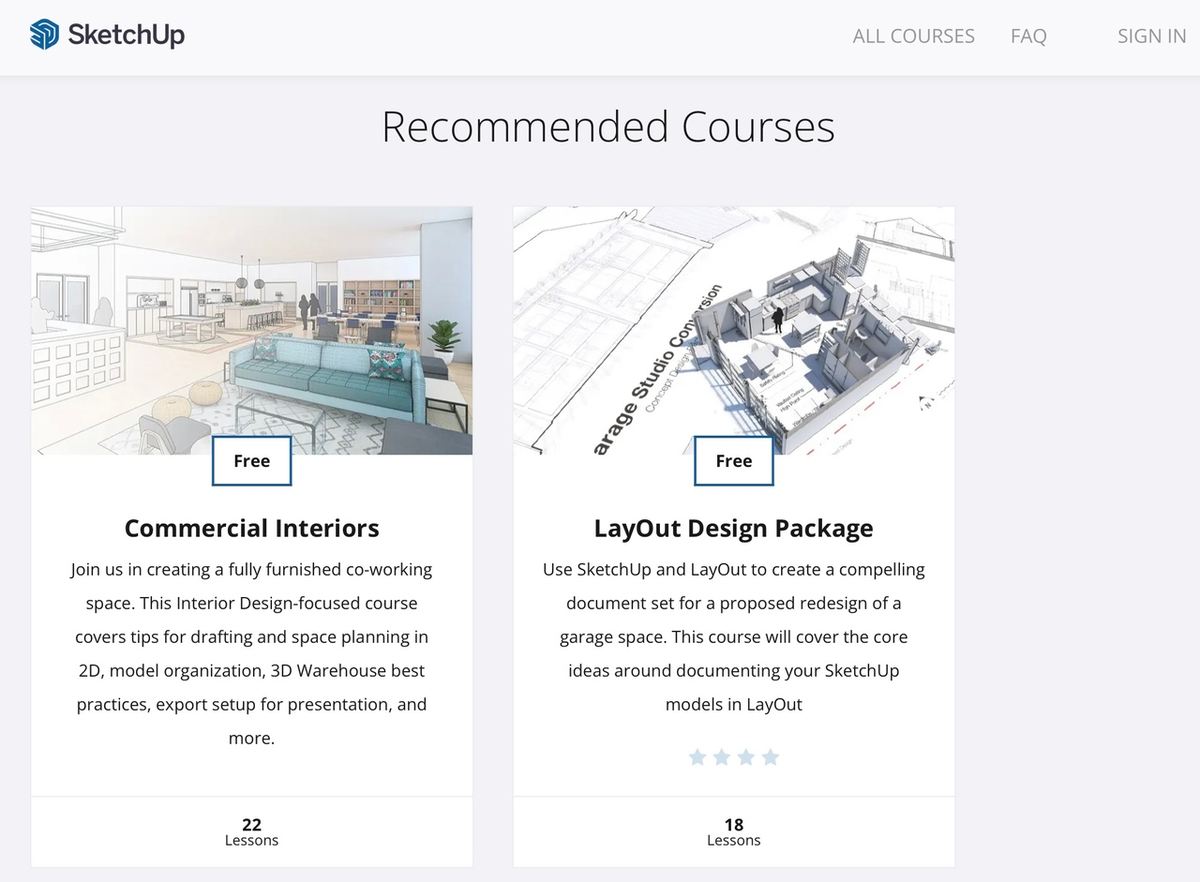
- Company: SketchUp has an official support center and, most importantly, they have the SketchUp Campus, where you have access to 12 completely free courses, some being almost 40 lessons long.
- Community: SketchUp is very active on Reddit with a community of 28,600 members. Additionally, there are many resources online, like YouTube. A popular channel is AaronBishopDesign, which posts almost exclusively SketchUp content, including SketchUp Basics.
Blender
- Company: Blender has its own art gallery where, beyond showing what kinds of results can be achieved, you can learn to replicate the designs or use certain features. Additionally, there are many communities officially supported by Blender, in many languages.
- Community: Blender grows thanks to hobbyists and fans. With one of the most active communities of any software out there, their Reddit group has 953,000 members. There are many other online resources, the most classic one being YouTuber Blender Guru, who teaches Blender starting from a donut and keeps the series consistently updated with new Blender releases.
Final Thoughts

As you may have figured out, each of these programs has a lot to offer and, while there are some overlaps, perhaps one is better suited to your needs than the other.
If your projects and goals go in the direction of architecture, civil engineering, or landscape planning, then SketchUp is the tool for you. It’s optimized for these functions, has additional features to enhance things such as marketing, and is an industry-standard tool, meaning it will open more doors for you to work in such fields. Do remember that it’s easy to get the basics, but there’s a lot to refine.
In contrast, if the “architectural” modeling you have in mind is more aimed at film, animation, or video games, or if you have something totally different in mind, such as character animation, then Blender is the way to go. So better start learning those hotkeys!