15 Best Snapmaker CNC Projects

If you're looking for some new Snapmaker CNC projects, we've got some of the best ideas. Read on to find your next Snapmaker project!
The Snapmaker machines are versatile tools with three main functions: 3D printing, laser engraving, and CNC milling. In this list of awesome projects to make, we’ll be focusing on Snapmaker’s CNC function. All of these projects, though perhaps originally purposed for another machine, can fit on at least one of the Snapmaker’s build plates, so once you find an idea you love, you can start cutting right away!
At the time of writing, the Original Snapmaker and the first Snapmaker 2.0s, the A250 and A350, have been discontinued, while the 2.0’s current available versions include the A250T and A350T, and Snapmaker also offers the Artisan. There are also the 2.0 F250 and F350, but these only offer 3D printing functionality.
Because the Original Snapmaker, the 2.0, and the Artisan don’t work with all file types, you may need to run the files through a program like Autodesk’s Fusion to make them compatible with the Luban software.
Without further ado, let’s get started!

Organizers
These projects are ideal to bring order to different spaces: the kitchen, your workspace, and even your gaming room…
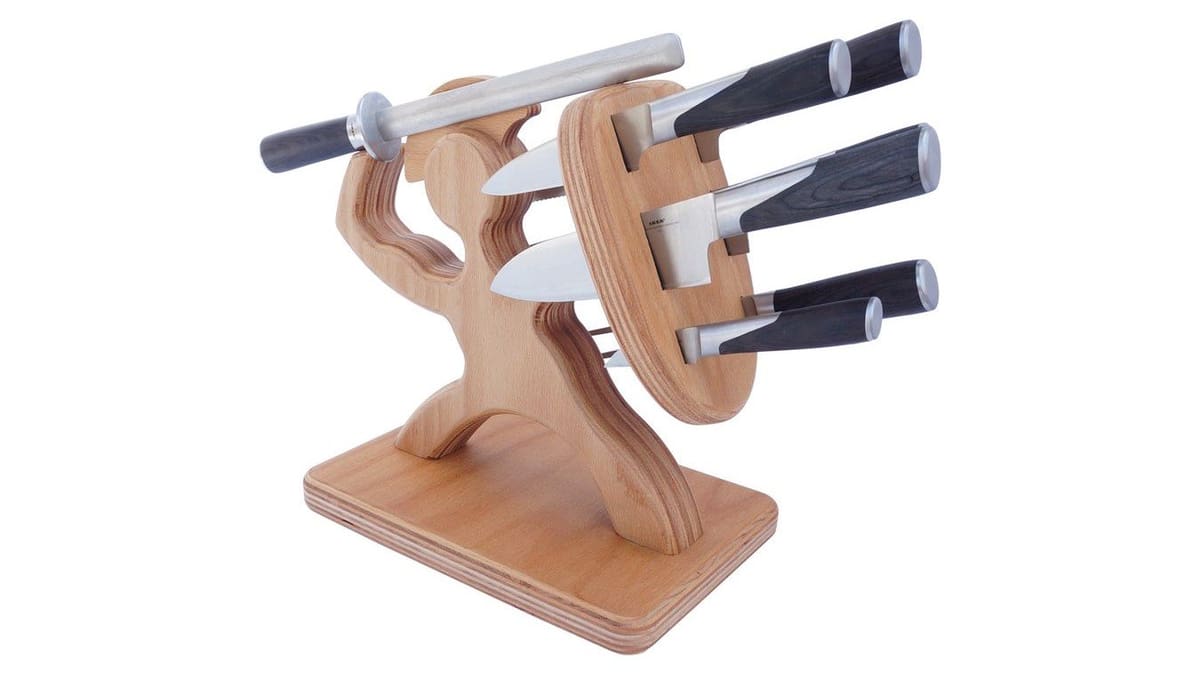
Spartan Knife Holder
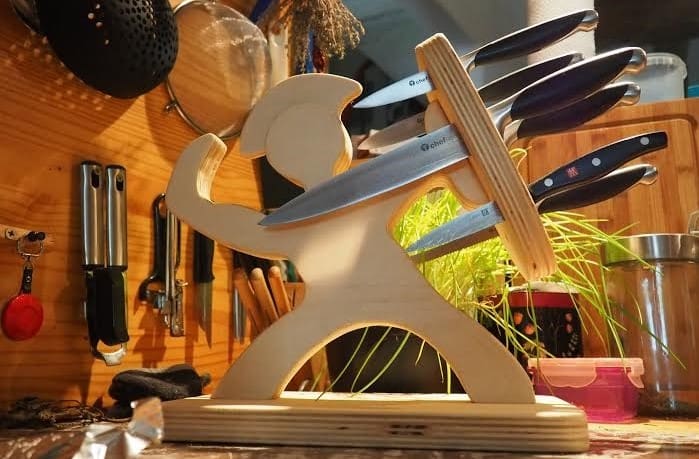
This project is special, for sure. In addition to its uniqueness, it’s extremely useful. It’s an adorable, hilarious, yet elegant knife block that will spice up your counter with ease. Most of the work for this project can be completed on your Snapmaker, but you’ll have a bit of manual sanding and corner-rounding to do, too.
Due to its larger size, this project is only feasible on a Snapmaker 2.0 A350T or an Artisan. You may be able to scale this model down in order to hold smaller knives with one of the smaller Snapmakers.
- Designer: Christian Knuell
- Core materials: Beech plywood, magnet Ø25 x 5 mm (NdFeB), 6-mm dowels, your favorite kitchen knives
- Project site: Instructables
- Compatible with: A350(T), Artisan

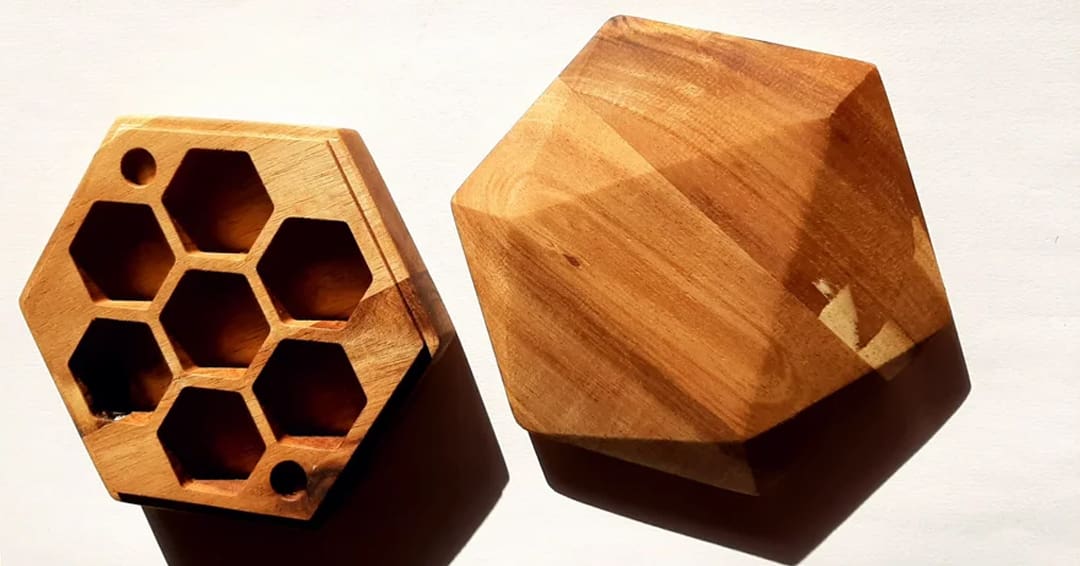
Modular Desk Organizer
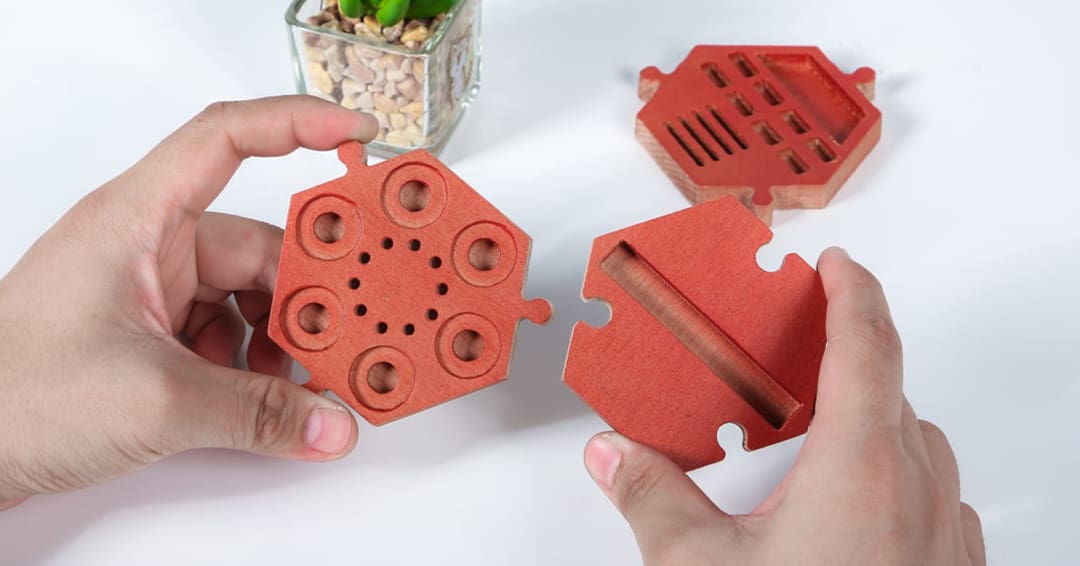
Makers tend to have all kinds of tools lying around the workshop and desk, so why not use the Snapmaker to help deal with the clutter? Desk organizers are essential for maintaining a tidy workspace and can be both functional and decorative elements. In the case of those organizers, the base shape is a hexagon, and for each one, you can carve the shapes that you need, whether you have a phone, CNC bits, USB sticks, or much more.
This is the perfect project if you’d like to become more confident using Fusion, both for design and for CAM. Starting from the 3D models that Snapmaker has uploaded, you can customize the hexagonal tiles based on your needs to create exactly what you desire. When you’re satisfied with the result, you can move on to the CAM environment and start setting your CNC carving, using the provided configuration and you’re ready to start milling.
- Designer: Snapmaker
- Core materials: Beech Plank (suggested 100 x 92 x 10 mm), plywood (suggested 100 x 92 x 2 mm)
- Project site: Wikifactory
- Compatible with: Original, A150, A250(T), A350(T), Artisan
Dice Box
If you’re into tabletop gaming, you probably have more than a few dice scattered around. Dice get easily lost, so tidy them up with this super cool dice box! It can contain up to 7 dice with 20 faces, but even smaller ones will fit. This is a project that all Snapmaker owners can create since it will fit even on the smallest model, the A150.
The author of the model has created a nice guide on how to set up the G-code in Fusion. First of all, you’ll need to specify the origin – make sure to set it on the surface of the piece. For the bottom part, you can use a flat-end mill, while for the top, you’ll need a V-bit.
Once the milling is done, to make the box look even better sand it and apply a wood finish. The creator of the design has used linseed oil to make the wood shine better. Then you can finish the project by gluing the magnets.
- Designer: ch4tterb0x
- Core materials: Two boards of wood of choice (e.g. acacia) 120 x 180 x 18 mm, 4x 10- x 3-mm magnets
- Project site: Instructables
- Compatible with: Original, A150, A250(T), A350(T), Artisan
Settlers of Catan Token Tray
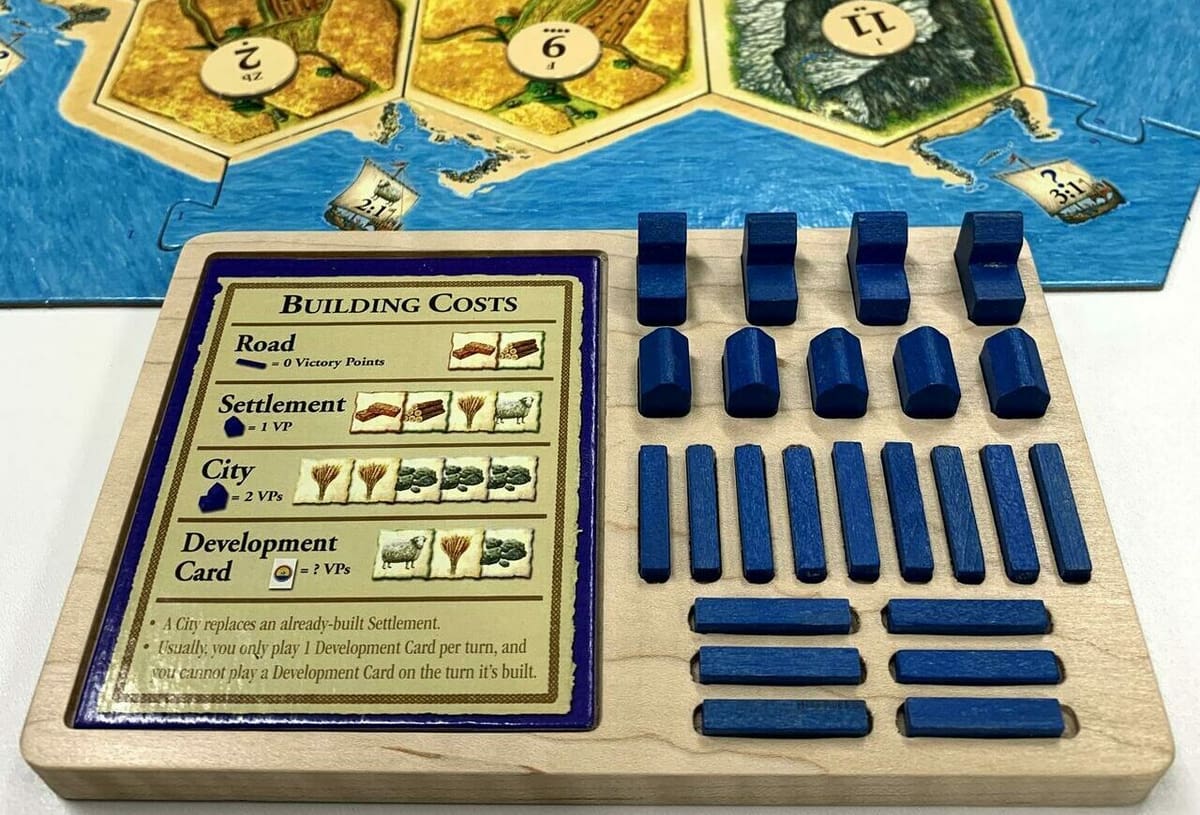
Settlers of Catan is a wonderful game of strategy, skill, and island domination. Everyone has their own strategy regarding how to accumulate 10 victory points the quickest. However, you can take the upper ground with this sleek token organizer that will demonstrate your strategic dominance. Aside from looking great, this project will be a lifesaver. The small wooden pieces are prone to leaping off game tables and making themselves difficult to recover. This tray will dispel the fear of losing important pieces.
For this project, you can design your own custom tray or download the provided files (.dxf, .step, and .stl) and cut them. The longest dimension of this tray is just shy of 175 mm, so you’ll need to cut this on a Snapmaker 2.0 A250T, A350T or an Artisan.
- Designer: nimblewoodworks
- Core materials: Lumber ~200 x 125 x 12.7 mm
- Project site: Instructables
- Compatible with: A250(T), A350(T), Artisan

Hammer Joint Box
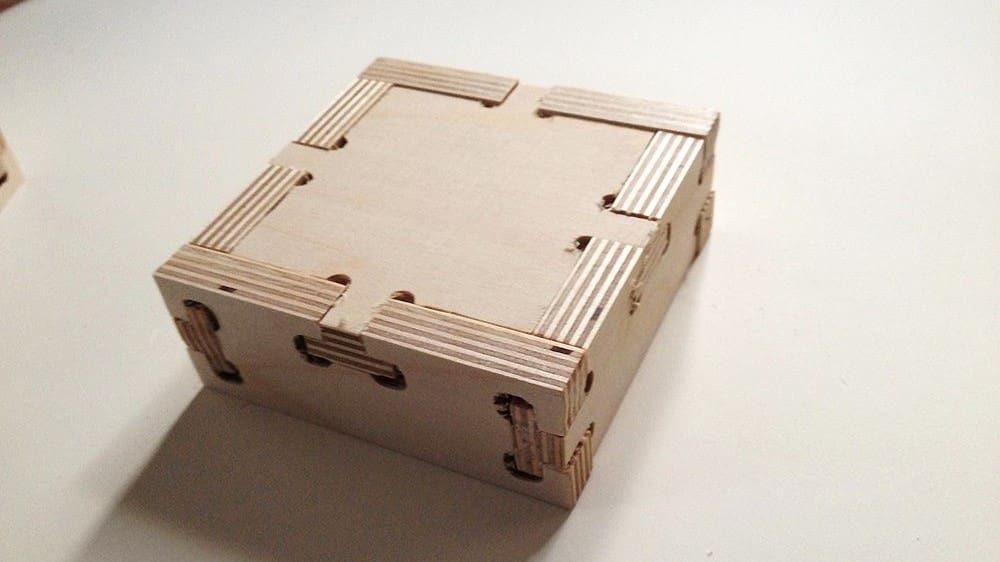
Boxes are fantastically useful and fun to build, too! This particular box uses a technique called “Hammer Tenon”, which makes it easy to assemble and requires zero glue. With some 12.7-mm plywood and your Snapmaker, you’ll be ready to cut some delightful organizers at any size you want. You’re about to take your organization to a whole new level.
The instructable includes a quick design tutorial, and while the .eps files that are available for download aren’t compatible with the Snapmaker’s Luban software, the author’s quick CAM tutorial is very helpful.
- Designer: mydarndest
- Core materials: 12.7-mm plywood
- Project site: Instructables
- Compatible with: Original, A150, A250(T), A350(T), Artisan
Phone & Watch Stand

Simple, sleek, and useful are difficult criteria to meet in one design. However, this phone and watch stand meets all three qualifications. It’s even easy to cut!
Its simple lines and curves make bringing this idea to life a breeze! After cutting the files, the only assembly required is to slide the three pieces into place.
The parts fit within 200 x 200 mm dimensions, so it’s only feasible to mill on a Snapmaker 2.0 A250(T), A350(T), or an Artisan.
- Designer: Jakub Spiryn
- Core materials: 6.35-mm wooden board with a width of at least 200 mm
- Project site: ZMorph Blog
- Compatible with: A250(T), A350(T), Artisan

Personalized Keychain
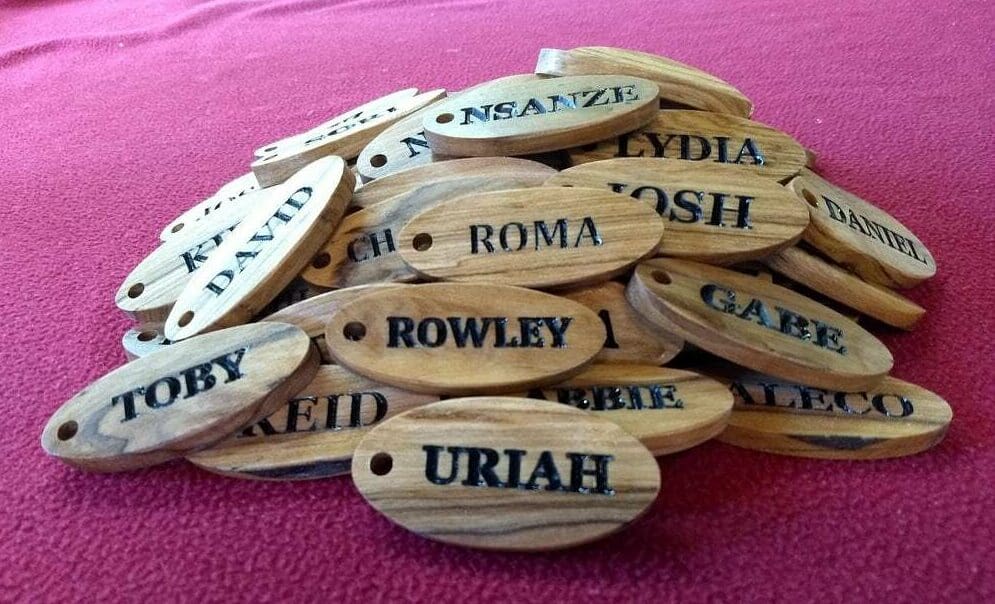
If you have some wood scraps and a CNC machine, this project is quick and easy. Personalized keychains are great gifts and they’re extremely popular for DIY projects, and they keep your keys organized (or, at the very least, together). Keychains are typically very small, so you’ll be able to make this regardless of your Snapmaker’s size.
The designer provides a detailed design tutorial so that you can begin cutting your custom keychains with no sweat at all.
- Designer: philandmarimanning
- Core materials: Wood scraps
- Project site: Instructables
- Compatible with: Original, A150, A250(T), A350(T), Artisan
Decor & Fun
Next up are a variety of projects that’ll add some pizzazz to any room, will keep you entertained, and will help you develop a few skills…
Topographical State
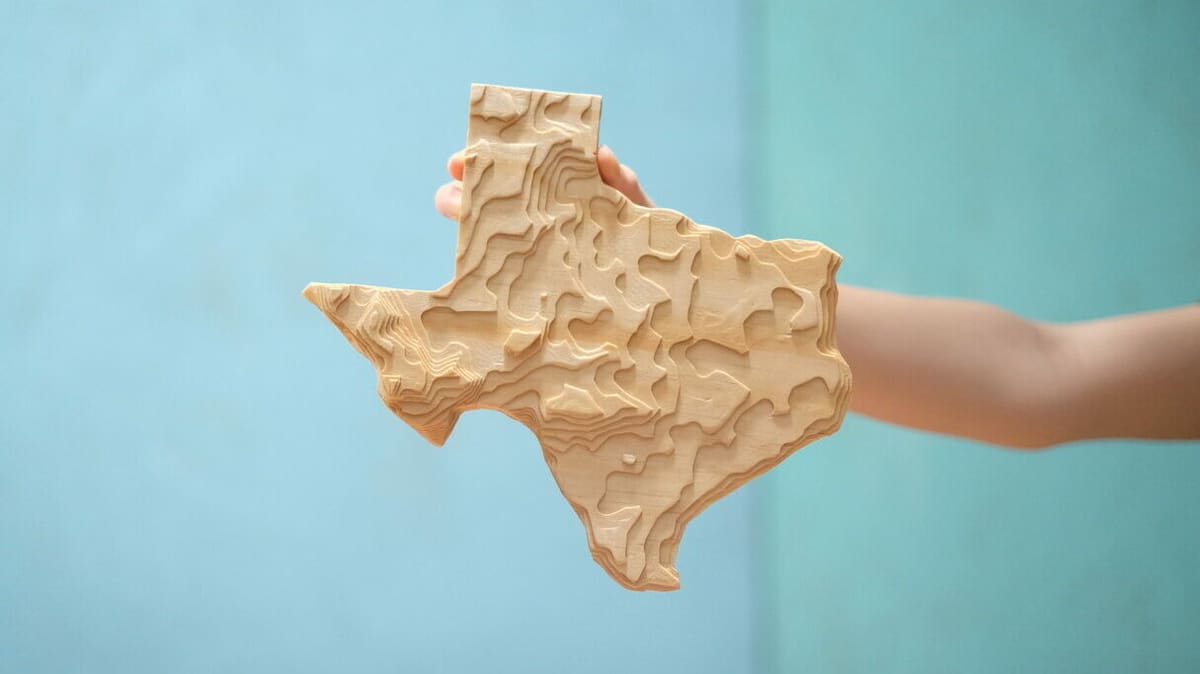
Evan & Katelyn are a husband and wife team who publish hundreds of DIY project tutorials. This next project is an example of one of their designs. Scalable to any size, a wooden topographical map of your state is an excellent CNC idea for any Snapmaker model.
Evan & Katelyn provide a detailed tutorial on how to retrieve your state’s topographical data and turn it into a file that can be milled. They also reference a link to access such files for every US state.
After either creating or downloading your state’s files (in .stl format), you can jump right into cutting the outline and topography with your Snapmaker.
- Designer: Evan & Katelyn
- Core materials: Any board size will work, depending on how you decide to scale this project, but make sure that it’s thick enough to capture both the high and low points of your state’s topography
- Project site: Instructables
- Compatible with: Original, A150, A250(T), A350(T), Artisan
Passive Phone Speaker
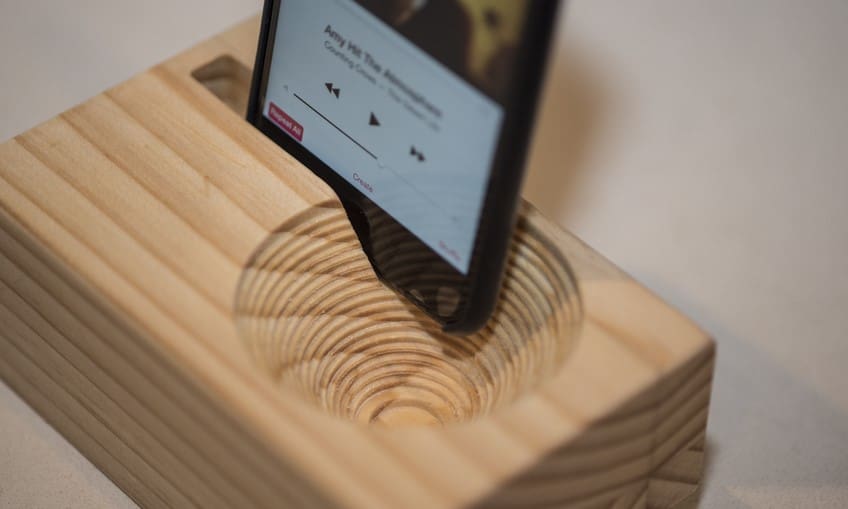
Passive phone speakers are simple to make, but they look great and sound even better. This project is an excellent idea if you’re looking for a useful project that’s easy to cut on your Snapmaker. This speaker’s maximum dimension is 150 mm, so you should be able to create it on any Snapmaker model.
If you’re making this on an Original Snapmaker or a Snapmaker 2.0 A150, you may have to get a bit creative with how you secure the stock onto your platform. One easy solution would be to use a 150- x 150-mm stock board that you can easily secure to the platform without interfering with the cuts. Later, you can trim the project to its intended width.
The files for this project are available in Inventable’s free Easel software. If you’re using another CAM program, you can copy the design from Easel and download the files in a .zip folder.
- Designer: Warren Downes
- Core materials: Two framing timber boards ~200 x 90 x 60 mm
- Project site: Inventables
- Compatible with: Original, A150, A250(T), A350(T), Artisan
Chess
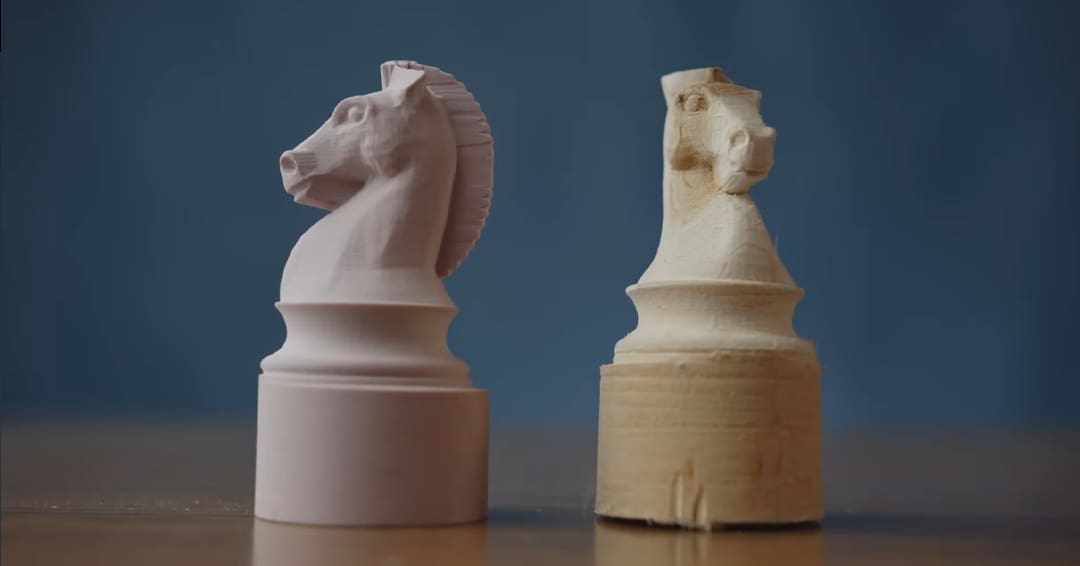
All of us have played chess at least once in our lives. This game is fascinating and it’s loved by many makers. With this project, you’ll be able to realize a custom chess set from scratch that you can personalize from the OpenSCAD files.
This is the most time-consuming project on the list but it’ll be surely worth it. To recreate it, you’ll need the rotating module so make sure to prepare it!
To obtain the best possible results, keep the feed rate low at 4 mm, or a maximum of 5 mm. And if you’d like finer details, choose some hardwood, such as walnut, oak, or maple.
- Designer: TimEdwards
- Core materials: 32x wood cylinders 40 x 40 x 70 mm
- Project site: Thingiverse
- Compatible with: Original, A150, A250(T), A350(T), Artisan with rotating module
Five-Sided Lantern
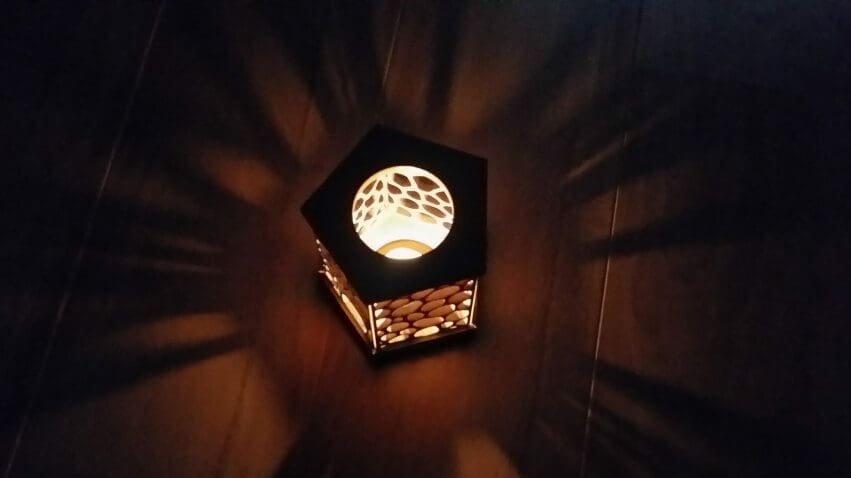
This project is a beautiful lantern that takes advantage of bubbly shapes in the vertical panels to create lovely shadow geometry. The pentagonal design requires the cutting of 10 pieces, all of which are small enough to fit on any Snapmaker model. Since the panels are so small, you’ll need to sand a slight chamfer on the vertical panels so that they fit together cleanly. Assembly doesn’t require glue and the lantern is designed so that it holds itself together.
Along with the .dxf files for each piece, there’s a .stl file for visualization purposes. After downloading the files, pop them in your CAM software and get cutting!
- Designer: ZenziWerken
- Core materials: 6-mm birch plywood for the vertical panels, 4-mm plywood for the horizontal parts
- Project site: Thingiverse
- Compatible with: Original, A150, A250T, A350T, Artisan

LED Batman Lamp
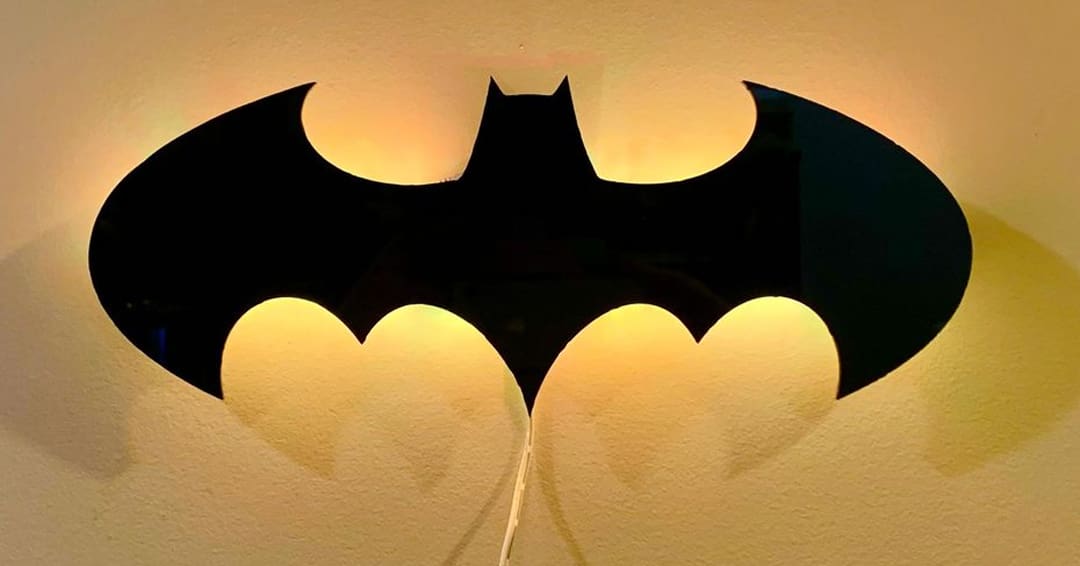
If the more rustic lantern doesn’t do it for you and you’re into comics, you’ll love this lamp. Batman-themed, this piece is realized with only a black acrylic sheet milled with a Snapmaker A350 and a small 3D printed base that houses the LED control unit. The designer has also uploaded video instructions so you shouldn’t have problems creating this beautiful lamp.
To assemble the lamp, stick the LED strip to the 3D printed base contour and snap the LED control unit in the opposite hole. Then it’s only a matter of gluing together the Batman logo and the printed base to finish your beautiful furniture piece.
Since the Batman logo is approximately 360 mm wide, it will only fit on the Snapmaker A350(T) positioned diagonally or the Artisan.
- Designer: Design8Studio
- Core materials: Sheet of black acrylic 300 x 300 x 6 mm, LED strip (RGB are suggested), PLA, hot glue gun (optional)
- Project site: Thingiverse
- Compatible with: A350(T), Artisan
Maze
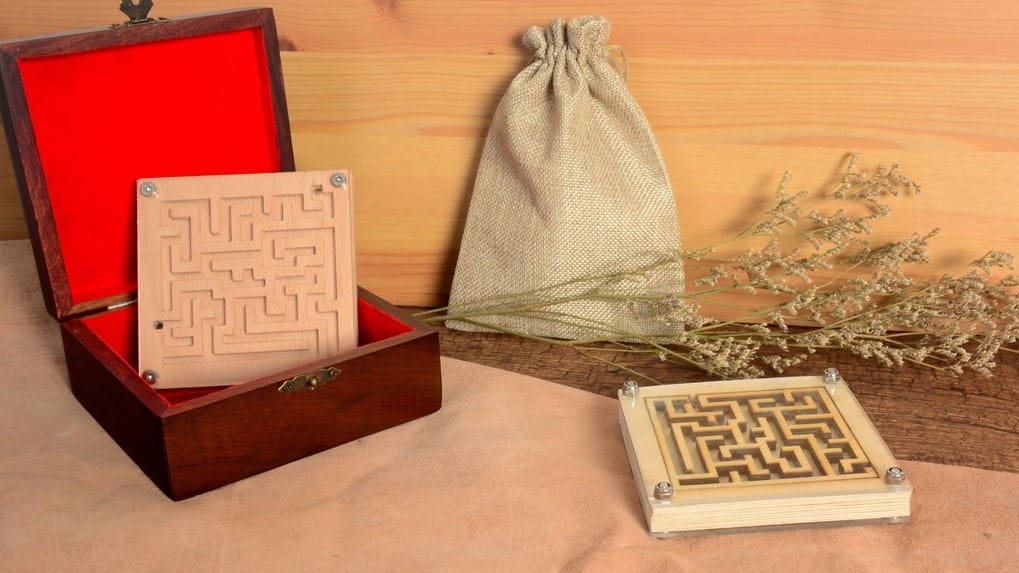
If you’re looking for a cool gift for a kid (or for yourself), look no further! This little maze is perfect for entertaining… everyone. A little bit of plywood and acrylic and you’re ready to start. You’ll have no problem making it since the designer has uploaded a video guide to set correctly the milling path.
In the CAM environment, you’ll need to set only one operation: a 2D pocket. Using a flat-end mill, select the maze path as the geometry of the pocket and set the height to -5mm with a plunge ramp type. You can follow the step-by-step video instructions of the designer if you need help. Once you’re set, you can send the file to your machine, and after approximately 43 hours your maze will be done.
To play with it, add a small ball with a 3.5-mm or smaller diameter and, if you’d like to make it even cooler or want to avoid losing the ball, you can add an acrylic panel to enclose the ball in the maze.
- Designer: leonardodeng6209, Howard Lai
- Core materials: Plywood 80 x 80 x 1.5 mm, acrylic 80 x 80 x 1.5 mm (optional)
- Project site: Thingiverse
- Compatible with: Original, A150, A250(T), A350(T), Artisan
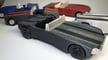
Willys MB
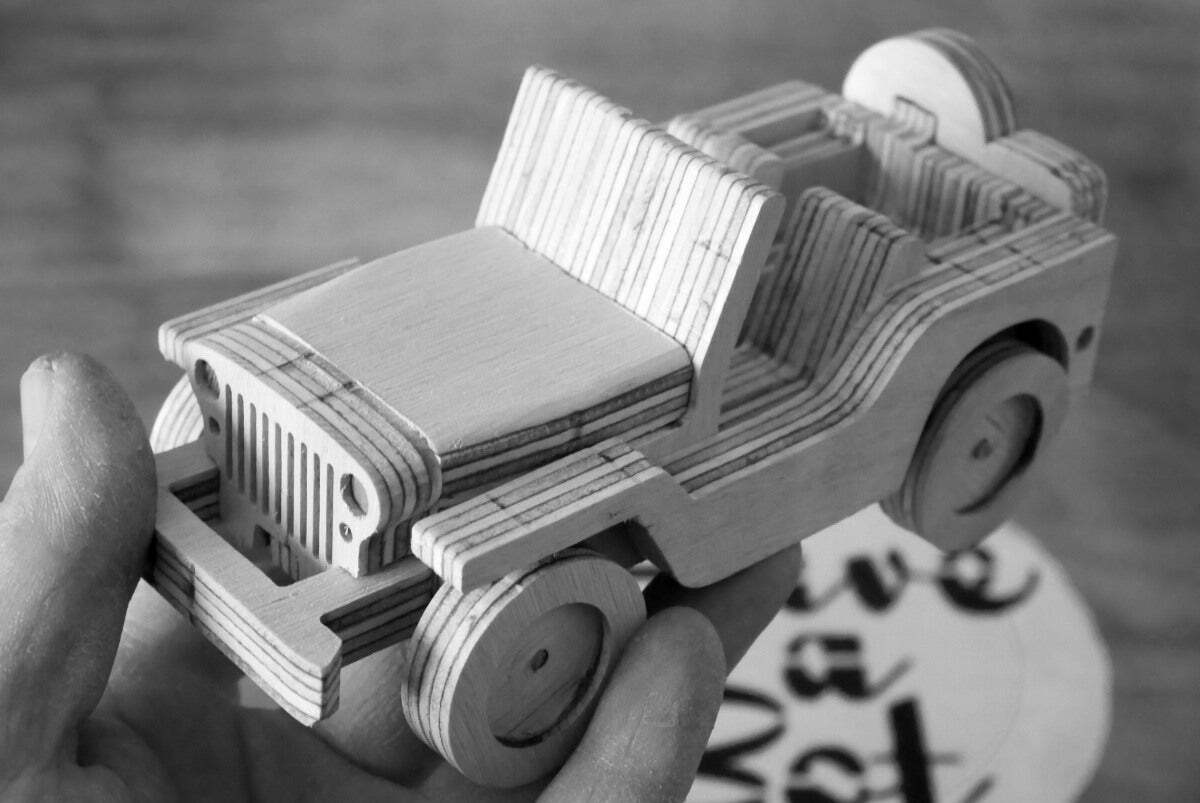
According to the maker of this clever model, “The forefather of the Jeep is the Willys MB. Developed in the 1940s this 4×4 truck was supposed to be small, relatively cheap, and produced in large quantities. The soldiers loved the vehicle for its endurance and agility.”
If you’re a traditional car junky, this project may be just perfect for you. However, you aren’t limited to this car alone, as the maker has designed a whole host of cars that are easy to CNC and beautiful to behold. Everything is intentionally designed so that the small size doesn’t compromise structural integrity. So, you’re good to go to cut the parts for this Willys MB on whichever Snapmaker model you own.
Files are available in .dxf, .svg, and .pdf formats, and the .stl is included for viewing purposes only.
- Designer: ZenziWerken
- Core materials: 6.35-mm beech plywood and 5-mm dowels for the axles
- Project site: Thingiverse
- Compatible with: Original, A150, A250(T), A350(T), Artisan
Custom PCB
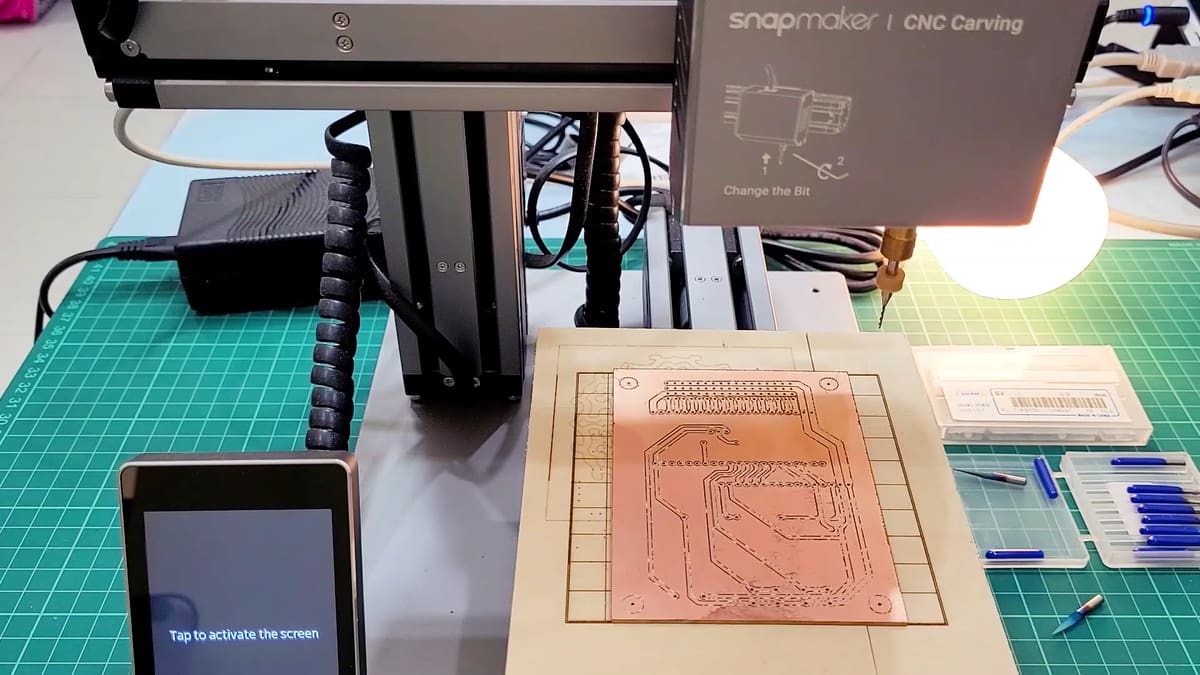
This next idea isn’t a standalone project and it’s not for decoration or fun, but we couldn’t leave it out either.
It’s a guide for using your Snapmaker’s CNC function to create your own custom printed circuit board (PCB). A PCB provides mechanical support for electronic components that are then connected with the conductive tracks engraved in the board. A custom PCB is invaluable for a maker who wants to make their own circuit boards in-house. With a Snapmaker, this goal can become reality!
The tutorial goes through everything from developing your circuit board design to cutting it on your Snapmaker.
- Designer: Cytron Technologies
- Core materials: A blank PCB board
- Project site: YouTube
- Compatible with: Original, A150, A250(T), A350(T), Artisan
License: The text of "15 Best Snapmaker CNC Projects" by All3DP is licensed under a Creative Commons Attribution 4.0 International License.