SolidWorks Macros: How to Get Started

Macros are a great way to speed up your design process and save time. Read on to learn how to create your own SolidWorks macros!
Over and Over Again
Have you ever needed to do a task in SolidWorks over and over again? Is there a repetitive sequence of actions that you happen to perform on many of your models? If so, macros are your new friend. They allow you to pre-program a set of commands that can then be executed automatically, at the press of a single button.
Macros exist in other applications (Microsoft Excel being a popular example), and they’re actually the product of APIs (Application Programming Interfaces). An API is basically an environment in which programmers can utilize the native features and functions of the base application to direct it to perform specific actions or services. For example, in SolidWorks, the environment would be all the features and tools available for the user. In Excel, it would be all the Excel functions, chart tools, and so forth.
So, by creating a macro in an application, you basically utilize the API of the specific application. SolidWorks’ API uses the Visual Basic programming language to write macros, but even if you don’t know how to program, you’ll probably be able to understand how your macro works (more on that in later sections).
Why Use Macros?
SolidWorks macros allow almost infinite freedom in manipulating all of the program’s features and tools. They also allow for the implementation of classic programming along with the use of standard SolidWorks features. For example, you could write a macro that receives a design requirement from the user (say the diameter and height of a cylinder) and then automatically builds the model according to the requirement. Another use case would be the automatic creation of a cylinder and calculation of its required height based only on the user’s specification of its diameter and volume.
Those examples, however, are usually advanced topics for those who are more familiar with macros and programming. For users who are just getting into SolidWorks macros, they’re especially helpful for repetitive tasks that are composed of several steps. Once a macro is created, its execution time is incredibly fast (depending on your computer, of course) compared to the time it takes to perform the task manually.
In this article, we’ll discuss the three main ways to create a macro, followed by a step-by-step demonstration of how to create one. We’ll even show you how to assign it a button in SolidWorks. So, if saving time is important to you, read on.

Do-It-Yourself Macros

There are three ways to create a SolidWorks macro. Let’s take a quick look at each.
Recording
The simplest way to create a macro is to record yourself performing the actions you would like the macro to repeat. In this case, you simply hit the record button, execute your sequence of commands, and once you’re done, stop recording. The macro will then be saved and ready for use.
This is a good solution for those repetitive tasks that are entirely contained within SolidWorks’ raw features and don’t require additional calculations or operations.
Programming
The biggest downside of a recorded macro is its limits. You’re basically limited to whatever you could do manually in SolidWorks. Instead of limiting yourself to only what you can record yourself doing, you could directly write the code for the macro.
This allows a much higher level of control of the application and, as mentioned, allows for the implementation of programming elements, calculations, and user interfaces, among other cool things. As you can see, this method requires some programming knowledge, so it’s not very friendly to beginners.
Hybrid Approach
This is the preferred method, and it can suit both the experienced programmer as well as the everyday SolidWorks user. The idea is basically to record what you can, then program everything else. Features, document operation, and so on can be recorded, then you edit the recording’s code to suit your needs. Additionally, you can add code between the recorded sections to fine-tune the macro.
Though some programming is involved, even users who are new to macros would benefit from editing recorded macros. This is mainly because when recording a macro, SolidWorks is recording everything you do, including model rotations, zooming in and out, everything!
How to Do It
In the following sections, we’ll explain step by step how to create and use a macro. The example we’ll use for the macro will probably be familiar to anyone who uses SolidWorks alongside Cura. In Cura, the coordinate system is different from the global coordinate system used in SolidWorks: The vertical direction in Cura is along the Z-axis, while in SolidWorks, it’s along the Y-axis.
This results in the fact that what is the “top plane” in SolidWorks is actually the “front plane” in Cura. This means that if a part was designed in SolidWorks so that its vertical direction is perpendicular to the top plane (which is the intuitive way), it will need to be rotated in Cura in order to be printed in the correct orientation.
We’ll be creating a macro that’ll automatically rotate a part to make it fit the coordinate system of Cura, and then save it as an STL file in a determined folder. Although these are relatively simple tasks, multiply them by the number of parts you’ve exported to STL and had to rotate in Cura, and you’ll start to see why automation is great for cases just like this.
User Interface
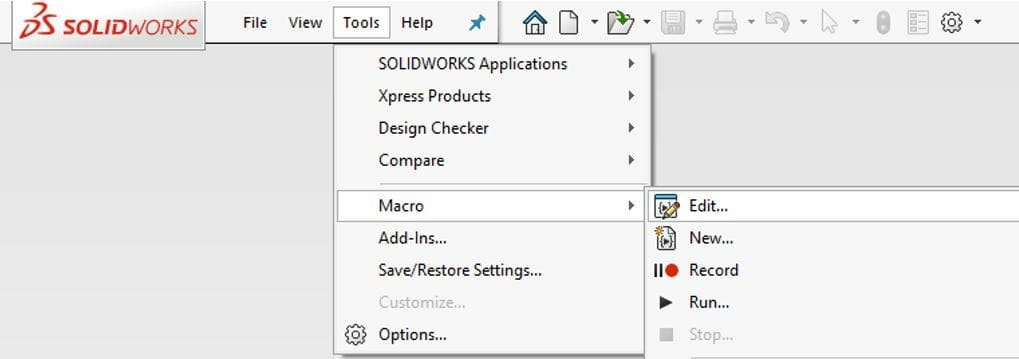
Before we jump into the steps, let’s quickly take a peek at SolidWorks’ Macro menu options. Found under the Tools menu, they include the following:
- Run allows the execution of existing macros, which you’ve written before.
- Record is one of the ways to create a macro. We’ll discuss it in a minute.
- Edit obviously allows you to edit, alter, or fine-tune a macro to better suit your needs.
Step 1: Recording
In this step, we’ll create the macro we discussed above by performing all of the necessary steps while SolidWorks records them.
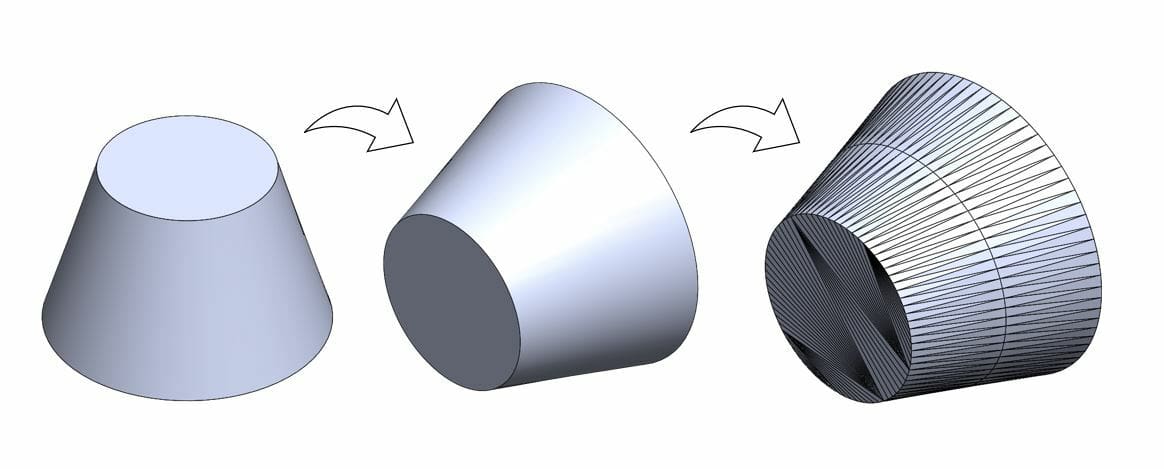
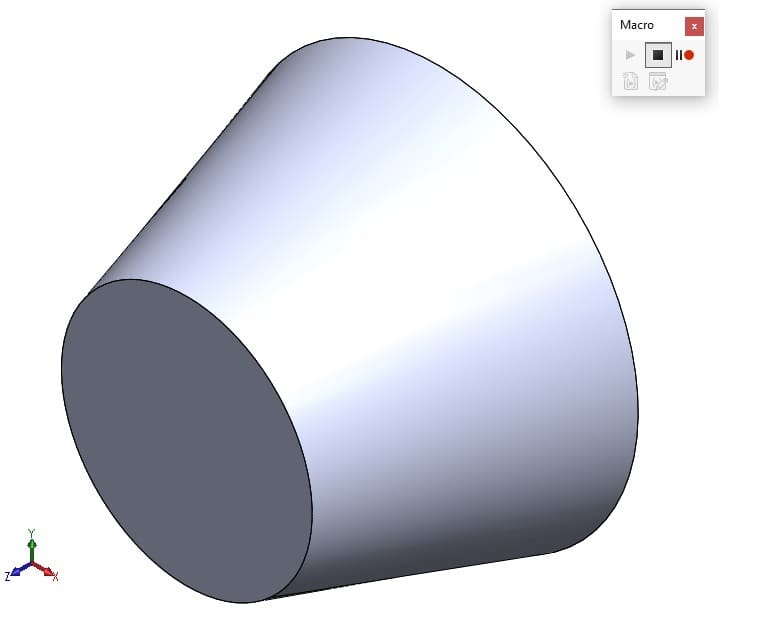
- Start from any SolidWorks model of your choosing. It can be a part you’ve just finished designing or something you’ve created a long time ago. For this example, our part is just a simple cone we’ve created for the demonstration.
- Make sure that the file is saved somewhere. If it’s not, save it first.
- Hit “Record” in the Macro menu.
- Rotate the part 90 degrees along the X-axis using the Move/Copy Body feature, which can be accessed either in Features under the Insert menu or by simply typing “Move/Copy Body” in the Search Command bar at the top right of SolidWorks’ UI.
- Save the file as an STL the way you would normally do (by using the Save As command).
- Press the black square in the Macro panel to stop recording.
- Select a file path to save the macro.
A Look at the Code
Now, let’s review the recorded macro’s code. Select “Edit” in the Macro menu and browse for the macro you’ve just created. This will bring up the raw code.
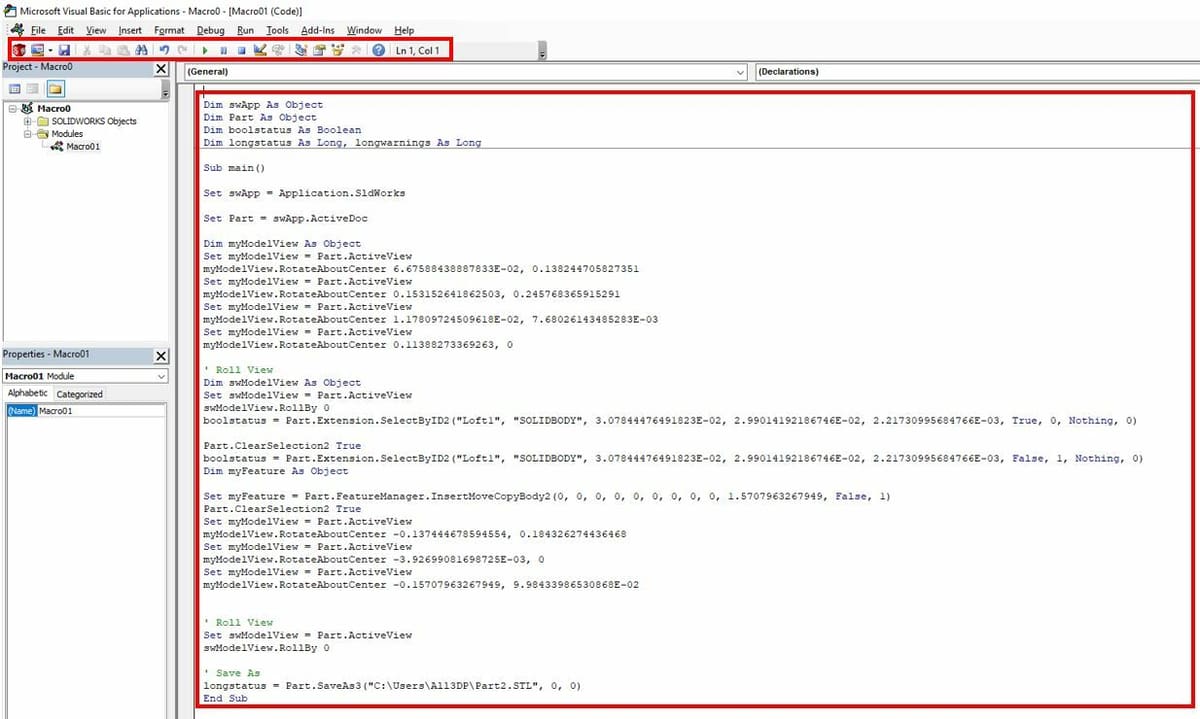
If you have experience in programming with Visual Basic, you’ll probably understand what’s going on. For those of you who aren’t programmers, the following are comments (marked in bold) for every block of code lines:
- Declare variables:
Dim swApp As ObjectDim Part As ObjectDim boolstatus As BooleanDim longstatus As Long, longwarnings As Long
- Basic API definitions:
Sub main()Set swApp = Application.SldWorksSet Part = swApp.ActiveDocDim myModelView As ObjectSet myModelView = Part.ActiveView
- Rotate model view:
myModelView.RotateAboutCenter 6.67588438887833E-02, 0.138244705827351Set myModelView = Part.ActiveViewmyModelView.RotateAboutCenter 0.153152641862503, 0.245768365915291Set myModelView = Part.ActiveViewmyModelView.RotateAboutCenter 1.17809724509618E-02, 7.68026143485283E-03Set myModelView = Part.ActiveViewmyModelView.RotateAboutCenter 0.11388273369263, 0
- Reactivate model view:
Dim swModelView As ObjectSet swModelView = Part.ActiveViewswModelView.RollBy 0
- Select the body called “Loft1”:
boolstatus = Part.Extension.SelectByID2("Loft1", "SOLIDBODY", 3.07844476491823E-02, 2.99014192186746E-02, 2.21730995684766E-03, True, 0, Nothing, 0)
- Clear the selection and select the body called “Loft1” (again):
Part.ClearSelection2 Trueboolstatus = Part.Extension.SelectByID2("Loft1", "SOLIDBODY", 3.07844476491823E-02, 2.99014192186746E-02, 2.21730995684766E-03, False, 1, Nothing, 0)
- Rotate the body:
Dim myFeature As ObjectSet myFeature = Part.FeatureManager.InsertMoveCopyBody2(0, 0, 0, 0, 0, 0, 0, 0, 0, 1.5707963267949, False, 1)Part.ClearSelection2 True
- Rotate model view:
Set myModelView = Part.ActiveViewmyModelView.RotateAboutCenter -0.137444678594554, 0.184326274436468Set myModelView = Part.ActiveViewmyModelView.RotateAboutCenter -3.92699081698725E-03, 0Set myModelView = Part.ActiveViewmyModelView.RotateAboutCenter -0.15707963267949, 9.98433986530868E-02
- Reactivate model view:
Set swModelView = Part.ActiveViewswModelView.RollBy 0
- Save as STL and finish the macro:
longstatus = Part.SaveAs3("C:UsersAll3DPPart2.STL", 0, 0)End Sub
Step 2: Editing
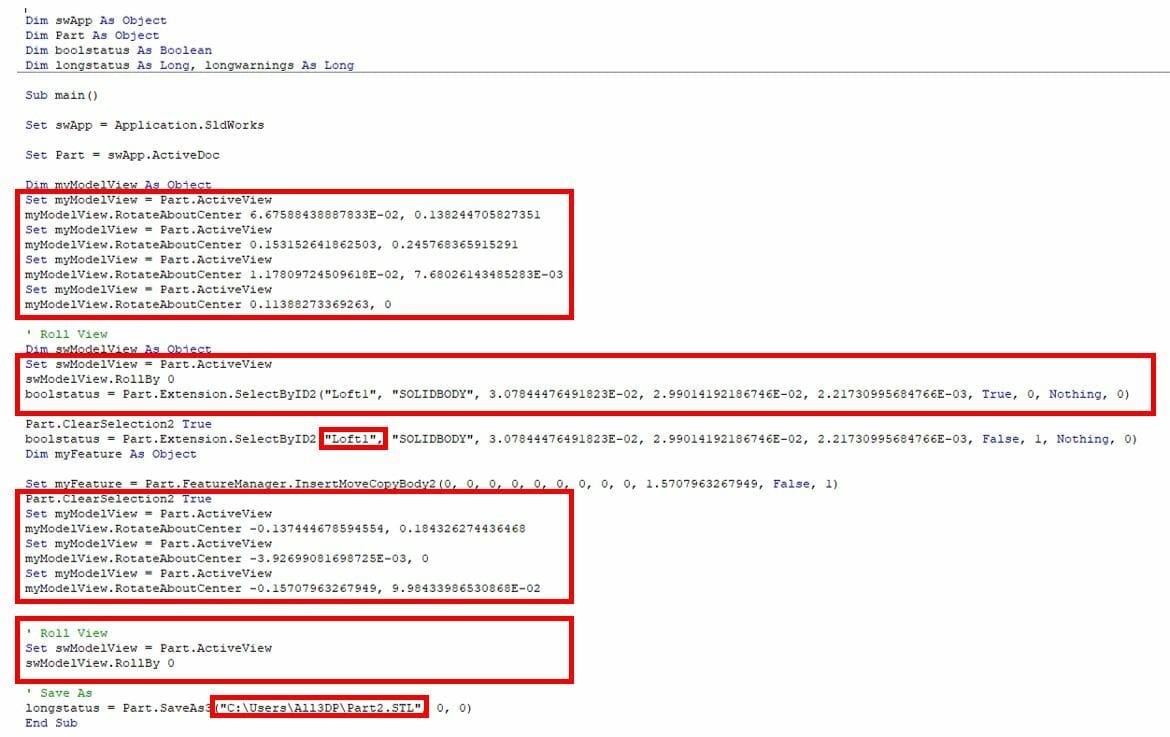
There are several issues with the recorded macro, which you may have noticed:
- There are unnecessary code lines that are not needed for the proper execution of the macro. For example, all the code lines that describe the rotation of the model (
RotateAboutCenter) were generated because the model 3D view was changed around during the recording of the macro. This is obviously not something we want to happen on purpose, so we have to keep in mind not to change the view when recording a macro. - In its current form, the recorded macro will only operate on bodies that are called ‘Loft1’. In most cases, obviously, the body to be rotated will not be called so.
- The specified file path may not be where you’ll always want to save the files.
By editing the code, we can overcome these issues.
- Start by removing unnecessary lines of code.
- Tweak the feature execution line to accommodate any solid body, not just “Loft1”. Fortunately, this is as easy as just leaving the name string empty.
- Change the path of the save to wherever you wish.
A Look at the Code
Looking at our revisions, notice how short and relevant the code is in comparison to the raw recorded macro.
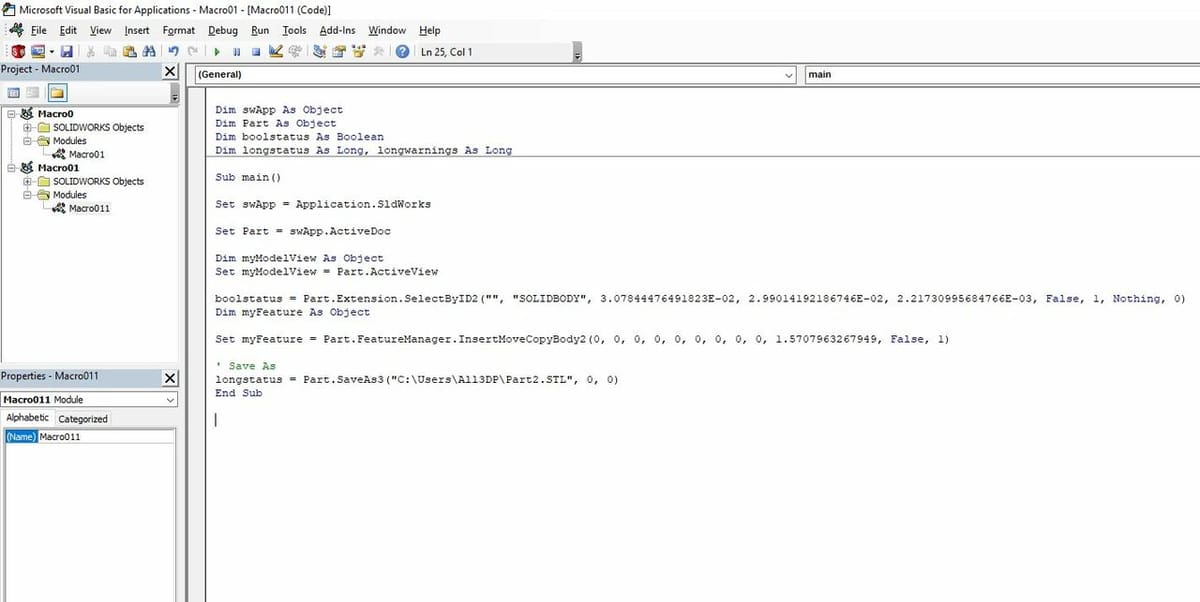
- Declare variables:
Dim swApp As ObjectDim Part As ObjectDim boolstatus As BooleanDim longstatus As Long, longwarnings As Long
- Basic API definitions:
Sub main()Set swApp = Application.SldWorksSet Part = swApp.ActiveDocDim myModelView As ObjectSet myModelView = Part.ActiveView
- Select the body:
boolstatus = Part.Extension.SelectByID2("", "SOLIDBODY", 3.07844476491823E-02, 2.99014192186746E-02, 2.21730995684766E-03, False, 1, Nothing, 0)Dim myFeature As Object
- Rotate the body:
Set myFeature = Part.FeatureManager.InsertMoveCopyBody2(0, 0, 0, 0, 0, 0, 0, 0, 0, 1.5707963267949, False, 1)
- Save as:
longstatus = Part.SaveAs3("C:UsersAll3DPPart2.STL", 0, 0)End Sub
Step 3: Adding a Shortcut
Now that we have a revised macro, we can access it in one of two ways. The first way, as mentioned earlier, is via the Macro menu where we have the Run option, which allows us to select and run the desired macro. The second way is to create a dedicated button that can be pinned to the SolidWorks’ Quick Command toolbar.
With macros, it’s all about accelerating your workflow, and ease of access to a macro can be very advantageous. So, here’s how to create a dedicated button:
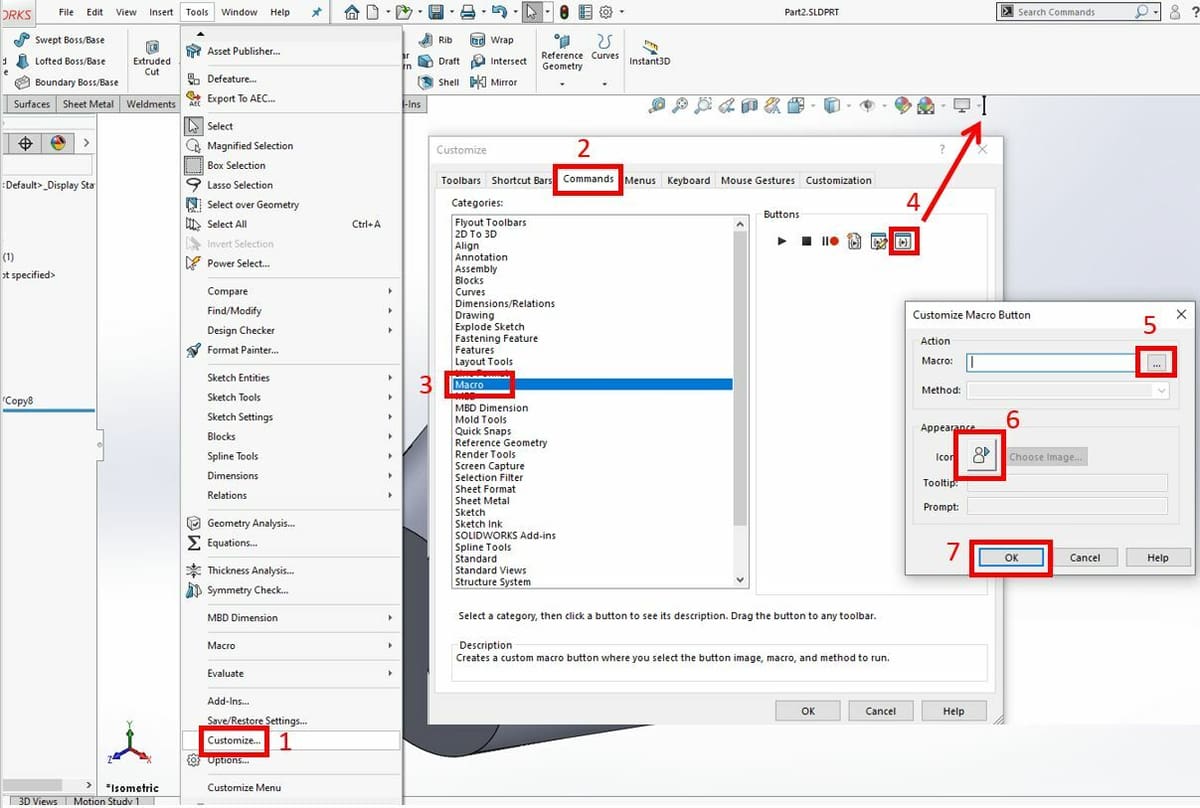
- Click “Customize” in the Tools menu.
- Go to the Commands tab.
- Select the “Macro” command.
- Drag the right-most button to the Quick Command toolbar.
- Browse for the macro you wish to assign to the button.
- If you want, you can select an icon for the button.
- Press “OK” to create the button.
That’s it! Now, the next time you need to export a SolidWorks model to Cura, just hit the button, and your macro will be executed.
Further Resources & Pre-made Macros
If you want to get a deeper understanding of how macros work and how to use them, there are great resources on the web:
- SolidWorks API Help is very detailed and thorough but not very intuitive if you don’t really know what you’re looking for. One major benefit, though, is that you can copy relevant code segments for your own macros from the many examples provided.
- The Solidworks VBA Macro page on The CAD Coder website is a beginner’s guide to programming SolidWorks macros. It’s a great starting point with many simple but useful examples including selection methods, creating fillets, and more.
- MLC CAD Systems created a series of YouTube videos that go through some of the more technical aspects of macro creation. SolidWorks API for the Total Beginner is the first video in the series.
There are also great pre-made macros and libraries that you can download and use as is or with minor adjustments. Just download the macro, edit it if you wish (now that you know how), and start using it! The following are some sites to get you started:
- Codestack: a library of macros and scripts to automate SolidWorks
- 3D ContentCentral: a repository of free 3D CAD models, 2D drawings, supplier catalogs, and of course, SolidWorks macros
- Javelin: an archive of SolidWorks Macros
- GoEngineer: free SolidWorks tools
Lead image source: Javelin
License: The text of "SolidWorks Macros: How to Get Started" by All3DP is licensed under a Creative Commons Attribution 4.0 International License.