How to Use a Temp Tower in Cura – Simply Explained

When you're printing a temp tower, Cura has its advantages. Read on to improve your 3D print and save on precious filament!
Temperature towers are designed to help dial in the best settings for your filament. Essentially, they’re models that include temperature changes after a specified number of layers or a set distance on the Z-axis. Once the model has finished printing, it gives you the opportunity to compare all of the temperature segments and decide which one best fits your needs.
Printing a temperature tower, especially when working with a new filament, is key to improving your prints. In this article, we’ll discuss how to set up a temperature tower in Cura and how to read the finished print.
There are two main approaches to this: the AutoTowers Generator plug-in available from Cura’s Marketplace or the DIY way. The former is more straightforward and might be the easiest if you don’t want to mess with scripts and the like, while the latter will give you more insight into what else you can do in the slicer.
After going over both options, we’ll look into what the prints themselves reveal. Let’s get to it!

AutoTowers Plug-in
As mentioned, the first option is arguably the easiest and fastest approach.
Installing the Plug-in
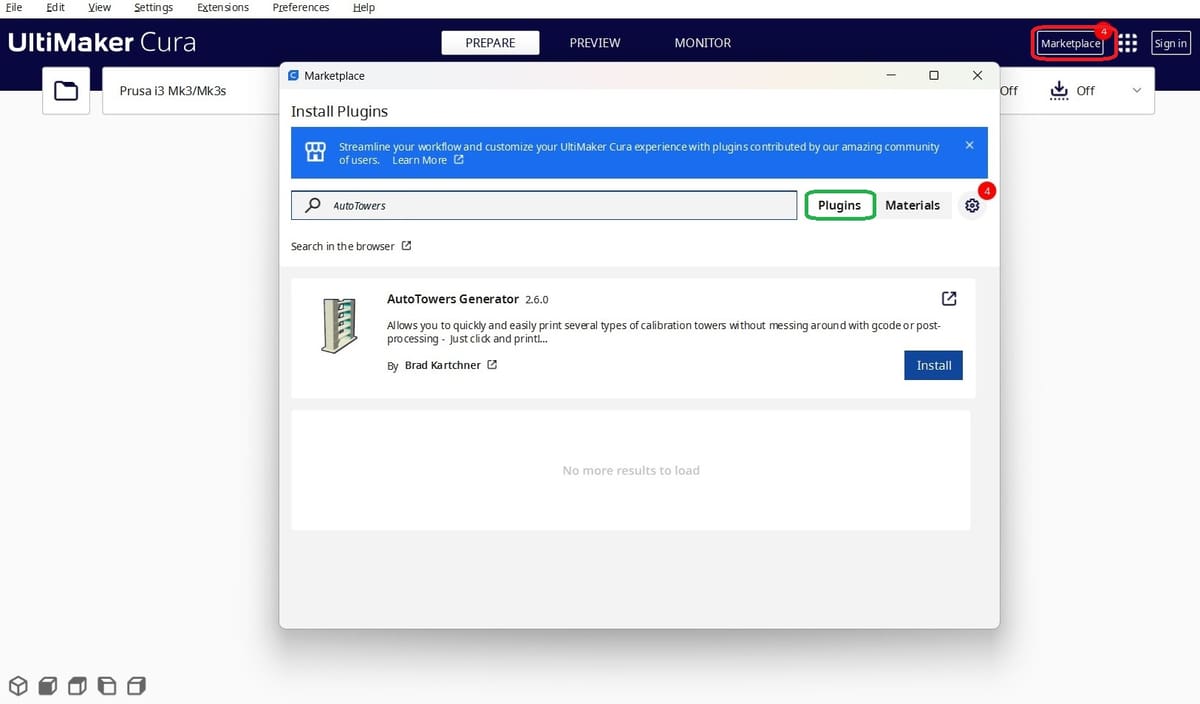
You can install the plug-in directly from Cura by clicking on “Marketplace” (see red above), and in the menu that’ll pop up, search for “AutoTowers Generator” (making sure you’re on the “Plugins” tab, in green), and click “Install” on the correct option. You’ll be prompted to close and open Cura again for the plug-in to be enabled.
Alternatively, you can find it in the Cura Marketplace platform and click on “Add to Cura”, although note that you’ll need to be registered first.
Adding the Tower

Once the plug-in’s up and running, you’ll just need to go to “Extensions > Auto Towers” and select the temperature tower of the material you’re working with. Note that there’s also the possibility of customizing your own temperature tower, but to do this, you’ll also need to have OpenSCAD installed and properly set up to work with the plug-in.
When you add the tower, some default settings will be automatically changed to fit it. For example, if you’ve got supports enabled, they’ll be turned off, as they defeat the purpose of the model. That said, there are aspects you can change, such as the layer height.
The advantage of this particular approach is that you needn’t go through the trouble of setting different temperatures at different layers – the model’s profile is set depending on the material, and all you have to do is slice it and print it.
The DIY Way
Next up, we’ll look at the slightly more involved (but still worthy) process of finding the temperature tower from a repository, tweaking some settings, and slicing the model.
Where to Find One
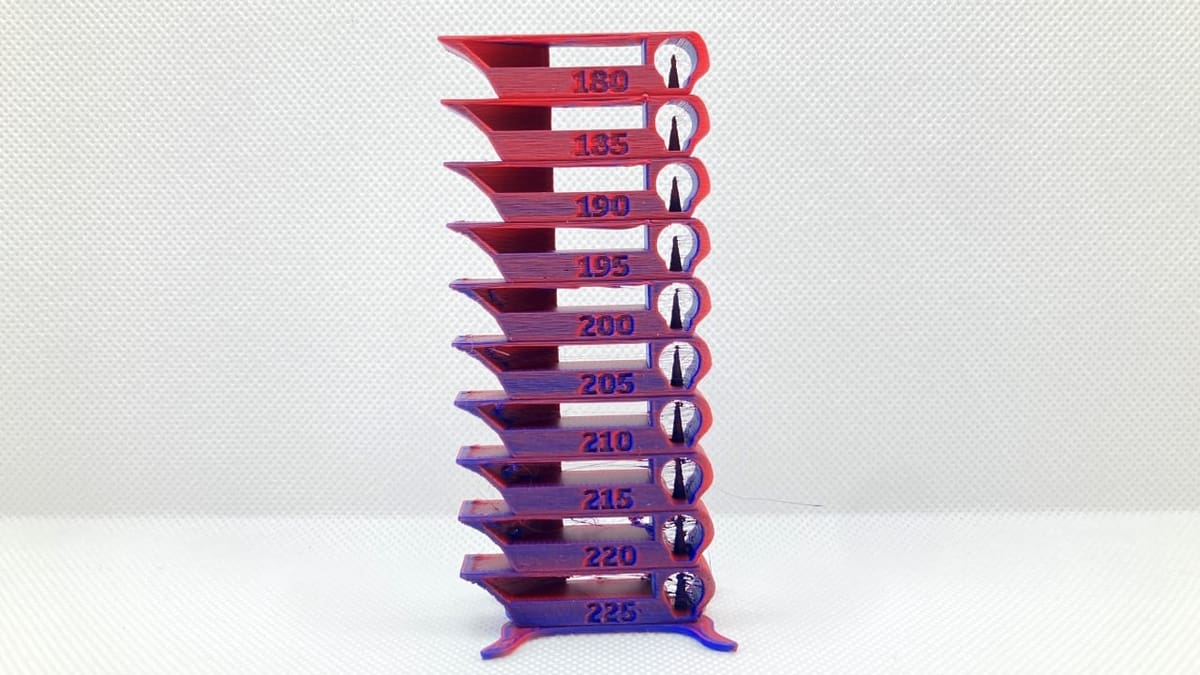
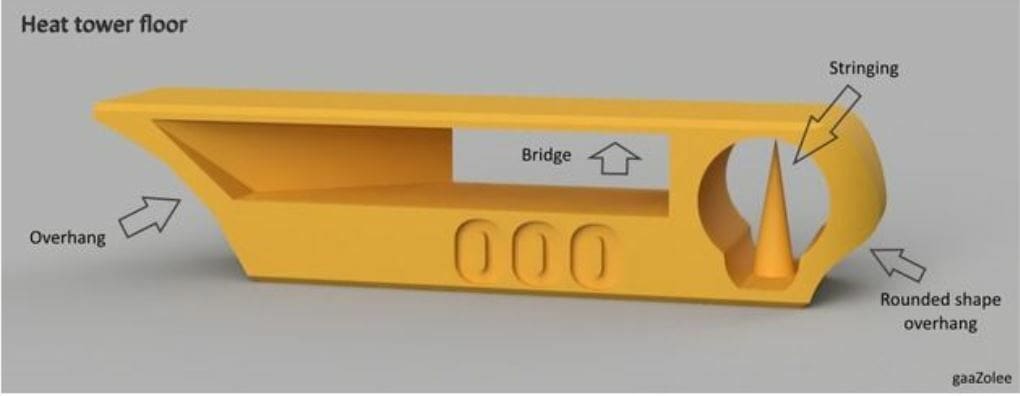
There are a couple of different options when it comes to getting a temperature tower. To start with, the easiest option is to download a ready-made one from Thingiverse or another STL repository. Some designs are as simple as blocks stacked on top of each other. Others offer more detail and tests in addition to the temperature checks. For example, the Smart compact temperature calibration tower from Thingiverse user gaaZolee shows how the temperature affects multiple important factors on a print, from layer adhesion to stringing.
If you’re proficient in 3D design, however, you may want to design your own temperature tower. This affords you the opportunity to focus on points that are most important to you. The key design decision will be how to measure the distance between temperature changes. This can be done either by counting layers or by measuring increases along the Z-axis. Both options are explained below.
In designing your own tower, you can be as simple or as fancy as you want. Just remember to include some way to show where the temperature changes occur for ease of comparison. For the purposes of this article, though, we’ll use the design from gaaZolee to demonstrate setting up the tower in Cura.
Setting Up in Cura
To start the process, open your chosen STL file in Cura by selecting “Open File(s)…” from the File menu. Select the file you have downloaded or designed. Once this is done, you can then start looking into the settings.
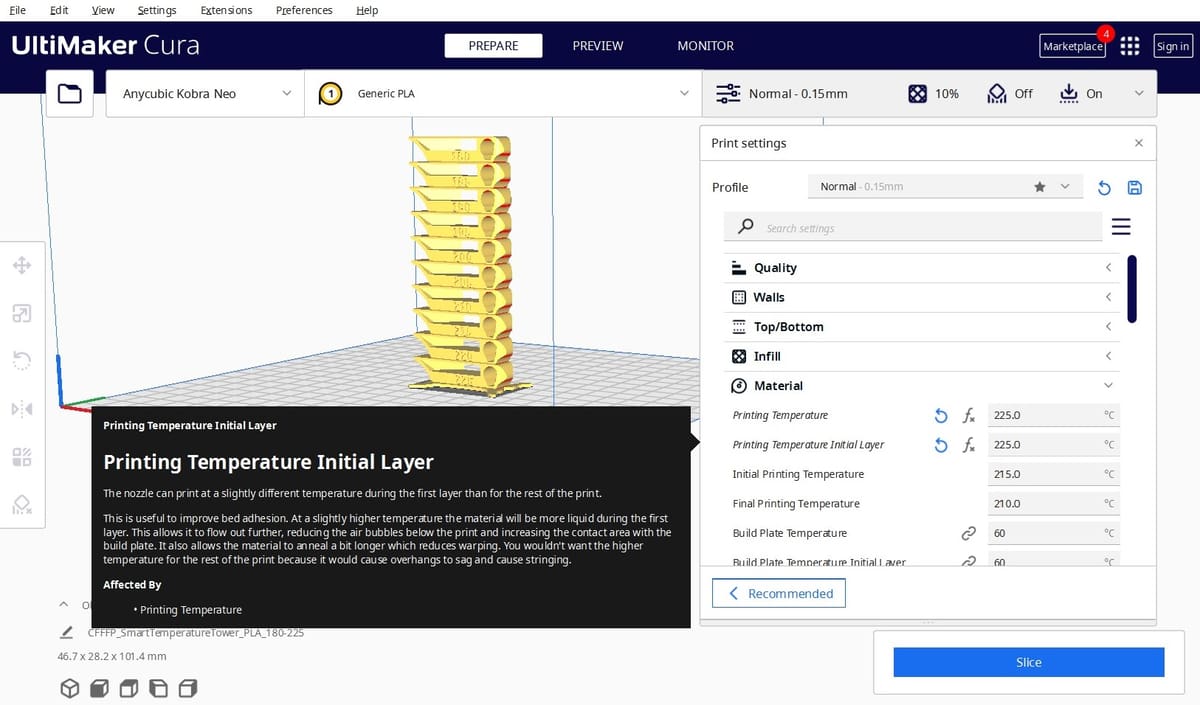
- Temperature settings: The print temperature needs to be set for the temperature that corresponds to the first block in your tower so that the printer’s hot end will be heated to the correct temperature to start. Using the heated build plate will help with adhesion in most cases and can be set to a value you know works for the material you’re using.
- Print speed: The print speed will need to be set to a value that your printer can comfortably handle. For example, an Ender 3 V2 could be set around 50 mm/s when printing PLA.
- Infill: In general, the infill settings can be relatively low and simple, too. Cura’s grid at 20% is a nice average starting point to ensure the tower isn’t flimsy and can hold its own weight if some of the layers don’t adhere well to each other.
- Layer height: This is very important for temperature tower tests, and you’re going to need to set the layer height carefully to ensure your 3D printer is able to change at the points you want it to. Generally, it’s accepted that a 0.2-mm layer height is a nice round number to work with (five layers being 1 mm) while also being a usable value for layer heights in the print itself.
Adding Temperature Changes
This is where things become slightly different compared to a normal 3D printing file.
Here, you’ll add modifications to the G-code to tell the printer when you want the temperature to change and to what value. Regarding the specific values, if you’ve downloaded a file, there are normally instructions included that will explain what to set this to. If you’re using a self-designed tower, a bit of math should allow you to work out which values are best for your file.
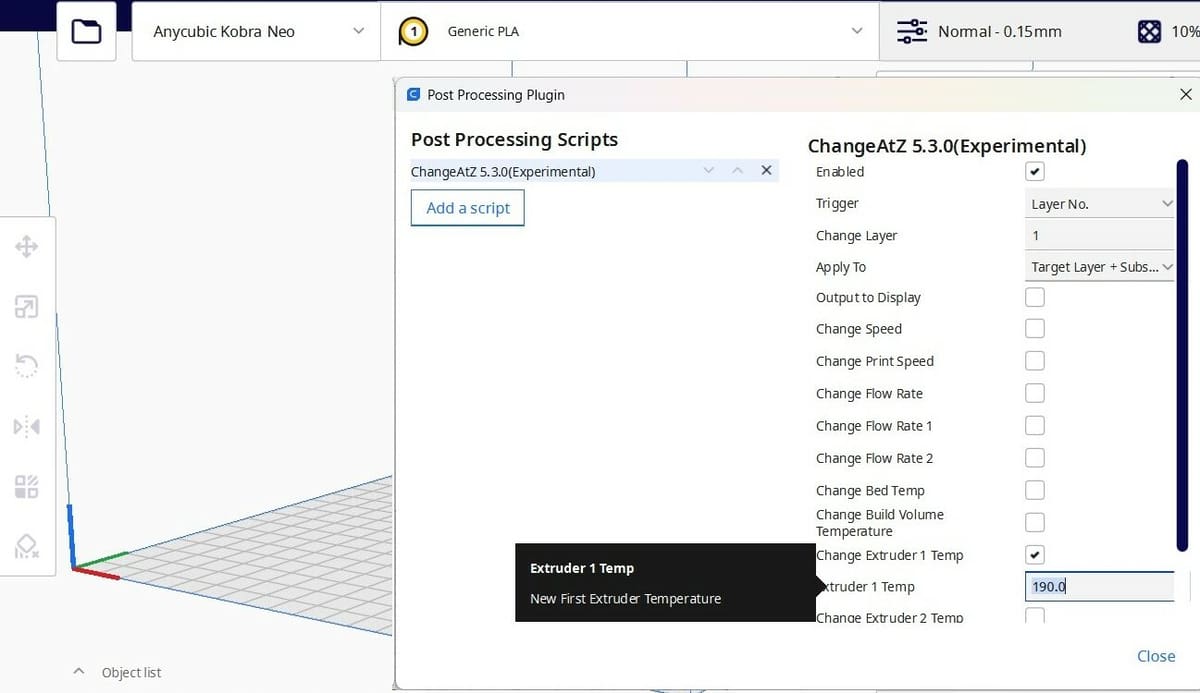
- To get access to the screen, go to “Extensions > Post Processing > Modify G-Code”. A new window will open, giving you options to add what you need.
- Select “Add a script”, followed by “ChangeAtZ 5.3.0(Experimental)” (the exact number might depend on the version of Cura you’re working with). This will display a number of settings that will allow you to set up your file based on either the Z-axis height or the layer number.
- Set the “Trigger” to “Layer No.” (instead of “Height”) and specify the layer number that the temperature should be starting at.
- Set the “Apply To” setting to “Target Layer + Subsequent”. This means that the temperature will change on the set layer and maintain that temperature either until the end of the print or when it’s told to change again.
- Enable the “Change Extruder 1 Temp” button, then select the desired temperature.
- Repeat steps 2 through 5 for as many different temperature sections as you need for your chosen file.
- Click on “Close” and slice your model.
How to Read the Results
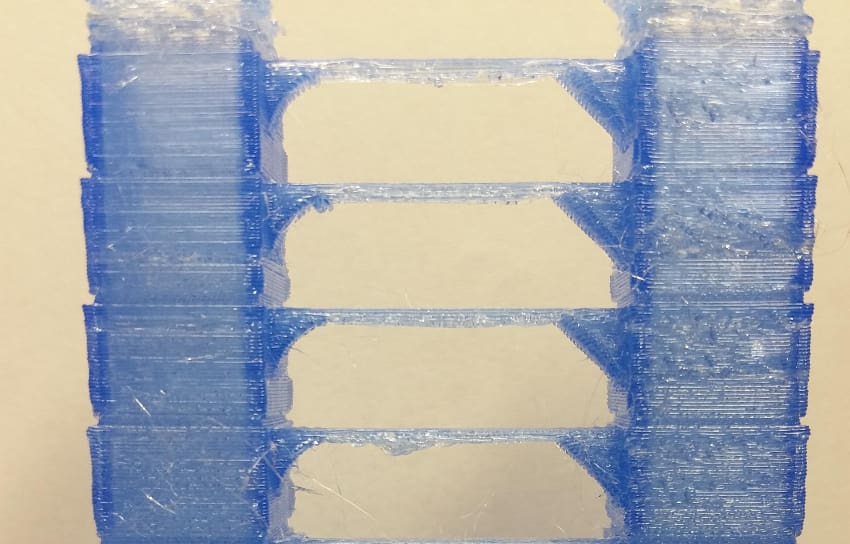
At the end of the day, beauty is in the eye of the beholder, and evaluating what you think works best will be different from person to person and print to print. The temperature tower isn’t the only tool you need to use to make sure your prints are going to come out as close as possible to what you need, but it can help point you in the direction of the best settings.
The three most common things people use temperature towers to evaluate are layer adhesion, stringing, and the quality of the print surface. Let’s discuss each of these points in more detail.
Layer Adhesion
Layer adhesion is the most common aspect of print quality that people are looking for on a temperature tower. Changes in temperature alter how the layers bind to each other, which affects both the model’s strength and its visual appearance.
If the material isn’t melting enough, it might not bind correctly to the layer below it. This means that you’ll have weak points at the layer joints, which can lead to print failures or the finished part being particularly brittle. When the print is finished, this becomes more obvious because the layers can be pulled apart, or there are visible gaps between layers.
Stringing

Another popular measure is the amount of stringing caused by different temperature settings. While this doesn’t affect the print as much as layer adhesion, it’s a key indicator of whether a print is set up correctly. More stringing means more post-processing will be needed, and when time is critical, this can be a major factor.
Stringing occurs when a small amount of filament escapes the nozzle while traveling from point to point. It can vary in appearance but often looks like fine filament hairs between two points that shouldn’t be connected.
Print Surface
The quality of a print’s surface isn’t often associated with the wrong temperature setting for a filament, but the two are more interconnected than people realize.
If the material isn’t melting in a steady, uniform manner, you’ll lose print details. This can appear in many forms, including blobs or zits on the surface or curves looking stepped due to layers not joining in a smooth manner.

License: The text of "How to Use a Temp Tower in Cura – Simply Explained" by All3DP is licensed under a Creative Commons Attribution 4.0 International License.