How to Get Your Tinkercad Project 3D Printed

Want to 3D print your Tinkercad project but don't have the equipment? Learn all about the options for getting it printed!
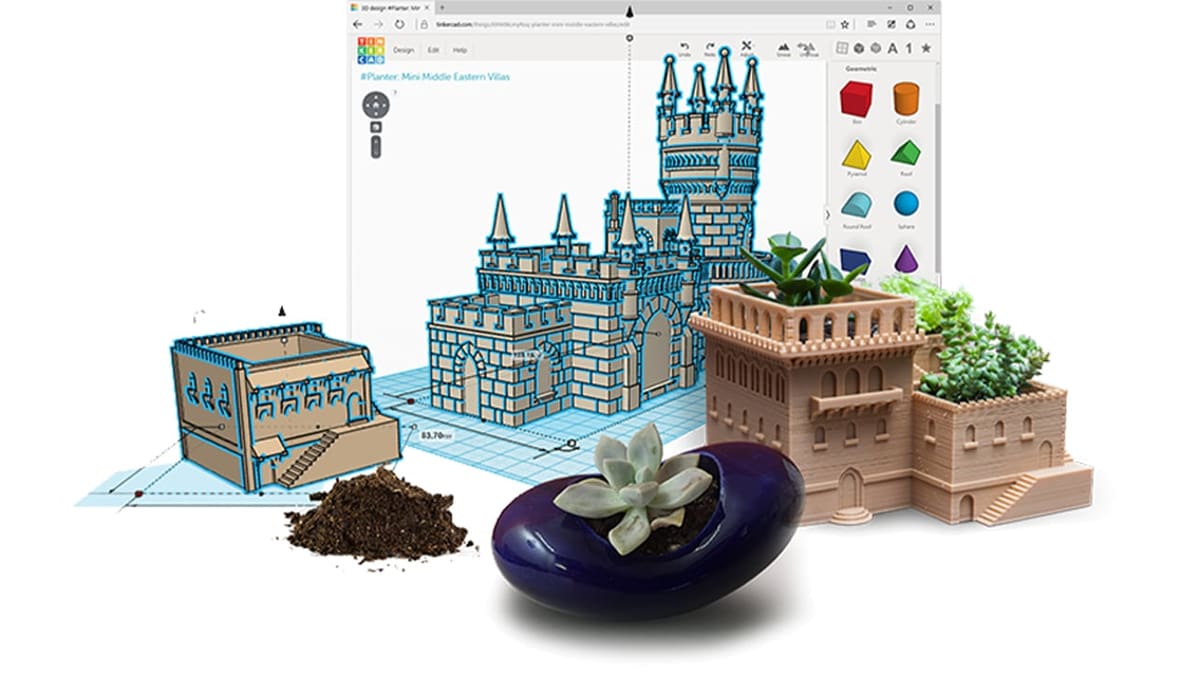
Tinkercad is a free, web-based 3D design and modeling tool by Autodesk. It’s easy to use and requires no prior knowledge of 3D modeling, making it a great tool for beginners and 3D printing users alike.
With Tinkercad, you can export your creations and 3D print them yourself, as the program supports direct export to specific printers. This makes life easier for anyone looking to design and print their own files for free, including creators with little to no experience in 3D modeling.
However, if you don’t own a 3D printer, Tinkercad has integrated 3D printing services right into the platform that are worth checking out. You can directly connect and send your projects to be printed by a professional 3D printing service.
In this article, we’ll talk more about Tinkercad, 3D printing services, and the necessary steps to make your tinker projects physical.
Design Considerations
Before jumping to the actual steps to get your Tinkercad design printed, it’s probably a good idea to review some design best practices that will ensure your parts will 3D print successfully.
Taking the time to consider the manufacturing method will ensure your experience with a printing service will go as smoothly as possible. While it’s not necessary to orient and place supports on the model before uploading it, as the printing technicians can take care of this for you, how you design your model will influence how much support, if any, will be needed, and this can affect the final quality of your print, especially regarding the surface quality.
- Supports: Perhaps the most important consideration is the necessity of support structures. These are temporary structures that are built alongside the actual parts to ensure they will be properly 3D printed. Supports will be needed for overhangs and bridged regions, but will also add material costs and time to the printing process. As a rule of thumb, try to design your parts with a 45-degree or less inclination angle to minimize the use of supports.
- Orientation: Another important consideration is the orientation of the part with respect to the print platform. For fused deposition modeling (FDM), having a flat and large enough surface that can be placed in contact with the print platform will promote good bed adhesion and prevent warping. For resin-based printing, the opposite is generally recommended. You should try to minimize the cross-sections along the Z-axis to prevent mid-print failures by adjusting the orientation or designing hollow parts, for example.
- Making the model manifold: You’ll also want to ensure that your model is manifold, which means it’s watertight with no holes or missing faces that could cause leaks in the interior of the shape’s volume. Basically, it needs to be geometry that could exist in the real world. If you’re experiencing issues with non-manifold pieces, it may be easier to work with the shapes available in Tinkercad to create your model.
There are more considerations that are worth keeping in mind on how to design parts for FDM, SLA and resin, or CNC.
Exporting Your Model
Tinkercad allows users to easily create 3D models in a simple UI using basic shapes to build more complex designs. There are three ways to get a 3D print from Tinkercad: by exporting a file (and then slicing and printing it), by sending it directly to a connected 3D printer, or by using a 3D printing service.
After you’re done tinkering, you can export your 3D models in 3D printing compatible formats, such as OBJ and STL. If you’ve got your own 3D printing setup, you can then import the file into your slicer of choice and work out the best settings (for FDM or resin) depending on the model, material, and machine.
This makes Tinkercad particularly useful for users who have access to 3D printers but who may not have that much experience 3D modeling. The overall process is easy for anyone looking to design and print their own files for free.
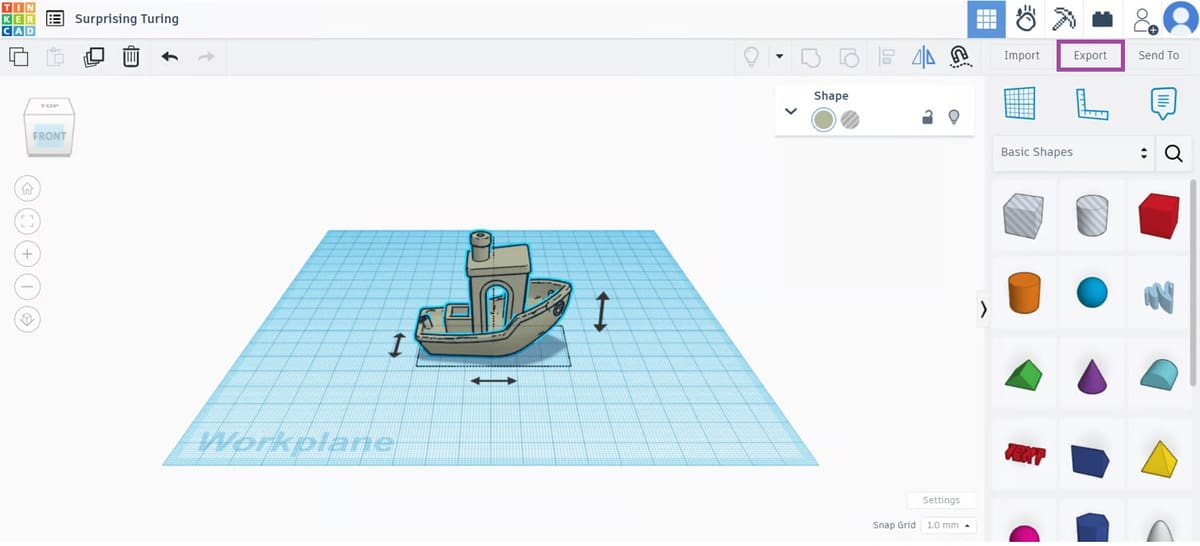
To have the file ready to import into your slicer, after you’re done designing, simply follow these steps:
- Sign in to your Tinkercad account and select a 3D project. In case you want to check the model or you need to make any changes, click on “Tinker this”, which will open the project in the 3D modeling workspace.
- Click on the “Export” button in the top right corner (see purple box in the image above), and a new window will pop up.
- By default, you should be in the “Download” tab. You can then select the file type you want to save the project as, with 3D printing options including OBJ, STL, and GLTF at time of writing.
- The file will automatically download in the format of choice, with the same name as the project.
Use an Integrated Service

As mentioned, with Tinkercad, you also have the option to send your models directly to connected 3D printers or to export them to a 3D printing service. After you’re done designing, simply follow these steps:
- Sign in to your Tinkercad account and select a 3D project.
- Enter Tinkercad’s 3D modeling workspace.
- Click on the “Export” button in the top right corner.
- Click on the “3D Print” tab to see the possible connected setups and 3D printing services available.
For connected setups, you’ll have to sign in to your account at MakerBot, Polar Cloud, or AstroPrint, among other options.
On the other hand, if you want to opt for a 3D printing service, Tinkercad has three integrated available on their platform (at time of writing):
- Treatstock: First up, Treatstock is an online marketplace for 3D printing service providers. Customers can compare prices, lead times, and ratings from different 3D printing services according to other Treatstock users. It’s available worldwide.
- Materialise: As a professional direct 3D printing service, Materialise offers a wide range of materials and technologies. From common FDM to SLS and even MJF (Multi Jet Fusion), there are over 100 different finishes, colors, and materials to choose from – including gold!
- Print a Thing: Another online marketplace of 3D printing service providers, Print a Thing is currently restricted to orders in the US and Canada. It has more limited choices when it comes to printing technologies and materials available compared to the other platforms, offering only FDM and resin-based options.
If you choose one of these services while in Tinkercad, you’ll be taken to their website to choose the 3D printing technology, materials, and finish so you can get an instant quote (including the shipping costs).
From there, all you need is to place an order and wait (patiently) for your package to arrive at your home. It’s that simple!

Craftcloud

Now, when considering different 3D printing services, Craftcloud can also be a great solution for getting affordable and quick parts. It’s an online marketplace that connects customers with 3D printing services worldwide.
This is how it works: You upload the STL or OBJ file that you exported from Tinkercad into Craftcloud’s user-friendly platform, choose from different materials and finishes, and receive instant quotes from over 100 different manufacturing partners. No need to waste time shopping around to find the best price!
One of the advantages of Craftcloud is the wide range of technologies, materials, and finishing options to choose from, providing a lot of flexibility and enabling customers to find the best solution for their projects. In addition, you can check out the Material Guide before you get started so that you can have a clear idea of what you can opt for, and you can clarify doubts at the Knowledge Base and Help Center before placing your orders.
Unlike other similar services, Craftcloud is completely free to use and you don’t even need to create an account to order parts online.
Alternatives
When it comes to 3D printing services, there are currently many options available. Here are some additional options of providers that will get your projects manufactured and shipped straight to your doorstep:
- Shapeways: A well-established digital manufacturing company, Shapeways produces parts via 3D printing but also works with more traditional manufacturing methods, such as CNC milling and injection molding.
- Xometry: As one of the largest and most popular on-demand manufacturing services, Xometry has a global partner network and a large selection of materials and manufacturing processes to choose from. Plus, their instant quote tool makes it easy to check out the pricing options for your model.
- Sculpteo: As a specialized 3D printing service provider, Sculpteo has a huge portfolio of technologies and materials, including binder jetting, SLM, and MJF processes.
- Protolabs Network by Hubs: Protolabs Network by Hubs (formerly Hubs) is another digital manufacturing service that works with various manufacturing processes from audited manufacturing partners to provide CNC machining, sheet metal fabrication, injection molding, and of course, 3D printing.
If you want to learn more about 3D printing services in general or how to choose a service that best fits your needs, here’s everything you need to know.
License: The text of "How to Get Your Tinkercad Project 3D Printed" by All3DP is licensed under a Creative Commons Attribution 4.0 International License.