UltiMaker Cura: All You Need to Know

UltiMaker Cura is the slicer of choice for many 3D printing enthusiasts. Read all about it so you can start your Cura journey!
UltiMaker Cura is a 3D slicer developed by 3D printer manufacturer UltiMaker. Its job is to “translate” 3D models into something 3D printers can understand and print. This means taking that STL, 3MF, or OBJ file you downloaded, selecting the 3D printing settings, and translating the 3D printing instructions into a language called G-code. This is at the root of digital manufacturing tools like CNC routers, plotters, and of course, 3D printers.
There are three main reasons for Cura’s popularity: Its compatibility with a long list of printers, the pace of its development, and its openness to plug-ins from the 3D printing community. On top of all that, it manages to be one of the most user-friendly slicers available and it has hundreds of settings to work with.
In this article, we’re going to give you a rundown of everything you need to know to get started with UltiMaker Cura. Let’s go!

System Requirements
Cura is available for Windows, Mac, and Linux computers. As with different programs, there are both minimum and recommended requirements; a common aspect is that it’s 64-bit – Cura isn’t compatible with 32-bit systems. The minimum technical requirements listed on the UltiMaker Cura website are:
- OS: No particular requirements
- CPU: Intel Core 2 or AMD Athlon 64
- RAM: Minimum 4 GB
- Graphics card: OpenGL 2 compatible
- Display resolution: 1024 x 768
- Disk space: 550 MB available hard disk space
- Internet: Required only for Marketplace plug-ins, updates, and to use your UltiMaker account
These requirements are relatively low by contemporary standards. Cura has a very light footprint, especially regarding graphics, because 3D modeling files are light to process. UltiMaker Cura only tends to crash with very large 3D models, like big articulated prints, or models with internal geometry errors.
For the best possible performance, the recommended requirements are:
- OS: Latest version
- CPU: Intel Core i3 or AMD Athlon 64
- RAM: Minimum 8 GB
- Graphics card: OpenGL 4.1 compatible
- Display resolution: 1920 x 1080
- Disk space: 600 MB available hard disk space
Like most 3D software out there, Cura is more comfortable to use with a 3-button mouse. That said, you should be able to get by with a trackpad in a pinch.
UI & Layout
UltiMaker Cura offers many tools for 3D printer operators and is still easy to approach. How? By breaking down the 3D printing prep tools into three main workspaces, each with a specific function. Some of these tools will travel from one workspace to another, while others are specific to a particular environment.
Before we take a look at the complete workflow from 3D model to 3D print, let’s take a closer look at Cura’s interface and layout.
Main Space & Prepare Stage
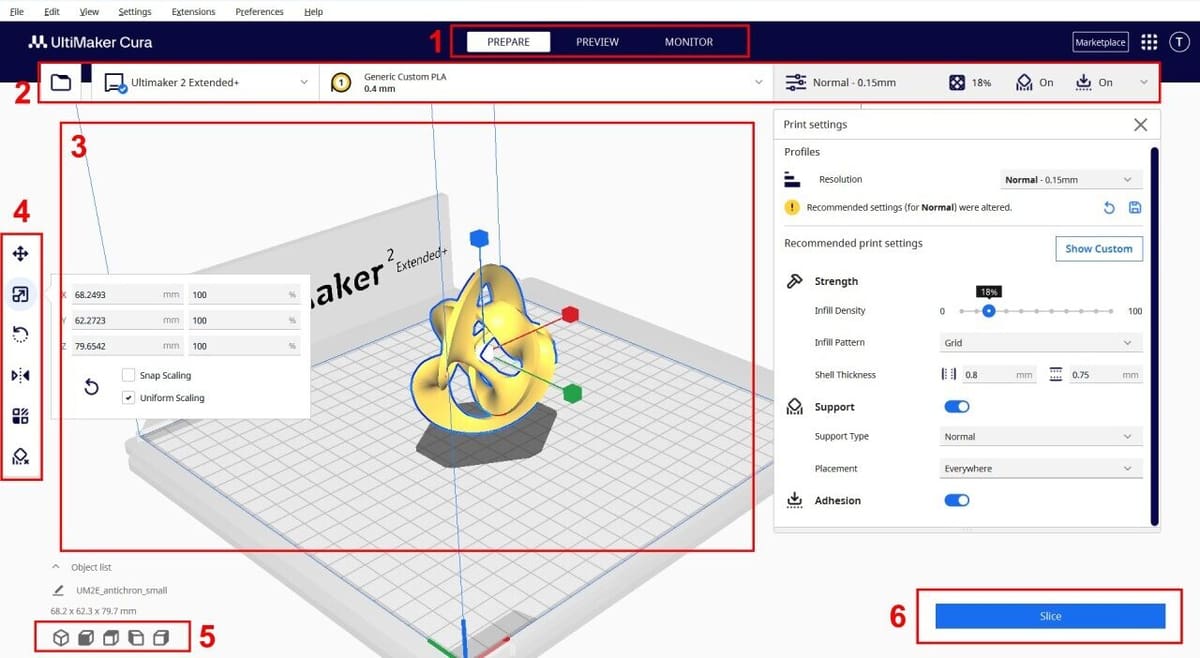
The Main Space is Cura’s default window. You can easly find the Prepare, Preview, and Monitor stages (1) of your 3D printing workflow. By default, the Prepare stage will open on startup.
Next is the stages menu (2). From left to right, this is where you will load your 3D models, select your printer model, the material configuration, and the print settings from their drop-down menu. When it comes to selecting a 3D printer model, Cura comes with default profiles from the most popular machines. But if your 3D printer isn’t included, adding a profile is easy!
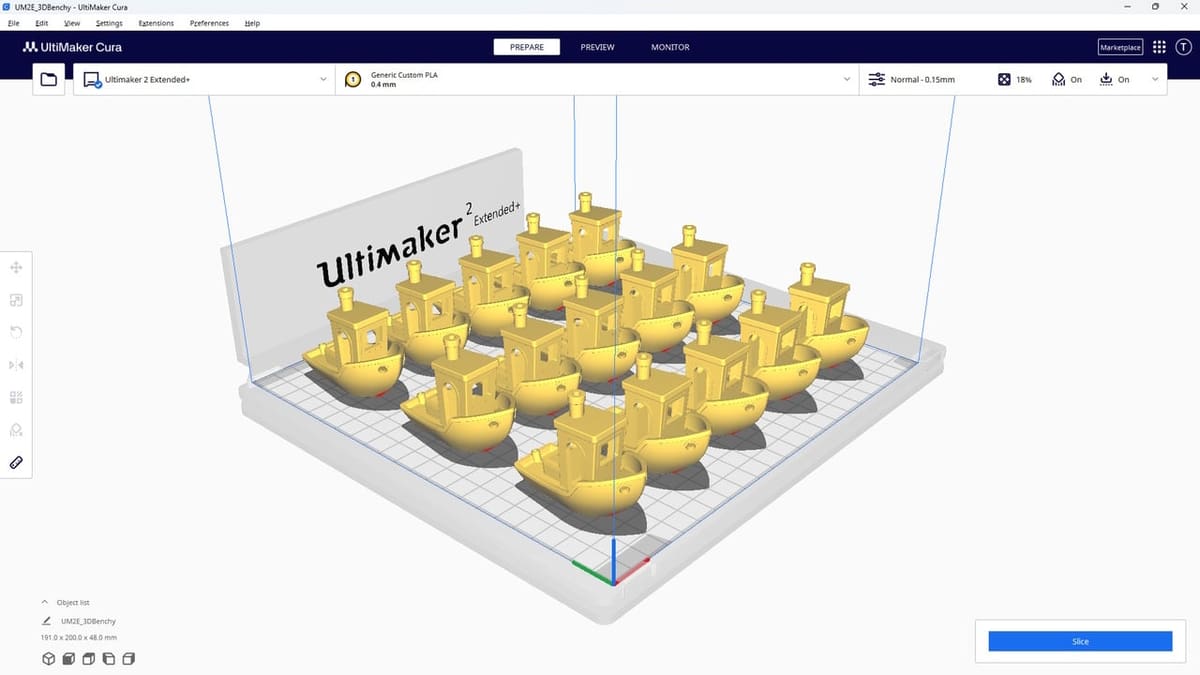
Taking up most of the screen, the printable area (3) will change to reflect the size and shape of the 3D printer you selected and display imported 3D models. The manipulation toolbar (4) will let you rotate, scale, mirror, set specific settings per part, and block supports for your models before printing.
View presets (5) let you travel from one view to another with one click, which is very convenient if you don’t have a 3-button mouse or you’re slicing a very complex or multi-part model.
Finally, with all the desired settings selected, the Slice button (6) preps your 3D model and moves your workflow on to the Preview stage, which will look familiar: It shares most of its features with the Prepare Stage.
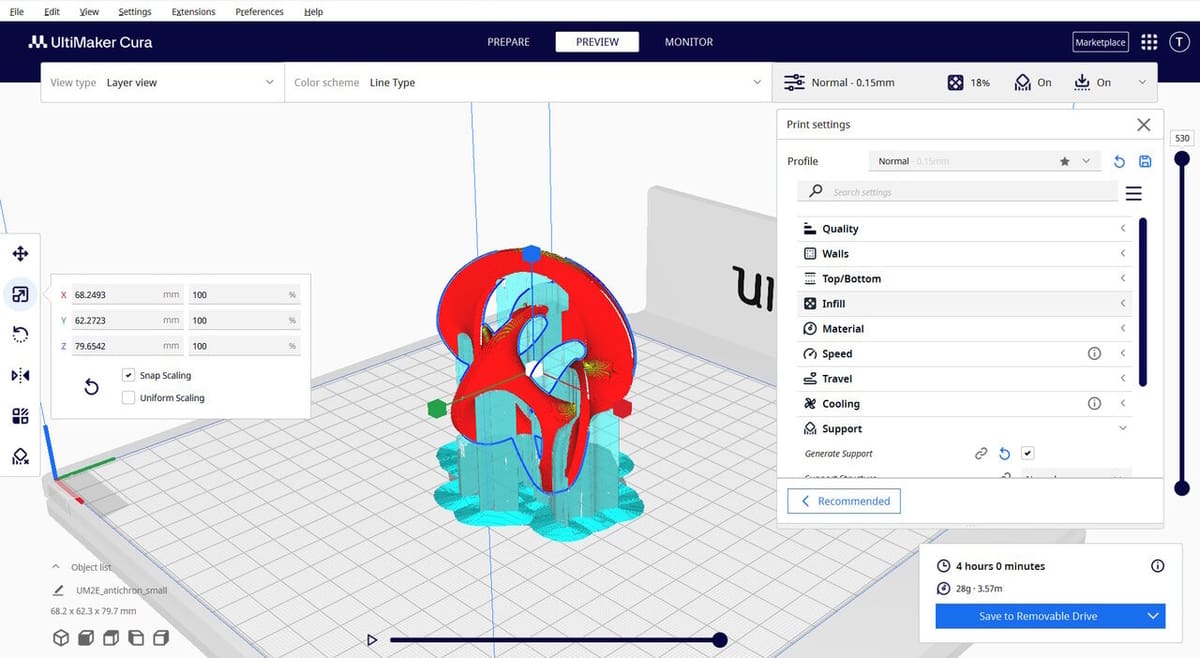
Preview Stage
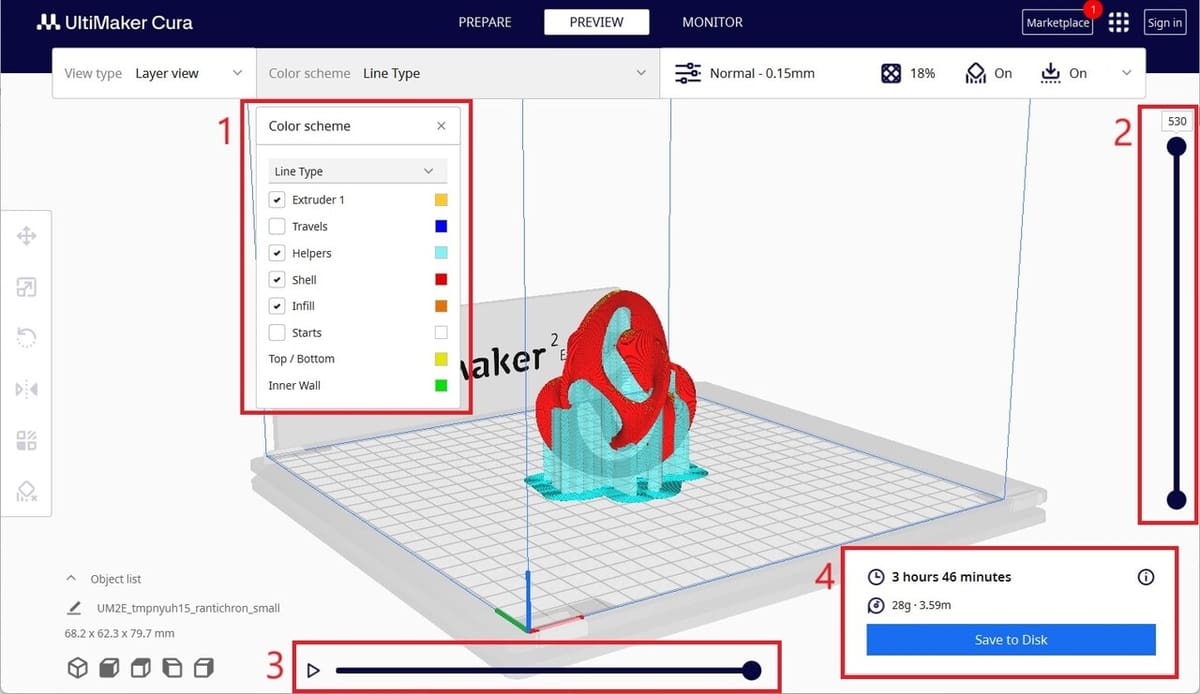
The Preview stage shows how your model will print after you’ve clicked the Slice button. The model might look different, as this screen will feature your print plus all the helper structures needed (more on them later) in two different colors, as well as the settings you want to see (1). Know that this is completely normal!
Many of the tools from the Prepare stage will be available here as well, but you will also notice two new features: A Layer Slider (2) to check from the first to the last layer, and a Path Slider (3) to follow along the nozzle as it prints each layer.
The Slice button will turn into a Print or Save button (4). Depending on your setup, it will either send your model’s G-code directly to your printer or save it to a flash drive or SD card to plug into your printer. The space above this button also displays an estimated print time of your model, and an estimate of how much plastic it’s using.
Monitor Stage
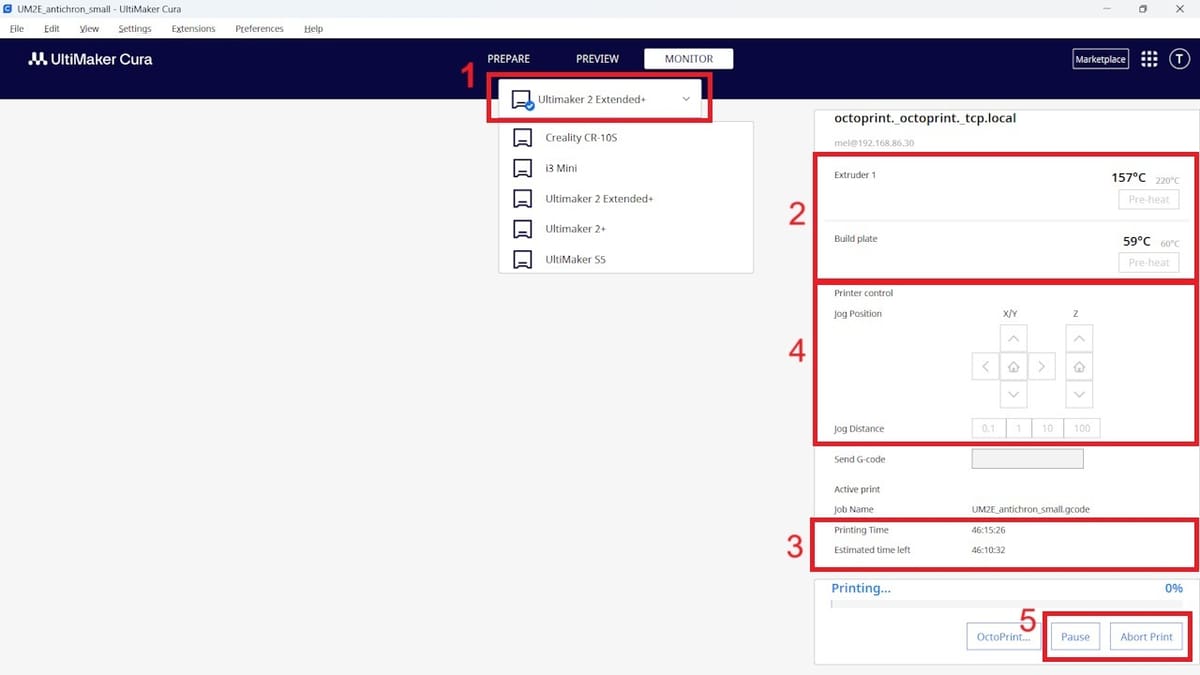
The Monitor stage shows you the state of your printer and your print, with a minimalistic interface.
The connected printer button (1) lets you pick which printer to monitor, in case you’ve got a multi-printer setup. On this same screen, you can find the temperature information (2) for the printhead and the print bed, as well as the total print time and estimated time remaining (3), among other details.
When it’s not actively printing, the printer movement controls (4) let you home or jog your printers print bed and printhead as needed, as well as change the jogging distance.
Last but not least, the Pause and Abort Print buttons (5) let you – you guessed it – pause or cancel the print as needed.
Features & Functions
Now that we’ve taken a glance at Cura’s interface, let’s take a closer look at some options in the Print Settings that are good to know. These are the main parameters in the Stage Menu you should be familiar with to print successfully: the Quality Profile, the Helpers settings, and the Marketplace.
Quality Profiles
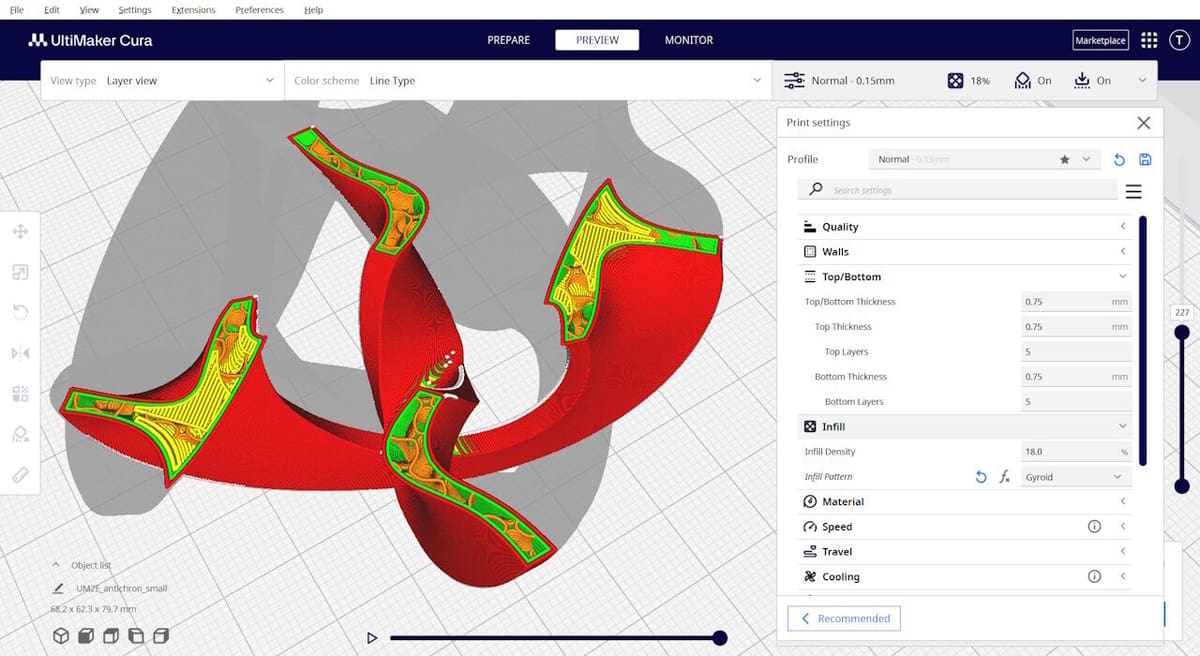
Available both in the Prepare and Preview stages, the Quality Profiles include settings users can tweak for each print. These settings can also change depending on the printing quality profile selected (from “Super Quality” to “Low Quality”). You can also manage these profiles or save new ones depending on your printing needs!
It’s worth noting that if you’ve sliced the model and are in the Preview workspace, tweaking any of the settings will mean you have to re-slice the model.
From the vast list of tweaks available, the most commonly changed settings include:
- Layer Height: This setting controls the thickness of each layer (or slice, hence “slicer”) of your print. Most contemporary printers default to a layer of 0.1 mm (detailed) or 0.2 mm (general).
- Infill Density: This setting controls how much of the inner structure of your print will be plastic, and how much of it will be thin air! Most slicers default around 15% to 20% of infill, unless you need a particularly sturdy print.
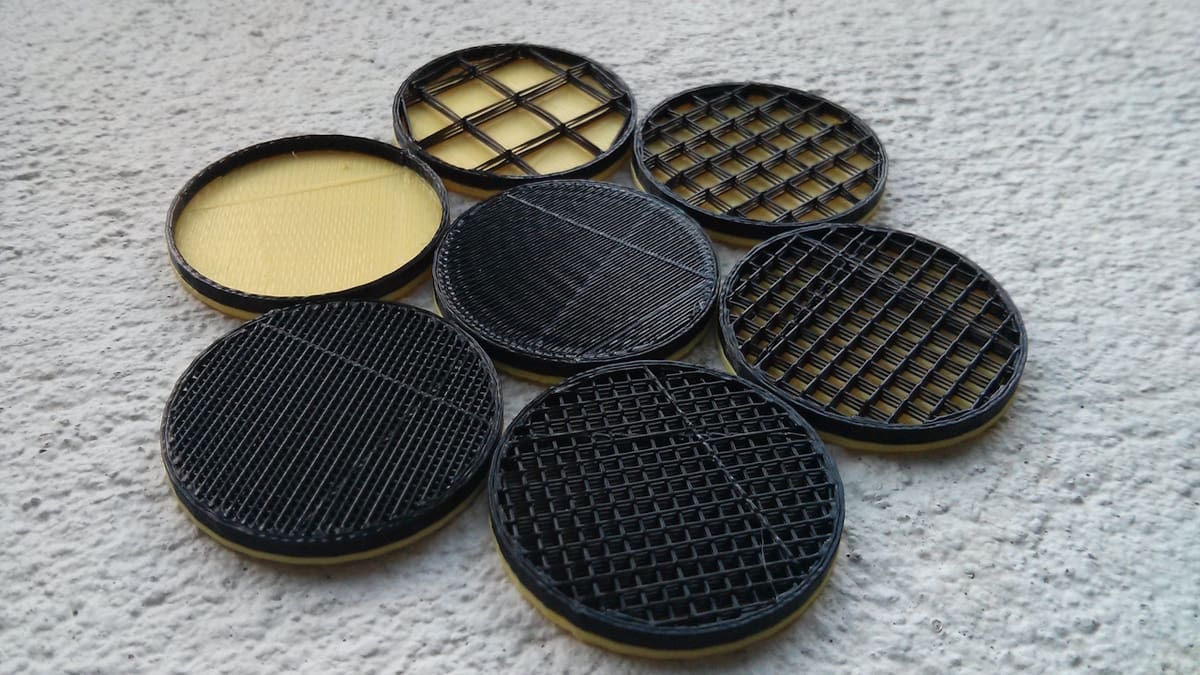
- Infill Pattern: Just like you change the percentage or density of the infill, you can also change its pattern. Depending on intended use, you might want to choose something other than the default “Grid”.
- Shells: This setting controls how many solid layers of plastic will be make up the exterior of your print. A shell thickness of 0.8 mm on the sides, top, and bottom is the generally accepted default.
Print Helpers
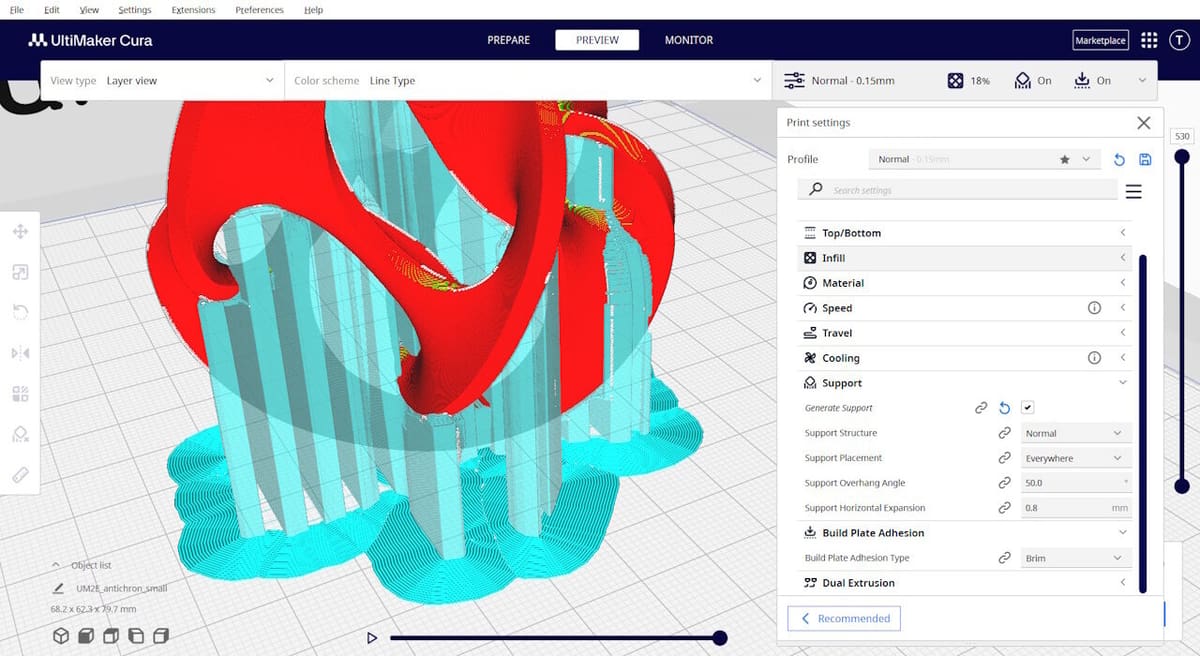
Next, let’s look at helpers: These structures are part of your print but not part of the model itself – they’re only here to make sure the print goes smoothly. Most commonly, you’ll be working with support helpers and adhesion helpers.
- Supports: These are here to – you guessed it – support your print at angles where it can’t sustain itself. Normal supports placed everywhere – not just where they touch the build plate – are a good default option. Cura offers plenty of options to explore, from the distance between the support and your print to their shape (do you want tree supports or maybe design your own?).
- Adhesion assistants: These make sure your print stays put throughout the 3D printing process. While a skirt helper is the default in most slicers, contemporary build plates have come a long way and adhesion helpers may not be as necessary as they once were. That said, there are some particularly finnicky models or materials that benefit from enabling them. That’s when a brim or a raft helper may be warranted, making the difference between an impossible print and a successful one.
When it comes to helpers, experiment is the key: Try them out with small prints and if one option doesn’t work out, try another to see if it sticks – figuratively and literally!
UltiMaker Marketplace
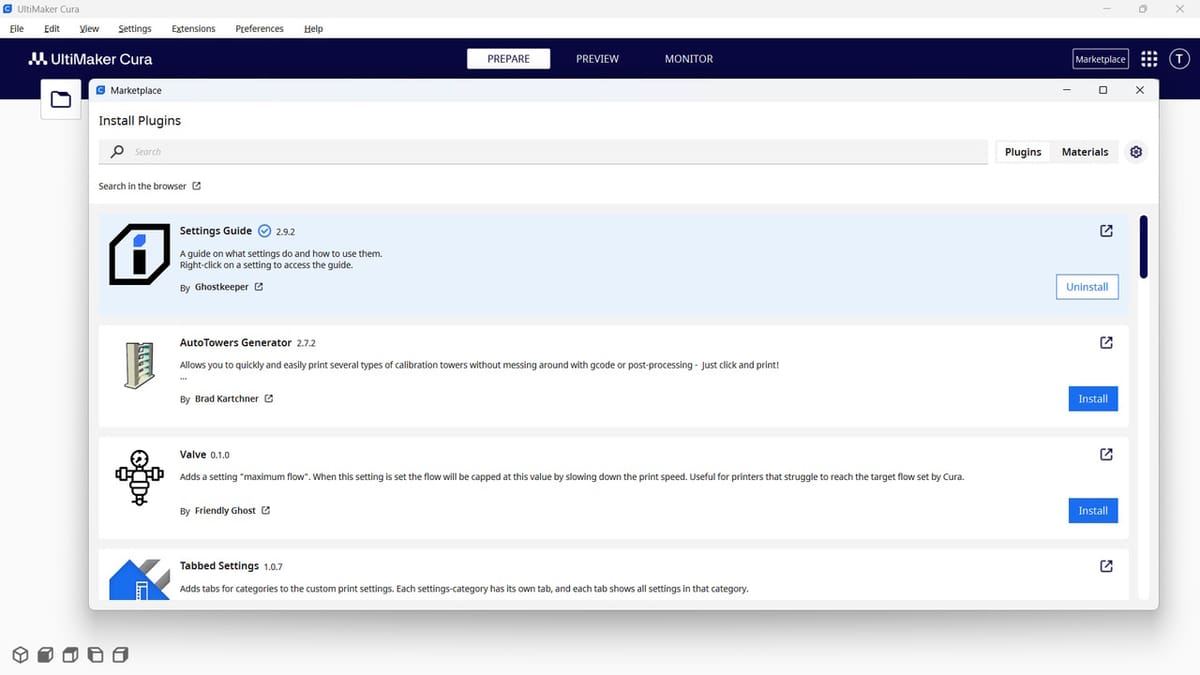
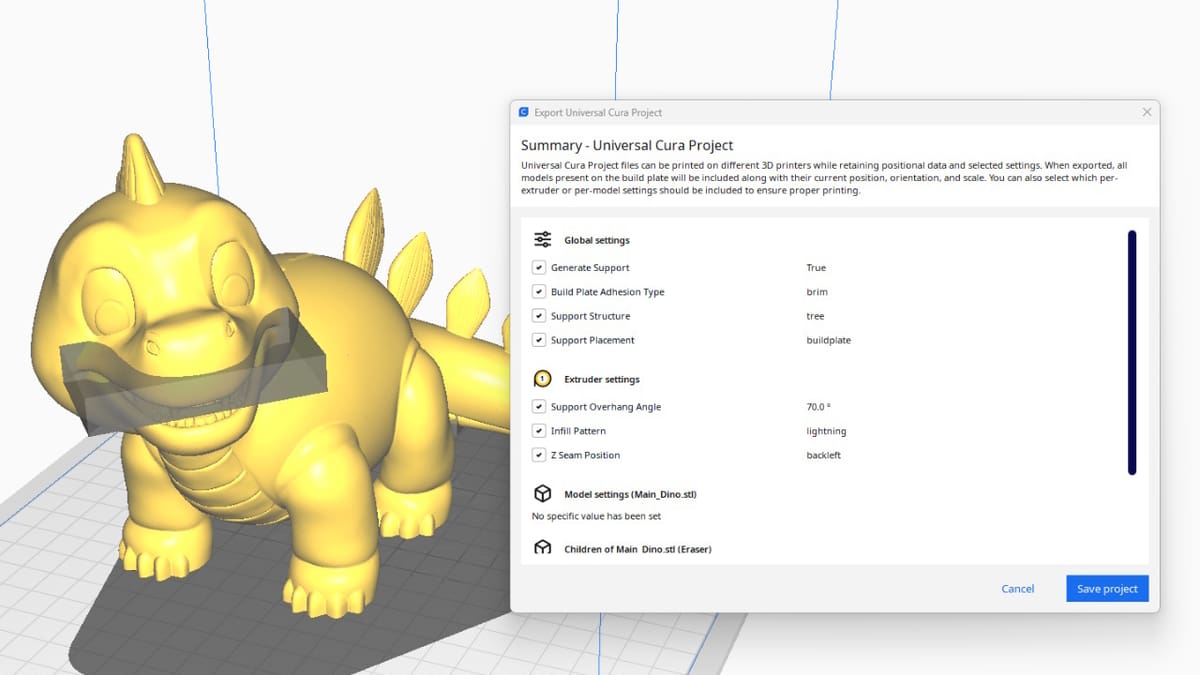
UltiMaker Cura’s Marketplace is where developers share plug-ins that complement Cura or add completely new tools. Click on the Marketplace button at the top right of the Main Space and a new window will pop up, with a selection of plug-ins for you to check or search for. You can also install plug-ins from the Cura Marketplace website, if you’re logged in with an UltiMaker account both on the website and in your slicer.
Some popular plug-ins to get started with are:
- Barbarian Units: Switch from Metric to Imperial units in a few clicks! 3D modelers often use centimeters and millimeters; if you’re not familiar with these units yet, this plug-in will help the transition.
- OctoPrint Connection: Older 3D printers often come without networking features. No problem! A Raspberry Pi SBC running OctoPrint connected to your 3D printer, along with this plug-in, will give your all the networking features you might want. Our guide to setting up OctoPrint will walk you through the process.
- Measure Tool: Most slicers only let you measure a whole object – Cura included. For all your other measuring needs, there’s the Measure Tools plug-in. It’s especially useful when trying to resize wearable 3D prints to fit.
- Mesh Tools: Downloaded 3D models can have flaws that make them impossible to print. Mesh Tools is a first-aid kit to fix these problems without a 3D modeling program.
Once you’ve picked a plug-in, Cura will install it and prompt you to restart the program. Your plug-in will then be ready for duty.
Experimental Settings
In addition to all the confirmed settings you can tweak to optimize your 3D prints, Cura comes with Experimental Settings that will give you an edge – or at the very least, make your 3D printing life very interesting. There are plenty to choose from, but here are a few that will give you instant results below:
- Fuzzy Skin: Unless they’re modeled that way, most 3D prints surfaces are smooth. It’s great for mechanical parts, not so much if you’re printing furry creatures or rock-like models. Fuzzy Skin unlocks these looks for your 3D prints without touching up models in a sculpting program.
- Adaptive Layers: Slicers usually let you pick layer height settings for a whole print, making you choose between print speed and detail. Cura’s got an alternative. Adaptive Layers will let you focus the highest resolution on the parts of the model that need it, while speeding through areas that don’t need much detail at higher layer heights.
- Coasting: If you’re dealing with stringing, Cura’s Coasting settings can come in handy. Enabling this feature will stop the extrusion of plastic a little sooner than usual when retracting, before hopping from one print area to another. This means less plastic will be pushing its way out where it shouldn’t, saving the aesthetics of your prints.
User Experience
Cura’s workflow is as straightforward as it gets. After opening the program, it’s time to load the file(s) from the Prepare Stage.
From the stages menu, the printer has to be selected. If you only have the one, it should be selected by default; otherwise, it needs to be added either from the default profiles available or manually. Then, it’s time to work on the Quality Profile settings. This is where the print’s resolution, infill percentage and pattern, and shells, among many other options, are set. Helpers for supports and adhesion can be toggled as needed.
With the settings confirmed, it’s time to hit the “Slice” button and move on to the Preview Stage. In addition to viewing the print and helpers, an estimate of the print time and filament usage can be found. Unless changes are necessary, the G-code can then be saved (to the desktop or an external memory source) or it can be sent to the printer if there’s such a setup.
After receiving the G-code instructions, the printer will preheat and get to work; this is where the Monitor Stage comes into play. If the printer is connected to the computer or available over the local network (for example through OctoPrint), it can be controlled and followed as needed.
And that’s it.
Company & Community Support

If you need help with this any difficulties in UltiMaker Cura you might have, don’t worry: You can find support in many places online!
UltiMaker’s official Cura support section covers the questions most users ask and should be your first stop on your 3D model slicing journey.
Next, UltiMaker’s Learn section will guide you through Cura’s more advanced workflows, from opening files directly from Thingiverse to sharing complete projects ready to print instead of just 3D models. Just be sure to click on the Cura tag for Cura-specific articles.
Another suggestion is the UltiMaker subreddit. It’s a great place to look for help or tips for better prints. With its 3,900 members, this community is dedicated not only to Cura but also to the UltiMaker lines of 3D printers, and it sits in the top 11% of Reddit’s communities.
At All3DP, we regularly feature UltiMaker Cura articles because of how relevant it is to the 3D printing hobbyist community. Make sure to explore our treasure trove of articles for tutorials and tips as well!
Use Cases & Applications
If you’ve talked with a 3D printing enthusiast or glanced around at some of the best slicers, you’ve probably seen Cura pop up time and time again. Why? Because it’s a great example of the “low-floor, high-ceiling” philosophy of makers.
It’s low-floor, because Cura has a very short and smooth learning curve to get started with, without needing detailed instructions. Set up a printer from a pre-existing 3D printer profiled in Cura’s Beginner mode profile, load a 3D model, hit Slice, and print. This makes Cura very approachable to new 3D printer users, and if you are the kind of person who likes to read the manual, there’s plenty of reliable documentation from the development team to help you get your bearings.
It’s high-ceiling, because Cura gives users control over every little feature depending on how comfortable they are in experimenting. Use the drop-down menu for Intermediate or Expert modes or pick and choose the settings you want to be able to control. You’ll be able to level up your 3D printing game at your own pace and experiment with the new features that are continually added to Cura – like the Scarf Seam controls to make your prints look better.
Over 400 settings to tune and plenty of customizability can look intimidating to beginners, but don’t let this fact fool you. UltiMaker Cura’s latest version (5.9 at time of writing) currently boasts 873,000 downloads on GitHub. This is a clear indicator that Cura is a well-loved staple in any toolbox – whether on Windows, Mac, or Linux – from 3D printing hobbyists to professional digital manufacturers.
Alternatives
Are you still having doubts about picking up Cura, or maybe you’ve decided it’s just not for you? In that case, here’s a list of alternatives to consider.
Cura Lulzbot Edition
UltiMaker Cura is an open-source program, meaning it can be tweaked, customized and expanded by anybody. That’s why Lulzbot, a leading 3D printer manufacturer in the US, built their own flavor of Cura! It includes profiles for their own 3D printers and materials, as well as profiles for popular brands and models and printers.
Cura Lulzbot Edition excels at managing printers directly connected over USB, something UltiMaker Cura sometimes falls short on, given that it focuses on managing printers over networks via the UltiMaker Digital Factory service or OctoPrint. Cura LE is perfect if you want the ease of use of Cura and the simplicity of a direct USB connection.
Orca Slicer
A relative newcomer on the 3D slicer scene compared to Cura, Orca Slicer is an open-source slicer project with a high speed development pace. Orca Slicer is built by a community of users at a very rapid development pace, and it’s based on Bambu Studio. Power users who want Bambu Studio features without needing a Bambu Labs printer should check it out!

Kiri:Moto
If you don’t need any bells and whistles for your slicer and don’t even want to install one on your computer, consider Kiri:Moto! This free web-based slicer features popular 3D printers profiles and will process your files from your favorite browser, on your own computer.
Kiri:Moto’s code lives online; all you have to do is visit the website. All your files then get processed on your own device, through your web browser. This opens up any mobile device – like a tablet or a smartphone – to slicing 3D printable files without needing to install anything.
License: The text of "UltiMaker Cura: All You Need to Know" by All3DP is licensed under a Creative Commons Attribution 4.0 International License.