
15 Most Useful Raspberry Pi Projects

Got a Raspberry Pi but don't know what to do with it? How about a useful project? Check out our top picks for Raspberry Pi projects.
The Raspberry Pi is a tiny, affordable single-board computer first developed by the Raspberry Pi Foundation to help teach computer science basics in educational institutions and disadvantaged countries.
Due to its small size, affordable price, and adaptability, the Raspberry Pi has a devoted following among hobbyists, academics, and professionals. The different models address a variety of needs, with the Pico and its variants working more as microcontrollers, the 400 coming in keyboard form factor, and the 4 replacing a desktop computer (depending on use), just to name a few.
The Raspberry Pi boards’ capacity to communicate with the physical world through input and output devices is one of the fundamental characteristics that contribute to their adaptability. They can do many useful things, like read data from sensors, operate motors and other actuators, and even communicate with other devices via infrared and NFC protocols. They’re excellent for creating everything from robots to running OctoPrint.
Considering everything that can be done with a Pi, it’s not uncommon to be overwhelmed, given how many projects are out there. We’ve combed through the mountain of online literature and found 15 useful projects that we deemed worthy of curation. Check them out below and enjoy!
Digital Projects
These first projects may not need much in terms of hardware (other than a Raspberry Pi) because all of the magic is happening behind the screen. Get ready to configure…
Internet Radio and Streaming Station
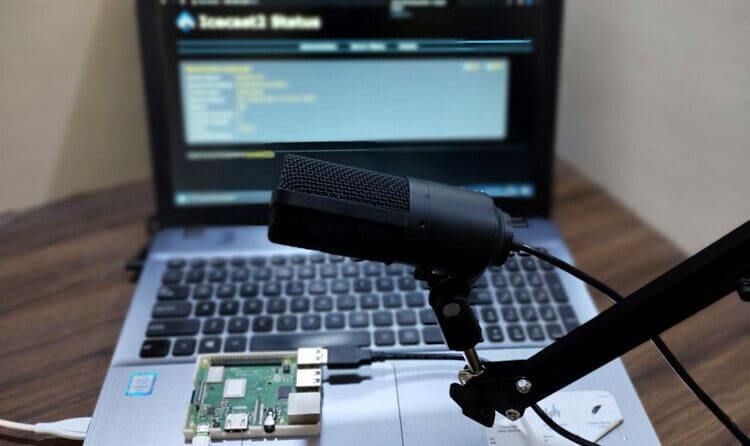
If you’re looking to get into streaming, a Raspberry Pi can help! Using DarkIce and Icecast, you’ll be able to put together your own internet radio with this beginner-friendly project. DarkIce records audio from an audio interface, and IceCast was developed to stream radio broadcasts on open-source software.
To get started, all you’ll have to do is download DarkIce and IceCast and upload them to the Pi. You can follow along with a helpful YouTube tutorial from the maker to see the configuration process. Once set up and paired with a high-quality USB microphone, you’ll be ready to make your voice heard! If you have a 3D printer on hand, consider printing a case to keep your board protected.
- Designer: Ashish Choudhary
- Project page: Circuit Digest
- Core components: Raspberry Pi, USB microphone
- Difficulty: Beginner
Python WebServer with Flask
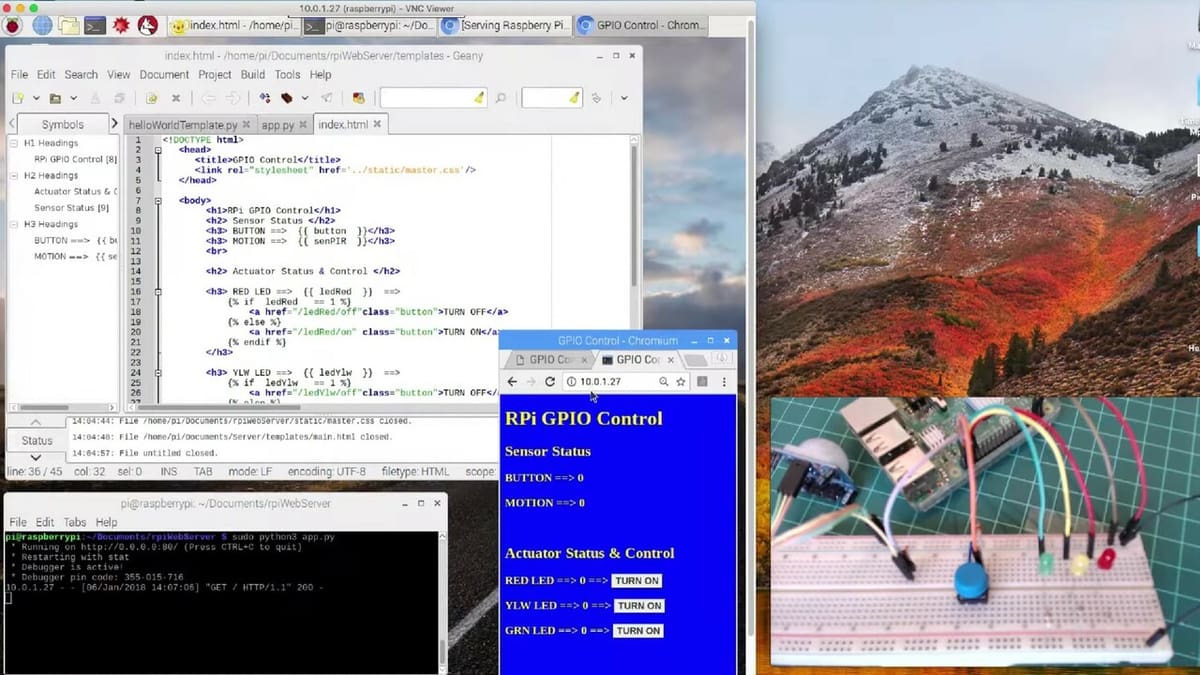
Are you tired of your clunky old desktop computer taking up space in your home office? Are you ready to upgrade to something more sleek and modern? Well, have you considered running a web server on a Raspberry Pi? Not only is it environmentally friendly (since it uses less energy than a desktop computer), but it’s also financially responsible since it’s much cheaper. Plus, it’s small enough to fit in the palm of your hand, so you can take it with you wherever you go.
Imagine the possibilities: you could host your own website from the comfort of your local coffee shop! Or, better yet, impress your friends by setting up a web server in your backyard and hosting a BBQ-themed website for your next cookout. The possibilities are endless with a Raspberry Pi web server. If you need to update your website on the go, just pull out your trusty Raspberry Pi and make the necessary changes.
And if you’re worried about security, don’t be – the Raspberry Pi is equipped with top-of-the-line firewall protection to keep your website safe from pesky hackers.
Not much hardware is necessary, and the creator of the project opted for Flask due to its ease of use and relevant functionality. With a YouTube video to complement the tutorial, the Python script is included. You only need to copy it if you’re not feeling up to creating your own. While the tutorial helps set up the web server, it’s up to you to take it as far as you want!
- Designer: MJRoBot (Marcelo Rovai)
- Project pages: Hackster, GitHub
- Core components: Raspberry Pi 3B, PIR sensor
- Difficulty: Beginner
Digital Audio Book Shelf
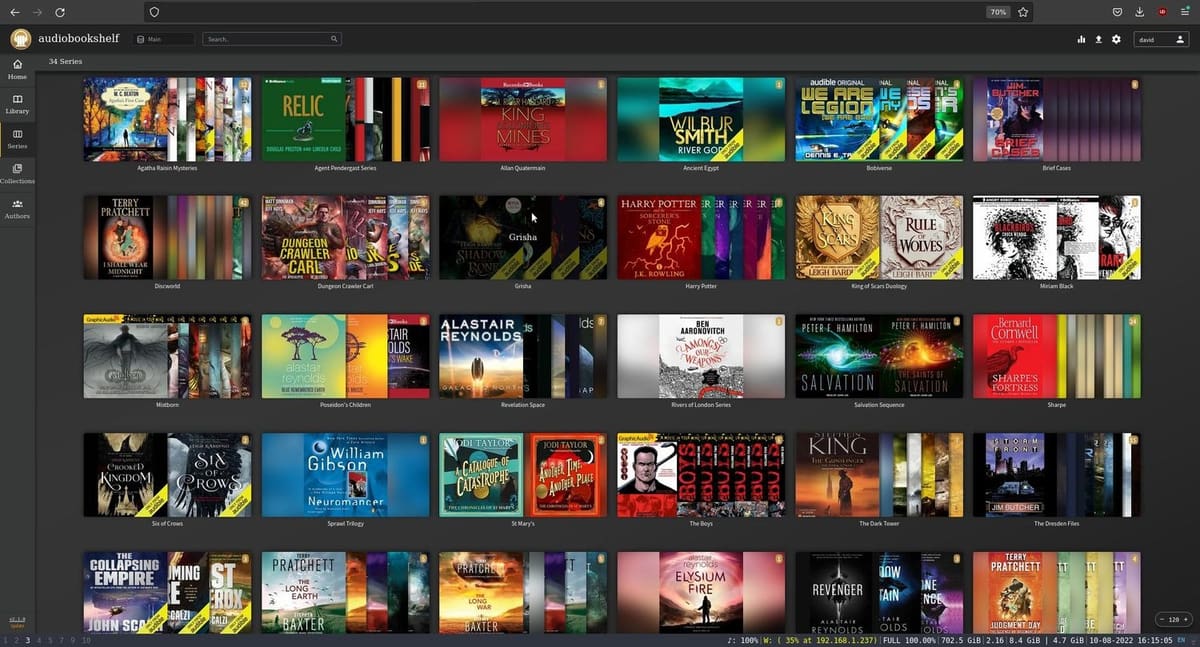
In this fun beginner-friendly project, you’ll use a Raspberry Pi to set up an audiobook streamer library that you can access anytime, anywhere – perfect for lovers of audiobooks and even podcasts. The creator provides instructions to set up the library so you can access it while you’re traveling as well!
To create this digital bookshelf, you’ll just need a static IP address for your Raspberry Pi and to connect to it with an SSH connection. Everything you need for the Audiobookshelf server can be found on GitHub, along with a step-by-step guide posted by the creator. Once you’ve got it set up, you’ll be able to stream MP3 files, M4A, and M4B files – the literary world is your oyster! Don’t worry, Audiobookshelf will “remember” where you’ve left off if you need a break.
- Designer: David Rutland
- Project pages: Make Use Of, GitHub
- Core components: Raspberry Pi
- Difficulty: Beginner
Email Server
Now’s your chance to set up your own email server, with the magic of a Raspberry Pi. Having your own email server allows you to have your own domain name and manage spam emails on your own terms. The creator has noted that the setup is relatively easy, but the configuration is more complex, so it’s perhaps best suited to those with some Pi experience.
The core of the project uses Citadel software, which is an open-source program to manage emails, groupware, calendars, and more. You’ll also need a DNS (the creator recommends Cloudflare) plus SpamAssassin to help manage unwanted emails.
As a last step, ClamAV can be used to scan emails for viruses and prevent your Pi from getting infected. Once the configuration is complete, you’re set to be the master of your own email domain!
- Designer: Gus
- Project page: Pi My Life Up
- Core components: Raspberry Pi, MicroSD card, optional USB keyboard and mouse
- Difficulty: Intermediate
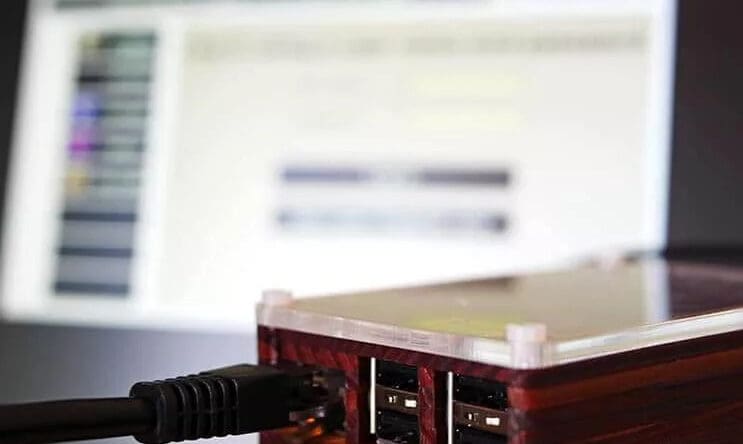
PiVPN
Hosting a virtual private network (VPN) server on a Raspberry Pi has several benefits. It allows you to securely access your home network from anywhere in the world, which can be useful if you frequently travel and need to connect to your home network or if you want to access resources on your home network from a public Wi-Fi hotspot.
When you use a VPN, your internet traffic is encrypted and routed through the VPN server, which can help prevent others from intercepting or spying on your online activity. By hosting your own VPN server on a Raspberry Pi, you have full control over your VPN and can ensure your data is secure and private.
There are three methods on GitHub to set things up. While the PiVPN is recommended to run on Raspberry Pi OS Lite, it’s claimed to also work with Debian and Ubuntu. While getting started is budget-friendly, it may take some effort to fully get up and running. That said, there’s a community on both GitHub and Reddit to see you through any issues.
Smart Home Light
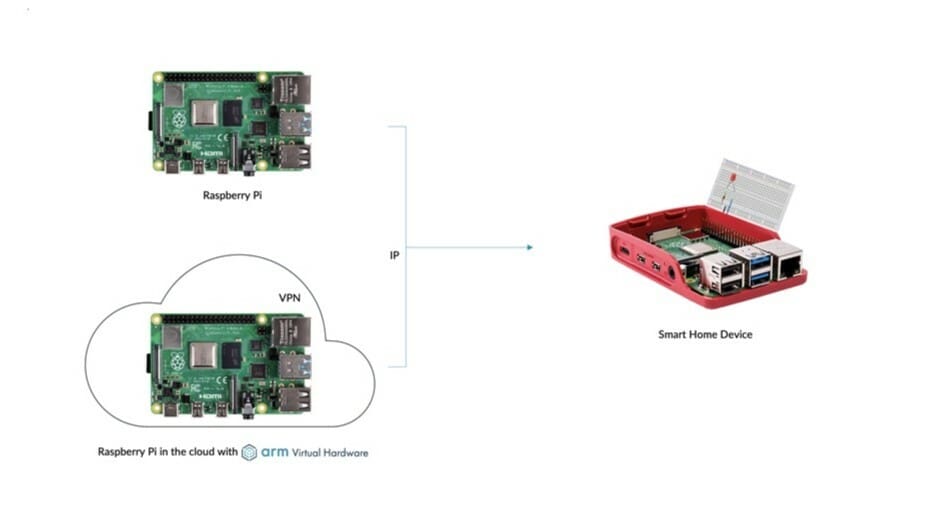
A Raspberry Pi-driven smart home hub is a device that uses a Raspberry Pi board to control and automate various smart home devices. It allows you to manage and monitor your smart home infrastructure from a single, centralized location. Using this bad boy, you can easily control and automate lights, appliances, thermostats, security systems, and more. You can even set up custom automations and routines to make your home more energy efficient and comfortable.
In this instance, working with Matter and, optionally, Arm Virtual Hardware, you can set up a lightning device running with either a physical controller or an AVH Raspberry Pi. In either case, the lines of code are presented for the different steps, yet a bit of know-how will help ensure that doubts are easily overcome.
- Designer: Sandeep Mistry
- Project page: Arm Community
- Core components: Raspberry Pi 4, MicroSD card (16 GB or more), USB-C power supply
- Difficulty: Advanced
Build Projects
This next set of projects will involve plenty of both digital configuration and hardware tinkering – perfect to unleash all your creativity!
NeoPixel Ring Lamp
The Ruiz brothers did the creator community a huge favor by releasing this tutorial detailing the assembly of a NeoPixel lamp controlled by a Raspberry Pi. For those unfamiliar with NeoPixel, it’s an affordable product line of components offered by Adafruit that lights up any project with their assortment of blinking, glowing, and spinning LED arrays and boards.
With some of these component offerings and any Raspberry Pi board (from the Pico on up), you’ll have this beginner-friendly project assembled in no time.
You’ll need to 3D print the frame, and the STL files are included so you can edit them if you want to go for a different order of the rings. Adding some light and style at the same time? This project can’t be beat.
Did we mention it defies gravity?
- Designer: The Ruiz Brothers
- Project page: Adafruit
- Core components: Raspberry Pi Pico, various NeoPixel rings (different sizes)
- Difficulty: Beginner
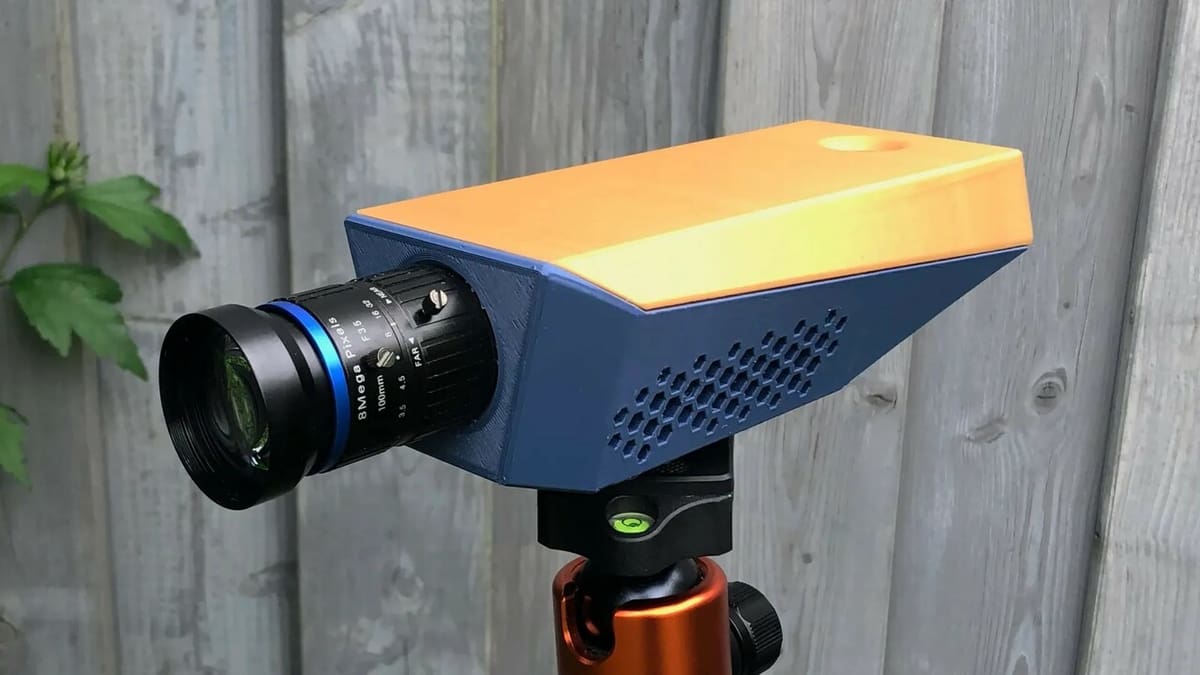
Home Air Quality Monitor
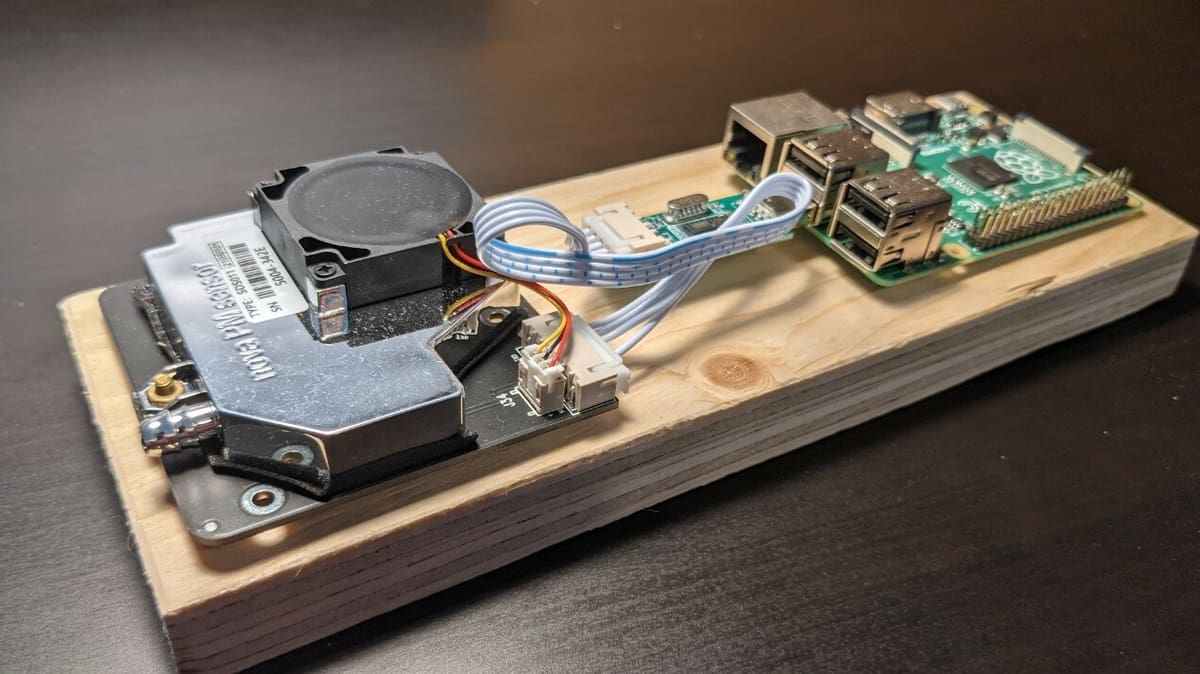
“Light scattering” is a technique in which an air sample is illuminated using a small laser diode while the scattered light is measured using a small photosensor.
In this project, instead of illuminating, the air is measured, and this value is analyzed on-board, giving you the amount of 2.5- and 10-micrometer-sized particulates within the room. When it comes to indoor air quality, it’s important to do your best to reduce the number of large particulates. Research has shown that they can have adverse effects on your respiratory system and overall health. So, while a fun undertaking, this project can also potentially save your life in the long run.
The code can be cloned from GitHub, and while it may appear complex, the steps are straightforward enough that they should be easy to replicate. Among the information you’ll be able to visualize, a graph will show PM10 and PM2.5. These refer to particulate matter (inhalable particles) with a diameter of 10 micrometers or less and 2.5 micrometers or less, both of which can pose a health risk, so it’s worth knowing what quantity you’re exposed to.
- Designer: Ryder Damen
- Project pages: Tom’s Hardware, GitHub
- Core components: Raspberry Pi 3 or 4, SDS011 air quality sensor
- Difficulty: Intermediate
Solar Powered Weather Station
Deciding “weather” or not to use your Raspberry Pi in an awesome solar-powered weather station project? This should be an easy one to say yes to! With this project, you’ll be able to keep track of the temperature, pressure, humidity, and more no matter your location. With the addition of solar panels and a rechargeable lithium-ion battery, the device should be self-sufficient!
In the assembly video, the creator walks you through the steps in a straightforward manner with clear audio and is responsive to user queries. The firmware used is MicroPython, but all of the necessary code is provided anyway if you are not familiar. Once assembled, all of the hardware gets loaded in a protective case and will send updates on the sensor data to the server every three seconds.
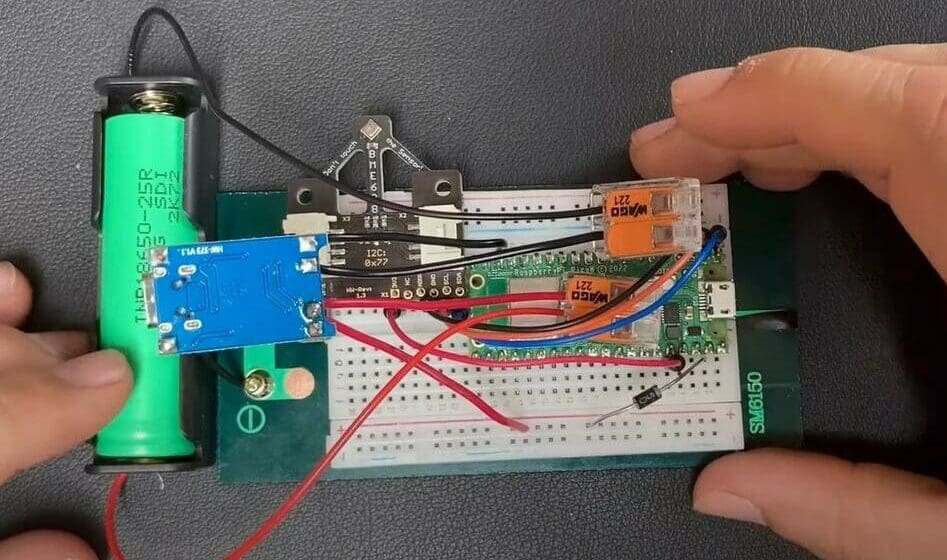
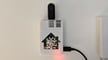
Garage Door Sensor
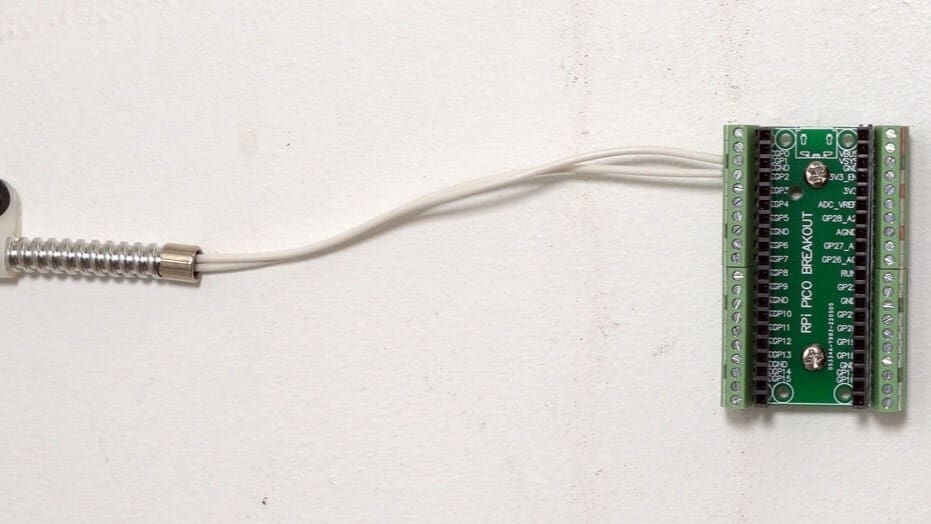
The goal of this project is simple: The creator wanted to build a device to tell him when the garage door was open and ultimately integrate it with Home Assistant. He did just that and, in the process, walked readers through taking on the same project themselves.
It’s amazing to see such a manageable project take aspiring hobbyists by the hand and lead them into the world of MQTT. This little messaging protocol is prevalent in the IoT world, and learning how to implement it early on will prevent wasted time spent debugging various devices.
Plus, by the end of this tutorial, you’ll have a functional garage door sensor and the knowledge to tackle another more advanced project down the road. With a YouTube video and the documentation on GitHub, there’s enough information to add this setup to your home system.
- Designer: geerlingguy
- Project page: GitHub
- Core components: Raspberry Pi Pico W, breakout board module, sensor
- Difficulty: Intermediate
The Internet Monitor
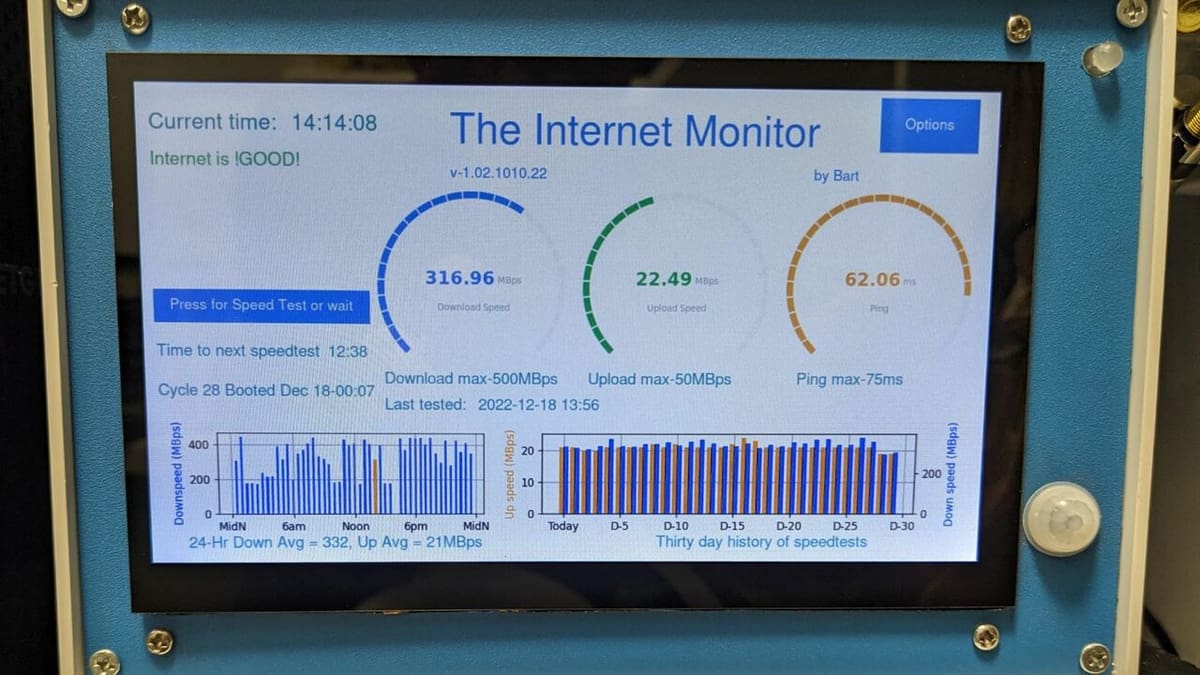
When deciding which projects to undertake, we should always ask ourselves a few questions: What value does the end result bring? Knowledge? A one-off item banished to the junk drawer? Or a fully extensible project that can be updated and improved for years to come? While the junk drawer seems fun (one man’s trash is another man’s treasure, after all) the preferred outcome is something we can interface into future or existing creations to increase functionality and overall value.
Over at Instructables, tinkerer bartsamnick published a guide on how to build a device to monitor the various metrics that can define an internet connection. These include download speed, ping speed, router boot time, and more. On top of the metrics, bartsamnick tackled the problem of data storage using a service called Ubidots, which allows you to store your data in the cloud for future analysis.
With plenty of photos and clear diagrams of the hardware setup, this somewhat challenging project should be achievable. It’s worth noting that the creator warns that the Pi needs to be rebooted every day to avoid program failure due to the buildup of threads.
- Designer: bartsamnick
- Project page: Instructables, GitHub
- Core components: Raspberry Pi 4, Raspberry Pi Touchscreen, case
- Difficulty: Intermediate
RetroPie
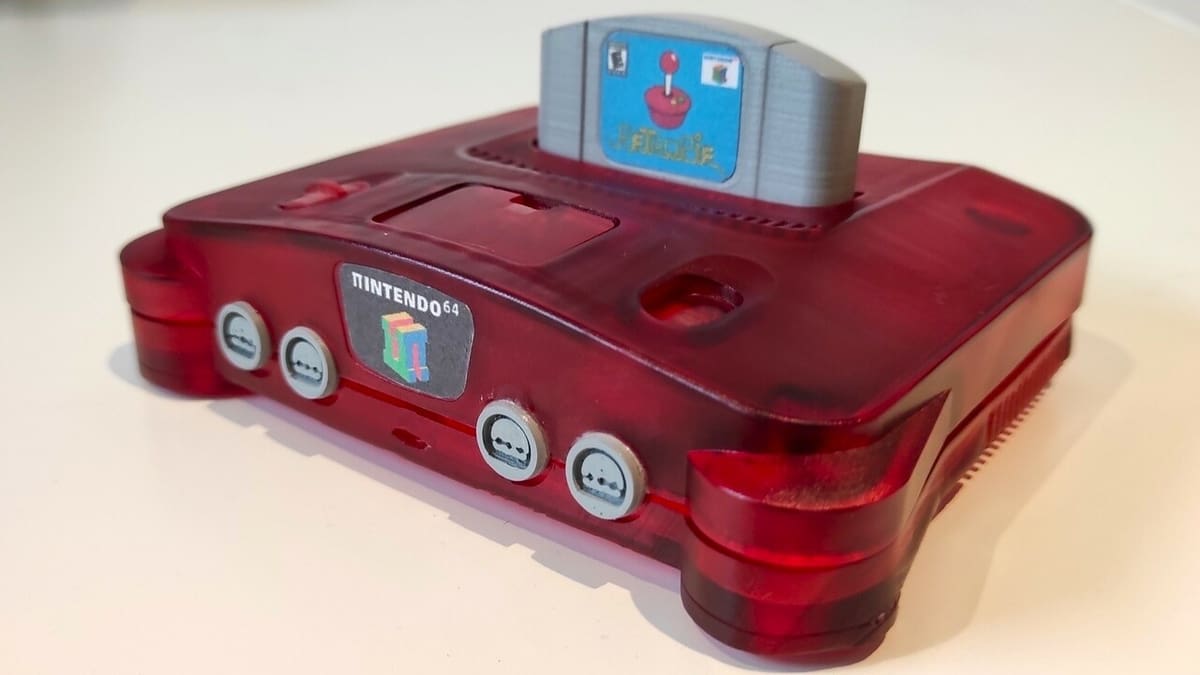
While there are plenty of DIY kits offering essentially the same thing when it comes to combining old-school gaming and Raspberry Pi, there’s one important distinction to make: Most are built around RetroPie.
By following the official tutorial, you can build a gaming system that allows you to emulate tons of different video game systems such as the Super Nintendo, the PlayStation 1 and 2, and the Gameboy Advance, SP, DS… The list goes on and on. And if that’s not classic enough for you, you can also go for others like the Commodore 64.
In addition to the hardware and software, you can really customize this project and make it your own by 3D printing a case to reflect your favorite console or gaming system. With the forum, documentation in GitHub, and a variety of YouTube tutorials, you’ll be ready to choose between Mario and Luigi in no time!
- Designer: petrockblog
- Project page: RetroPie, GitHub
- Core components: Raspberry Pi (the more RAM, the better the gaming experience), compatible MicroSD card, screen, game controller of choice
- Difficulty: Advanced

Bike Speed Tracker
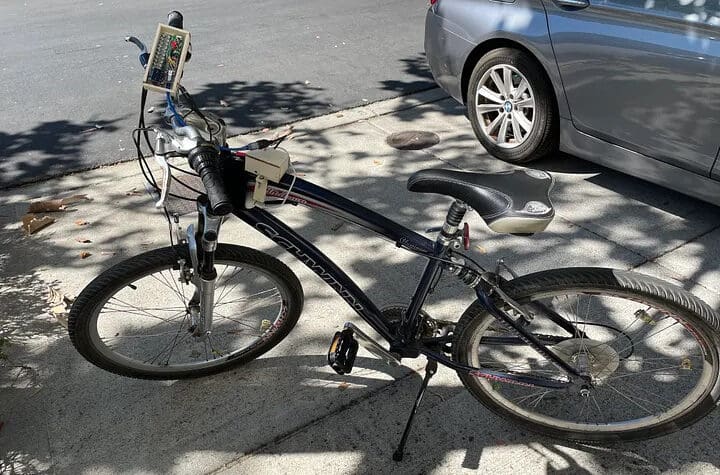
For enthusiastic bike riders who want to keep track of how fast they’re going as well as the bike route, this project is the perfect companion. This functional and practical project might be best suited to those with experience with microcontrollers and hardware assembly. Note that the creator mentions that the project can also be played around with a bit, so there’s definitely room for creativity here.
Using both a Raspberry Pi Zero W and an Arduino Nano board, this project contains two main pieces. The Raspberry Pi with a GPS module does most of the work, tracking your location and speed. On the handlebar, the Arduino board and an OLED display give you the time, your speed, and your tracking mode. Once you return home from your biking trip, you can view your route on a map!
Check out the demo video posted by the creator for a preview of the completed project.
- Designer: Jonathan Liu
- Project page: Medium
- Core components: Raspberry Pi Zero W, Arduino Nano, GPS module, SSD1306 OLED display, LEDs, push button, breadboard or prototype board, wires, resistors
- Difficulty: Advanced
Surveillance System
There’s not much that needs to be said about the benefits of setting up a surveillance system, is there? With Motion Eye OS, you can keep an eye on things (sorry, we had to), and there are a variety of boards that are compatible – yet you should check which one works with which version of the OS before you get started.
After you’re done, you can program the system to carry out different tasks, such as taking photos or emailing you after detecting movement. The amount of setup required does make this project a little more difficult than most, but the initial hassle may be worth the eventual peace of mind.
- Designer: Arun KL
- Project page: The Sec Master
- Core components: Raspberry Pi 4, Raspberry Pi Camera Module, Raspberry Pi power adapter
- Difficulty: Advanced
Magic Mirror
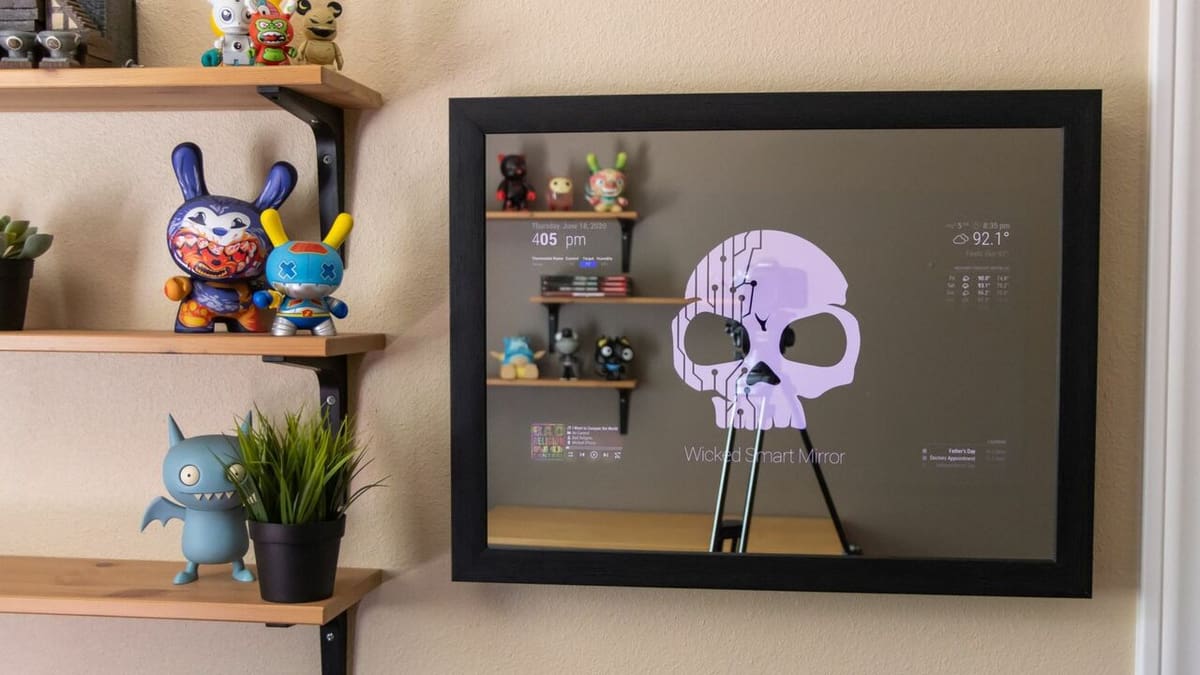
The WickedMakers really go above and beyond in this Instructables tutorial by presenting this project in an easy-to-follow format. The Magic Mirror won’t tell you who the fairest of them all is; rather, it’s an extensible, open-source platform that allows you to turn a mirror into a “smart” IOT device. Although, you could program it to tell you that you are, in fact, the fairest of them all.
This isn’t the easiest of projects to tackle, as it requires woodworking skills unless you want to buy everything directly. Even if you go for the latter, setting things up will mean using a hot glue gun, drilling, and working with Magic Mirror software on the Raspberry Pi.
However daunting the project may seem, there are at least two confirmed makers who pulled it off, so know that you can do it too! And if you need more information than what’s available on Instructables, the creators also sell detailed plans for ∼$5 and a YouTube guide.
- Designer: WickedMakers
- Project page: Instructables
- Core components: Raspberry Pi 4, two-way glass mirror, 90-degree HDMI adapter, monitor
- Difficulty: Advanced
License: The text of "15 Most Useful Raspberry Pi Projects" by All3DP is licensed under a Creative Commons Attribution 4.0 International License.