![Featured image of [Project] Filament Spool Windmill](https://i.stageall3dp.com/workers/images/fit=scale-down,w=1200,h=675,quality=79,gravity=0.5x0.5,format=auto/wp-content/uploads/2018/11/27104312/cisardom-thingiverse-1811271.jpg)
[Project] Filament Spool Windmill

Since the recent release of Prusament, Dominik Císař at Prusa Research has published some ingenious ways to reuse the spools. In today’s Weekend Project, we'll recycle an empty Prusament spool into a fun windmill.
Overview

This fall, Prusa Research delighted the 3D printing community with its release of Prusament, available in a wonderful range of PLA colors. PETG and ASA filaments are to be released in the near future.
Prusament is of extremely high quality and is wound around potentially useful spools. While many empty spools are thrown into piles or trashcans, Prusa has released fun, interesting ways to recycle empty spools to create amazing projects.
Dominik Císař, Art Director and Creatic Content Specialist at Prusa Research, has shared some such projects. This November, he shared an ingenious windmill idea. For this project, the spool frontages form the base and wheel.
This project is very straightforward and easy to complete, so let’s jump into its construction!
What You Need
In his Thingiverse post, Císař has included all the necessary STL files for the 3D printable windmill. Besides the blade clips and nose, the parts are printable without supports. If you plan to use the windmill outside, it’s recommended to print these parts in PETG or ABS rather than PLA. These materials offer higher heat resistance.
In addition to the printed components, here is what you’ll need to complete your own 3D printable windmill:
- Empty Prusament spool
- 2x Smooth rod (8 mm x 370 mm) (or cut to 370 mm)
- 2x Radial bearing (ø 22 mm / ø 8 mm)
- 2x M3 30-mm screw
- 4x M3 20-mm screw
- 2x M3 10-mm screw
- 8x M3 square nuts
- Super glue
How to Build It

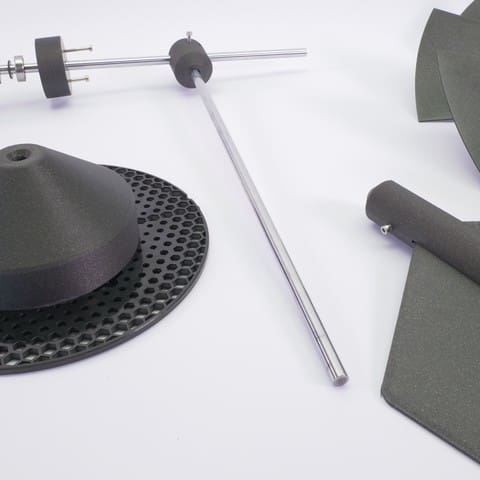
Once the models are printed and your Prusament spool is empty, it’s assembly time! First, take one spool frontage, push it onto the printed base, and insert one smooth rod into the base. Position the printed joint on the opposite end of the rod and slide the other rod through the second joint slot perpendicular to the other rod. Secure the rods with the appropriate screws and nuts.
Next, take the tail and, after sliding it into the tail grip, position this construction on the longer end of the horizontal rod, securing it with nuts and screws.

Take the clips and click them onto the second spool frontage as shown in the image above. Then insert the twelve blades into the clips, securing them with super glue, if needed.

The last step is to assemble the shaft as per the above picture. Be sure to put the printed rings between the gears to make sure the wheel doesn’t fall off.
After completing this project, you can even power the windmill with a motor and belt for a refreshing fanning on a hot day.
Happy building!
License: The text of " Filament Spool Windmill" by All3DP is licensed under a Creative Commons Attribution 4.0 International License.
CERTAIN CONTENT THAT APPEARS ON THIS SITE COMES FROM AMAZON. THIS CONTENT IS PROVIDED ‘AS IS’ AND IS SUBJECT TO CHANGE OR REMOVAL AT ANY TIME.