What Is Tinkercad? – All You Need to Know

Introducing Tinkercad, a free, browser-based design program for teaching and learning 3D modeling, electronic circuitry, and basic coding.
Tinkercad is a popular 3D modeling, circuitry-simulating, and block-coding software package that’s accessible for free via a web browser. Its popularity is, no doubt, a result of its user-friendly simplicity. It consists of three sections, each of which can be considered its own endeavor and be used for different purposes.
Tinkercad was launched as a free web-based 3D modeling tool by Kai Backman and Mikko Mononen in 2011. One year later, the program had over 100,000 user-created designs on its website. Recognizing the opportunity, Autodesk acquired Tinkercad in 2013. Then in 2017, Autodesk added circuit modeling and, later on, a coding tool to create the Tinkercad we know today.
Because Tinkercad is free and available via a web browser (accessible via PC or tablet), it’s popular with beginners and for classroom use. But this doesn’t mean that more experienced users won’t also enjoy using it.
In the following, we’ll look at the features, functions, and user experience of each section. We’ll also delve a little deeper into community support, what help is out there, and alternatives to Tinkercad in case you find yourself looking for something different.

Website Overview

Before you can begin using Tinkercad, you need to create an account. Those with an Autodesk Fusion login can reuse the same credentials because Tinkercad and Fusion are both Autodesk products. There are special accounts for educators and students and of course the personal accounts option.
Creating an account is easy and straightforward. Simply click on the link, fill in your details, and follow the onscreen instructions.
Keep in mind that the entire Tinkercad suite is designed to be web-based, and the functionality nicely reflects this through easy navigation via the use of the mouse with left and right clicks. The concept of making everything accessible via a mouse and easy menu options makes for a simple yet effective experience (especially given that there are also keyboard shortcuts for many functions).
Tinkercad isn’t known to have issues with menus or pages loading slowly. The website is responsive and easy to use, and despite being geared towards children and classroom use, the platform is by no means childish!
Dashboard
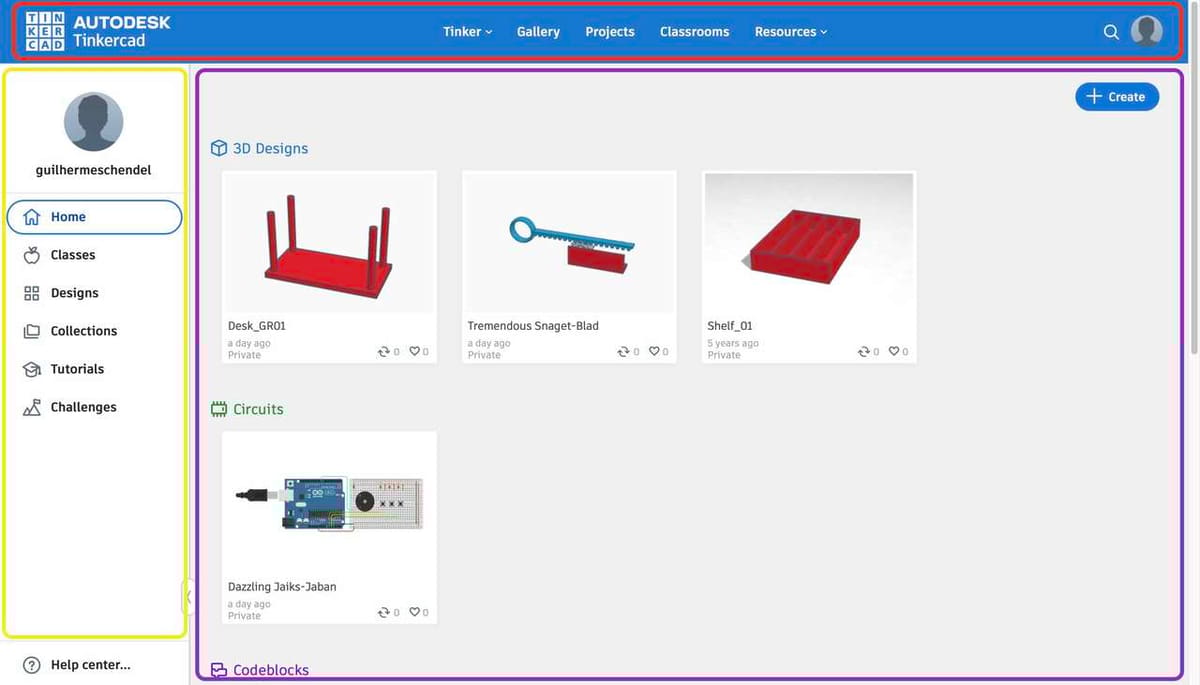
After logging in, you’ll land on the “Your designs” page, which is the overview page for your account, showing all your designs in one place. This dashboard in Tinkercad plays a central role. It’s always accessible by clicking the Tinkercad logo in the top-left corner of every page in Tinkercad.
The layout consists of a menu block to the left (outlined in yellow), in which you can find classes, collections, tutorials, challenges, and your account details. The main area (purple) shows your designs, which are divided into the three sections of Tinkercad: 3D Design, Circuits, and Codeblocks.
The top bar menu (outlined in red) gives access to various helpful starting points, such as the Tinker drop-down to start a design or the Gallery tab of community designs for inspiration.
Now that we know what’s there, let’s explore what all these features do.
Menu Block
The menu block gives access to a number of administrative functions. Let’s go over some of the main ones.
The profile image, when clicked, opens up the account profile page, which allows the users to add a mini-bio, a profile image, and a screen name. There’s also a logout button. Worth mentioning here is that there’s a separate kids section, which is designed to track the activity of “your kids”. This can be used to track classroom work or other coursework with participating kids in a class you’ve created, as either a teacher or a parent.
The Classes button allows you to join a class, provided you have the key provided by the creator of the class. This again emphasizes Tinkercad’s educational purposes.
Collections
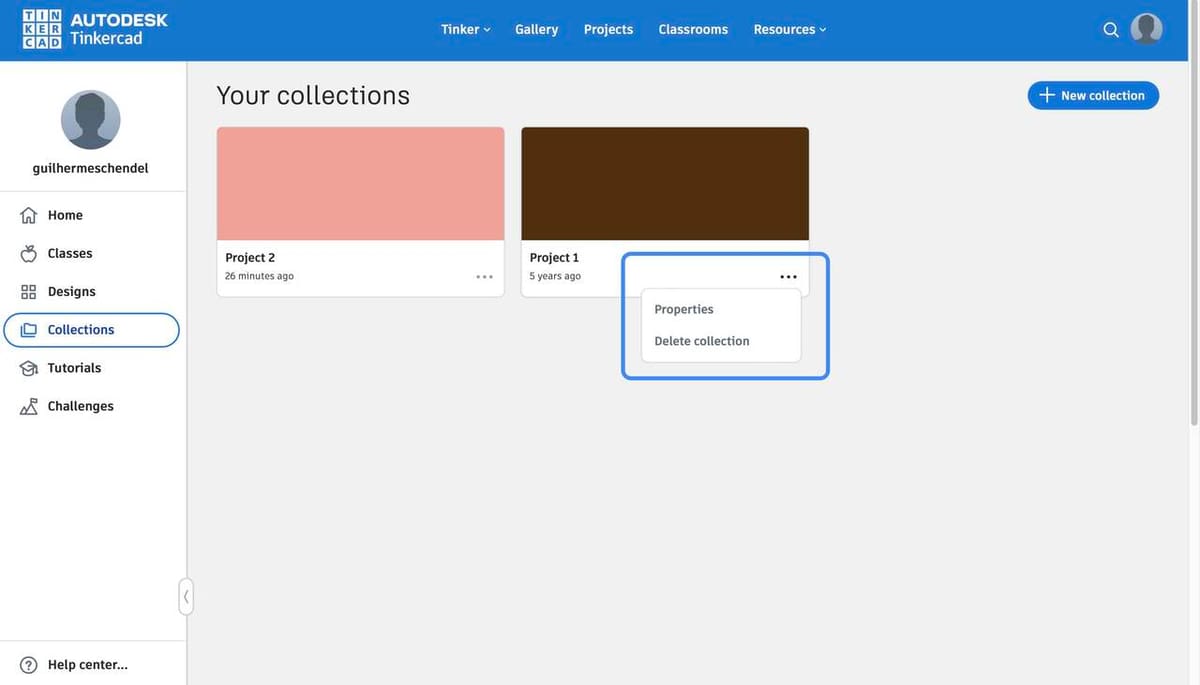
The “Create collection” button creates an empty folder for a collection of your designs, while the collection buttons open up the relevant collection in the main area. Collections can also be deleted from the main area by clicking on the three points in the bottom right and selecting delete (outlined in blue).
Main Area
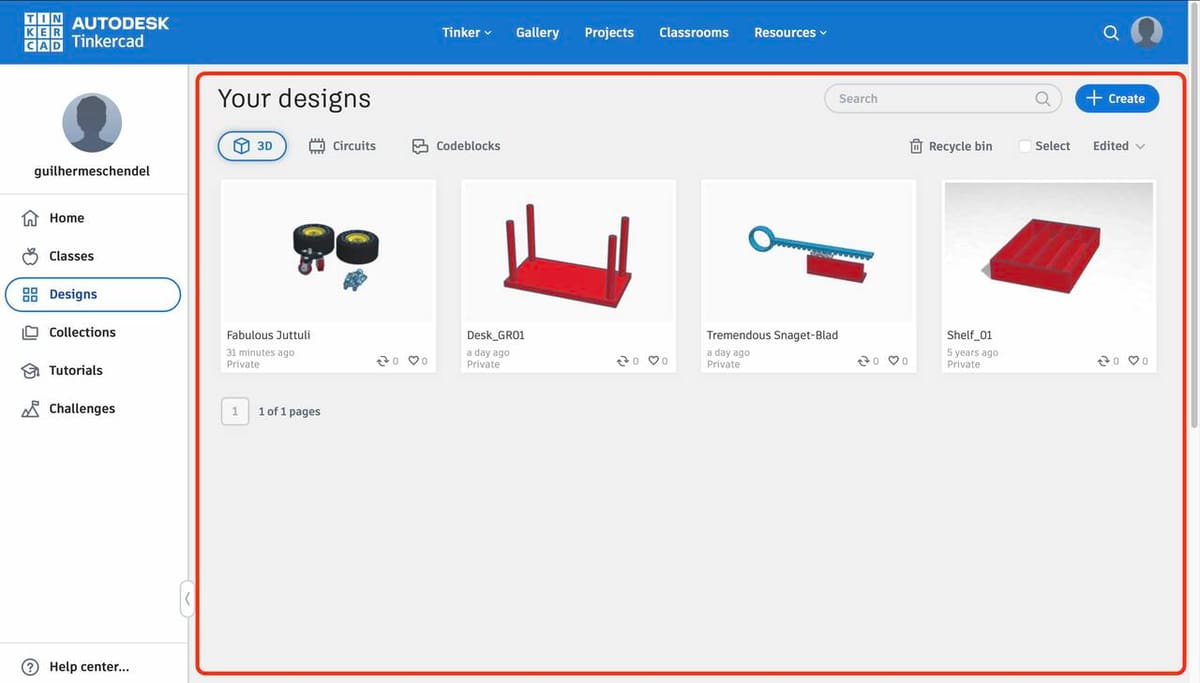
The main area (outlined in red) is titled “Your designs” and contains all the designs you’ve created in all three sections of Tinkercad.
In the top-right corner, we find the New button, which allows you to start a new project in any of the three Tinkercad sections. That button appears on a number of pages, but it always has the same function.
Top Bar Menu
The Tinker drop-down opens a section with shortcuts to 3D Design, Circuits, Codeblocks, Sim Lab, the iPad design app, and Fusion – another Autodesk program for 3D design.
The Gallery button shows various projects created by the user community. Should you run out of ideas, there’s plenty of inspiration to be found from the Projects button, which when clicked, shows a variety of project ideas with instructions to follow along.
For those who’ve been given a classroom code, they can join classes via the classroom button, the same as with the sidebar menu above.
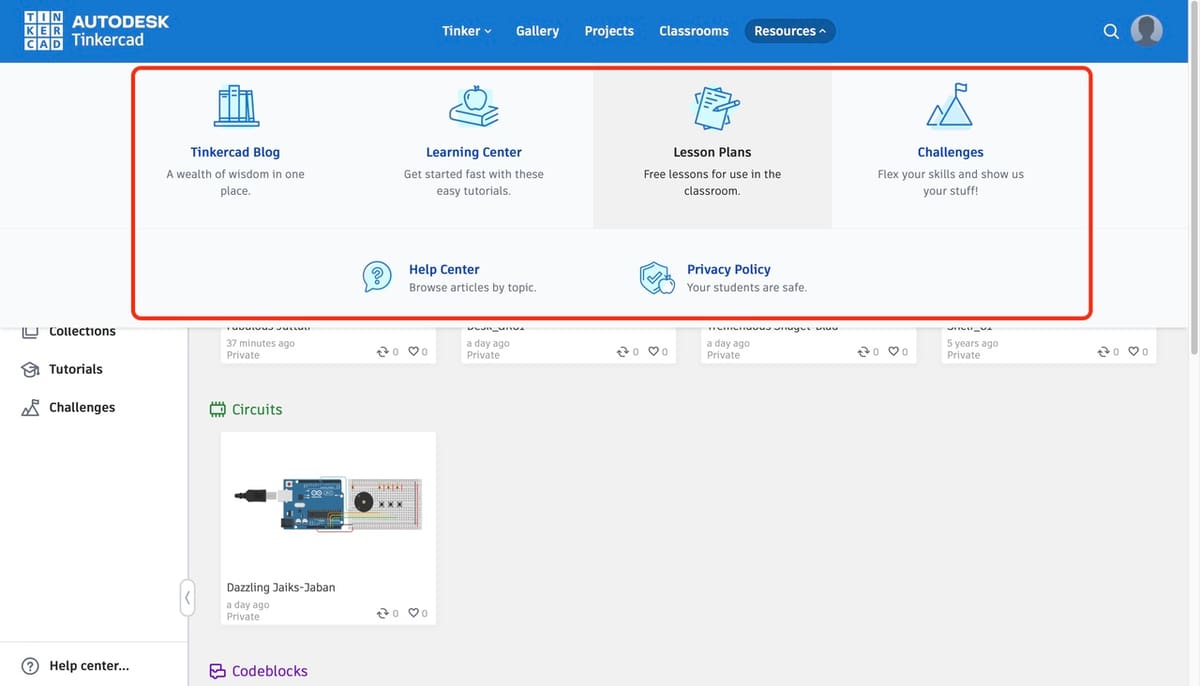
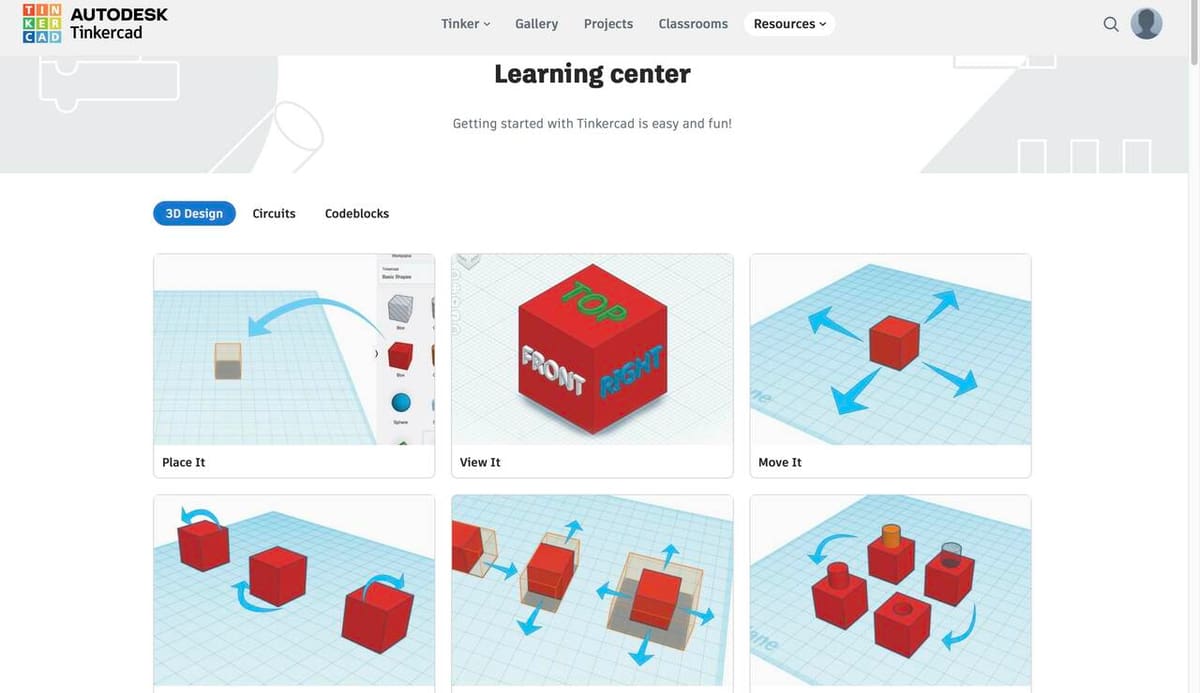
The Resource button gives access to a wealth of information and links (shown above). This includes tutorials, tips and tricks, a blog, and more.
Company & Community Support
We’ll try to cover a lot here, but there’s no limit to learning and expanding your skills. Here are a couple options worth considering:
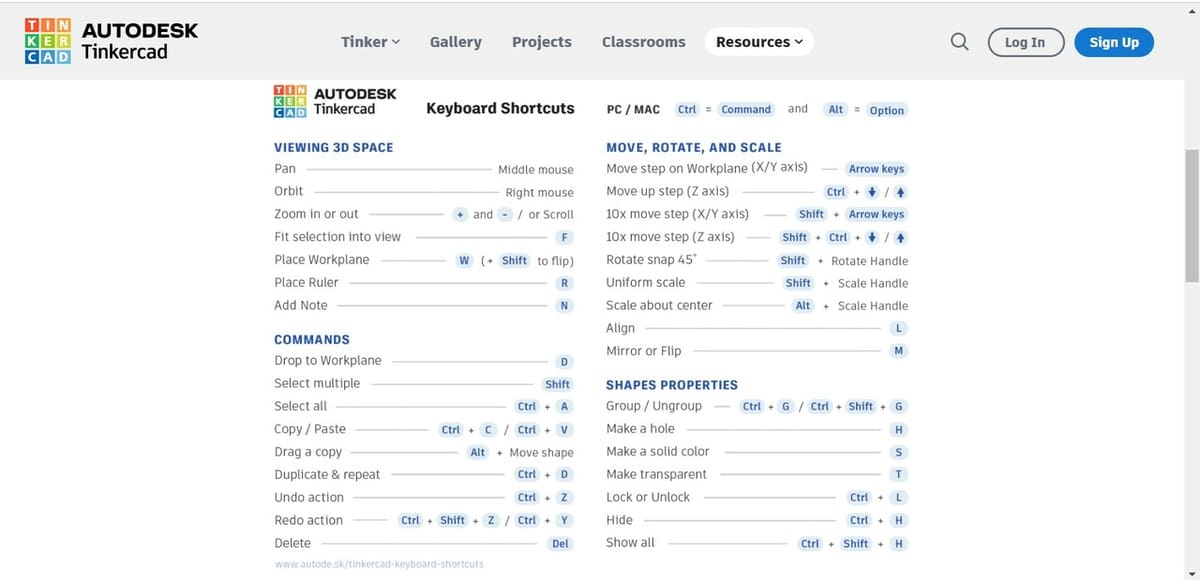
- Tinkercad Blog: Accessible via the dashboard’s Resources, the blog provides tips, hints, and tricks such as the handy keyboard shortcuts Tinkercad 3D design link.
- Social media: Links to Tinkercad on X (formerly Twitter) can be useful for educators. A lot of videos on YouTube show various techniques on how to construct items in Tinkercad.
- Direct support: Autodesk also provides a nice printable handout for 3D Design and Circuits.
- All3DP: That’s right, we have a number of Tinkercad articles including a beginner’s tutorial.

3D Design
3D design with Tinkercad is invitingly simple. The design concept is based on adding and subtracting simple shapes – for example, creating a pipe by starting with a large solid cylinder and then subtracting a smaller cylinder from it. Towards this end, the main operations are copy, paste, group, ungroup, align, and mirror. But you also has the ability to adjust dimensions, colors (which is great for organization), and the number of facets on round bodies. This simple concept is further simplified by the large library of shapes, which can be easily accessed and manipulated.
Don’t let the simplicity fool you, though, complex items can be designed with Tinkercad!
Everything is click, drag, and release, but it doesn’t have to be. If you require exact measurements, you can enter them with your keyboard, as well. As mentioned earlier, a host of keyboard shortcuts allow alternative ways to access the design tools available.
Use Cases & Limitations
3D Design allows you to create anything as a 3D model. The only limit with regard to what can be designed is your creativity.
You can turn your designs into Minecraft models with the Blocks button, which can be used with the Java edition of Minecraft. You can also create a Lego brick design from your design by clicking the Bricks button. This may be useful for makers who want to create a plastic brick model, such as the NES game console Raspberry Pi housing.
What Tinkercad isn’t capable of is 2D design, animated models, and analyses, but basic simulations can be done – like gravity and materials – in the Sim Lab. Of course, you can design items capable of movement, such as hinges and gears, although you cannot animate them.
Also important is that Tinkercad 3D design can’t create machine paths for milling or 3D printing. In other words, the platform doesn’t include a slicer, so you’ll always need a third-party program to turn your designs into reality.
Use Cases
- Creating 3D models
- Creating models for CNC mills or routers
- Teaching
- Creating Minecraft and Lego models
- Basic simulation making objects dynamic or static, and applying materials that behave differently
Limitations
- No simulation and analysis options such as FEM, finding the center of gravity of a model, etc.
- No interactive modeling such as hinge
- No special libraries for professional use
- No conversion of 3D objects to 2D plans
- No mesh tools, sheet metal mode, etc.
- No machining tool path functionality
- Restricted set of formats available for import and export
- No surface rendering beyond colors
- Limited freehand capabilities
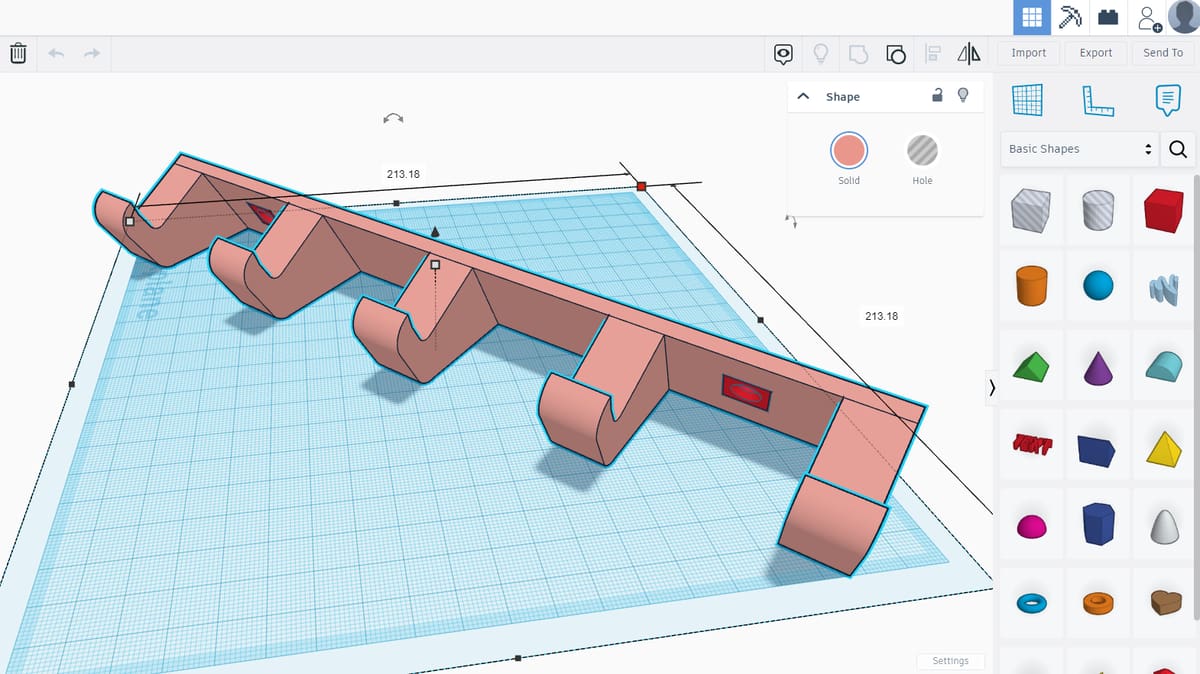
Layout
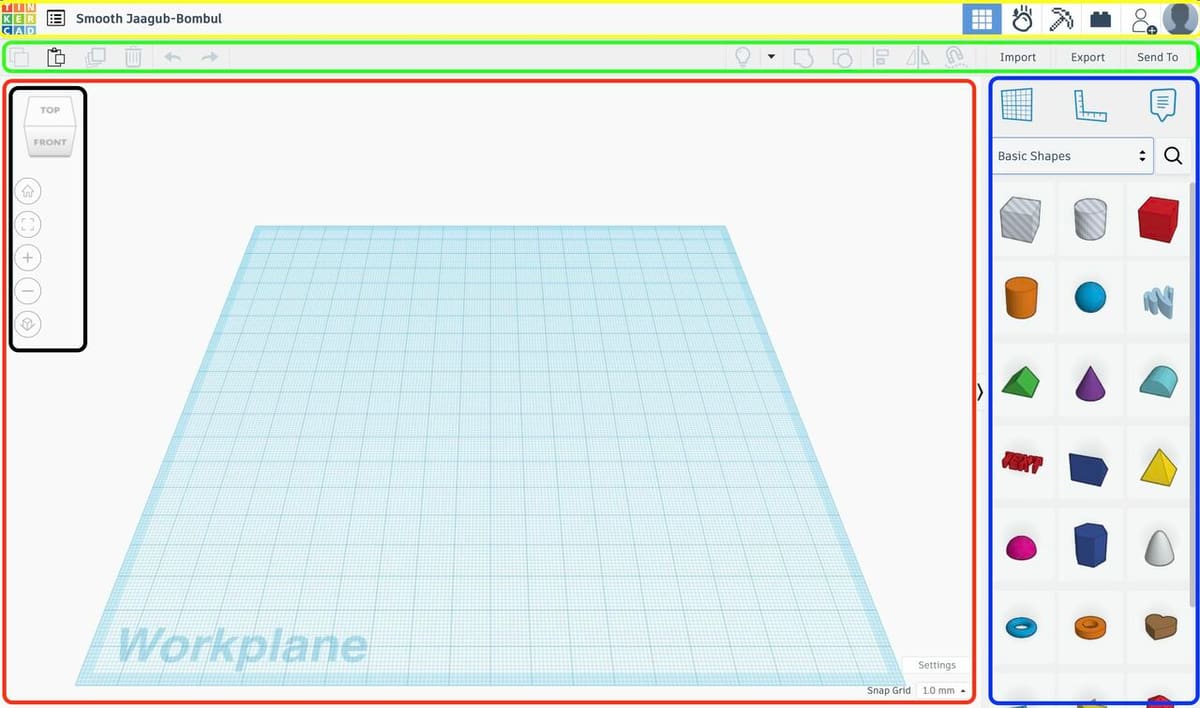
Navigating Tinkercad’s 3D Design workspace is relatively intuitive.
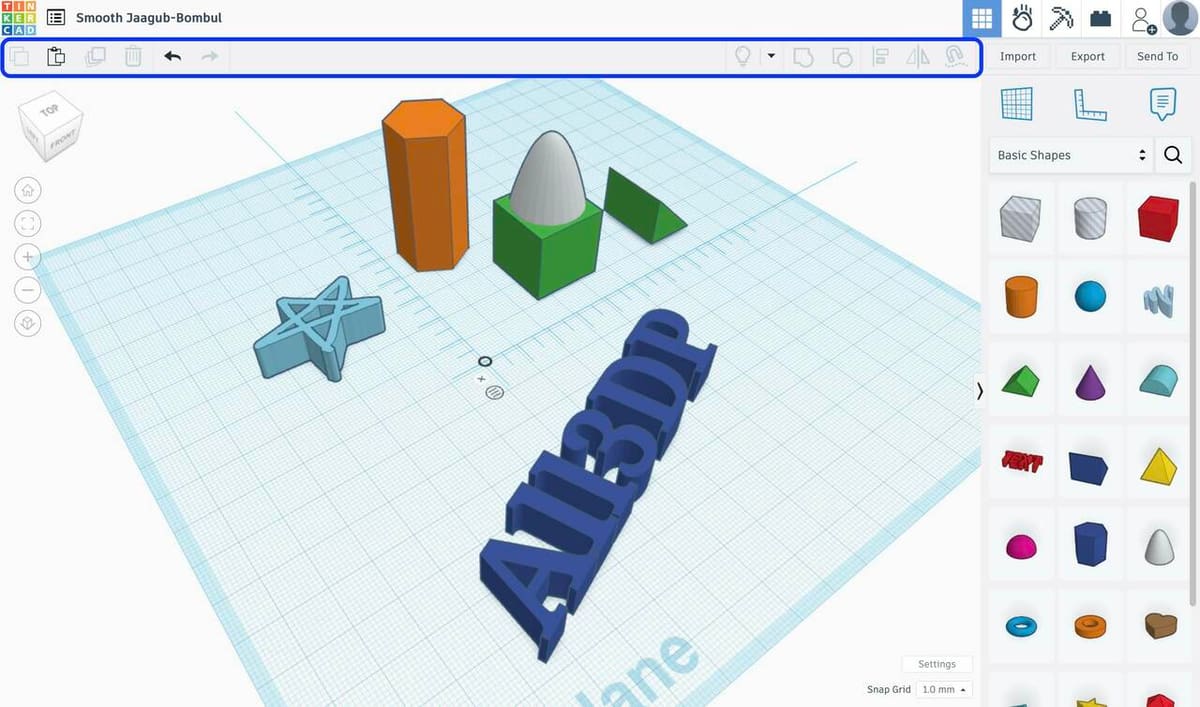
- The topmost bar (outlined in yellow) includes platform- and mode-specific options, like returning to the dashboard and changing to Minecraft or Bricks modes.
- The second topmost bar or the main menu (green) includes model-specific operations, like copying and grouping.
- Workspace orientation tools (black) include the standard rotatable cube and zoom options.
- The shape menu (blue) provides all the various shapes that can be added to the Workplane.
Features & Functions
By default, Tinkercad gives you a wide selection of basic shapes (outlined in purple), as well as an “empty” cube and cylinder to work with. If you would like something more niche, the drop-down menu has various categories, such as Creatures & Characters and Hardware. If you want something specific, you might try using the search function. Once you click a shape from the right menu, you then have to drag it to the desired spot and click again to place it on the workplane (the blue grid).
Shape Manipulation
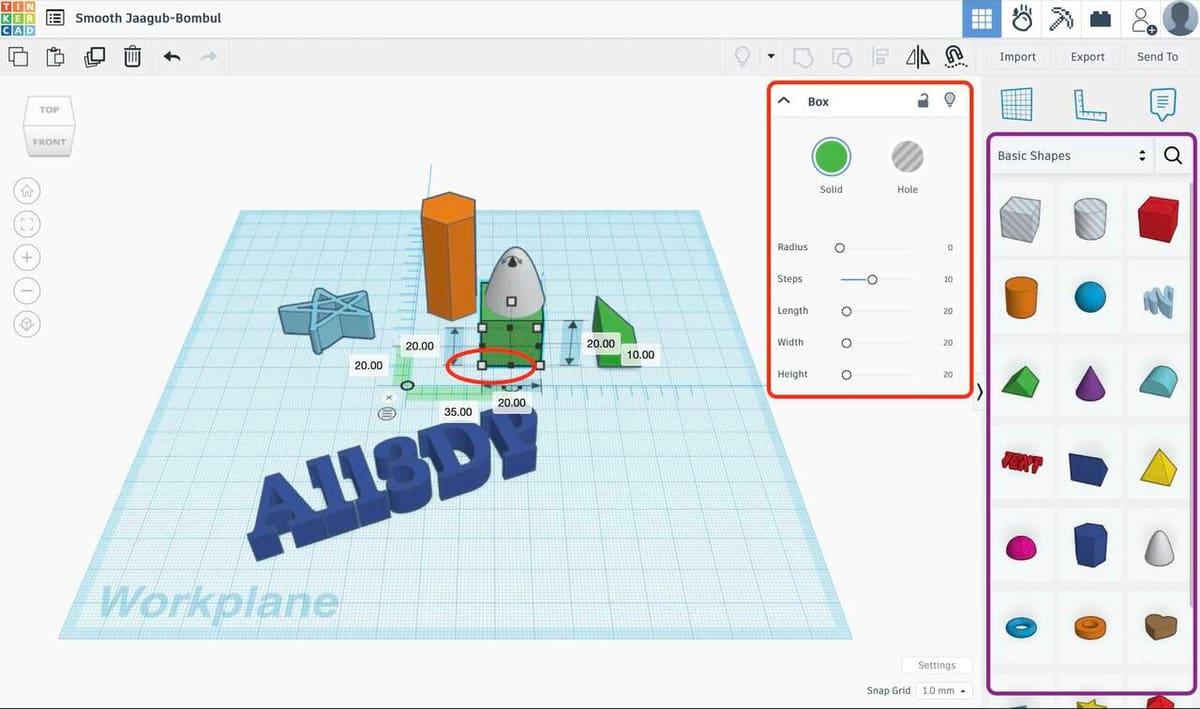
Selecting, moving, and resizing a shape is done with your mouse or touchpad. When selecting a shape on the workplane, two things happen: The shape will be given little white and black squares called handles (red), rotation arrows, and a raise or lower cone. You should also see a submenu in the top-right corner.
By selecting and dragging the squares, we can resize the shape, optionally holding Shift to keep dimensions proportional. When resizing, textboxes are shown with the dimensions, which can be edited directly for precise measurements.
Although not visible, an extremely handy keyboard shortcut is ‘D’, which sets the selected object on the current workplane, whether the general one or a user-placed one.
Depending on the shape, there can be a variety of attributes (green). In this case, we see the attributes for a box, but the most important attributes are the following:
- Lock: Keeps an object from being selected or changed.
- Hide: Makes an object invisible. Click the “Show All” button to reveal it.
- Solid or hole: Every shape is either a solid or a hole. When grouped with each other, the hole sections are literally erased from solid portions. Select “Solid” to adjust the color.
Using solid and hollow are core functions of Tinkercad (to be used alongside the group operation), and many of the other attributes differ depending on the model. (For example, cones have a top and bottom radius.)
Shape Coordination
In addition to your basic functions – copy, paste, duplicate, delete, undo, and redo – there are also some that are more specific for manipulating and adjusting 3D objects. Here are the most important ones:
- Group: Combines selected shapes into a new shape. This is equivalent to a Boolean operation.
- Ungroup: Separates a selected group into its component parts.
- Align: Allows you to move selected shapes in line with one another. In any of the three dimensions, you can align according to the edge, middle, or other edge of either selected object (e.g. top, middle, bottom).
- Mirror: Flips the selected shape along the chosen axis.
Workplanes, Dimensions, & Notes
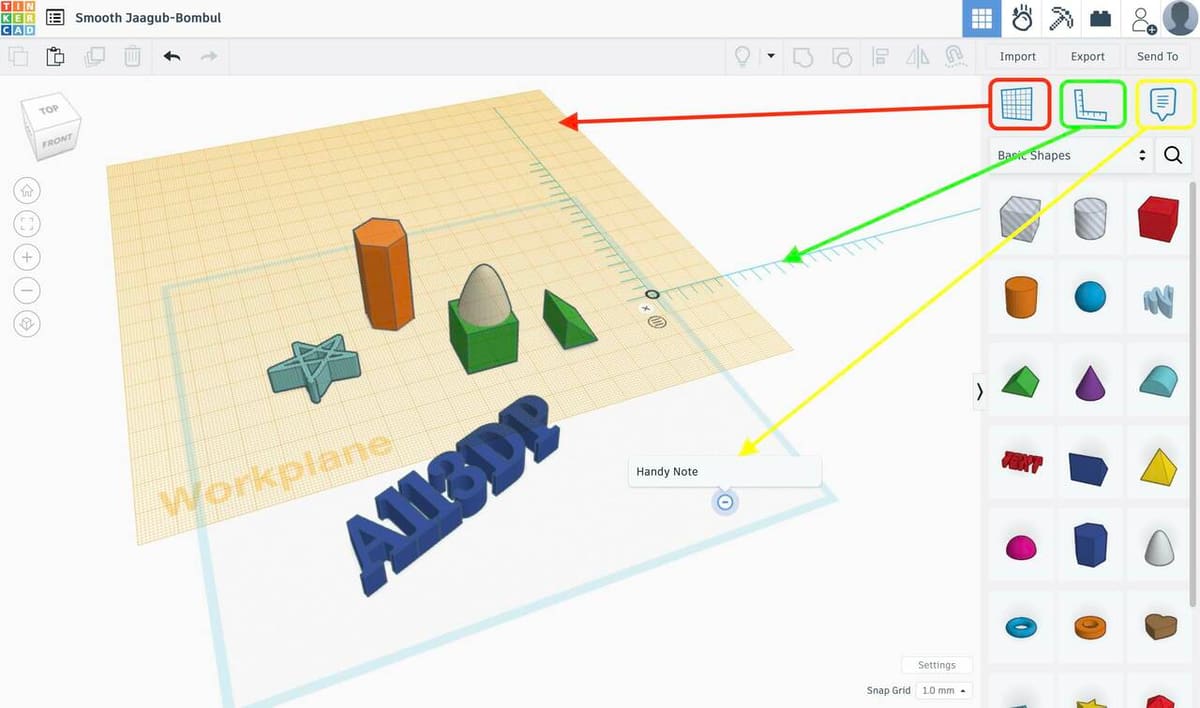
In the workplane settings, found in the bottom-right corner of the workspace (outlined in blue), you can adjust the grid size, toggle the grid and shadows, as well as specify which units you are using. The Snap Grid setting determines the interval that objects can move.
Above the shapes menu, we find the Workplane, Ruler, and Notes tools, outlined in red, green, and yellow, respectively. By far the most important is the Workplane tool, which allows you to click on the surface of any shape and make that surface a new, temporary workplane (indicated by turning orange) around which all shapes are oriented. Returning to the default workplane can be done by applying the tool to an empty space.
Importing & Exporting
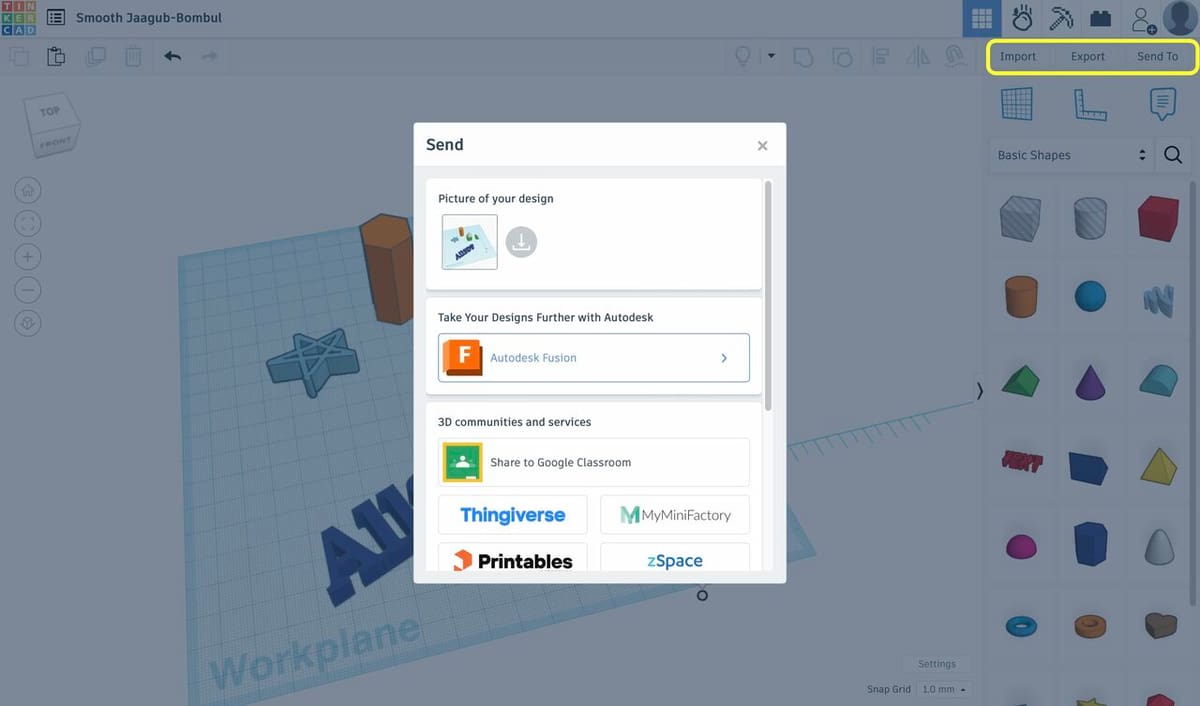
Above the Workplane, Ruler, and Notes tools, you can find the following (outlined in yellow):
- Import: Import 2D and 3D files, including SVG, STL, and OBJ file formats, up to 25 MB.
- Export: Export all or part of a project as an OBJ, STL, or GLB file for 3D printing and SVG for laser cutting.
- Send to: Transfer the design to Fusion for further use, download it as an image, or send it to a number of 3D model websites, such as Thingiverse, Prusa’s Printables, or MyMiniFactory.
Blocks
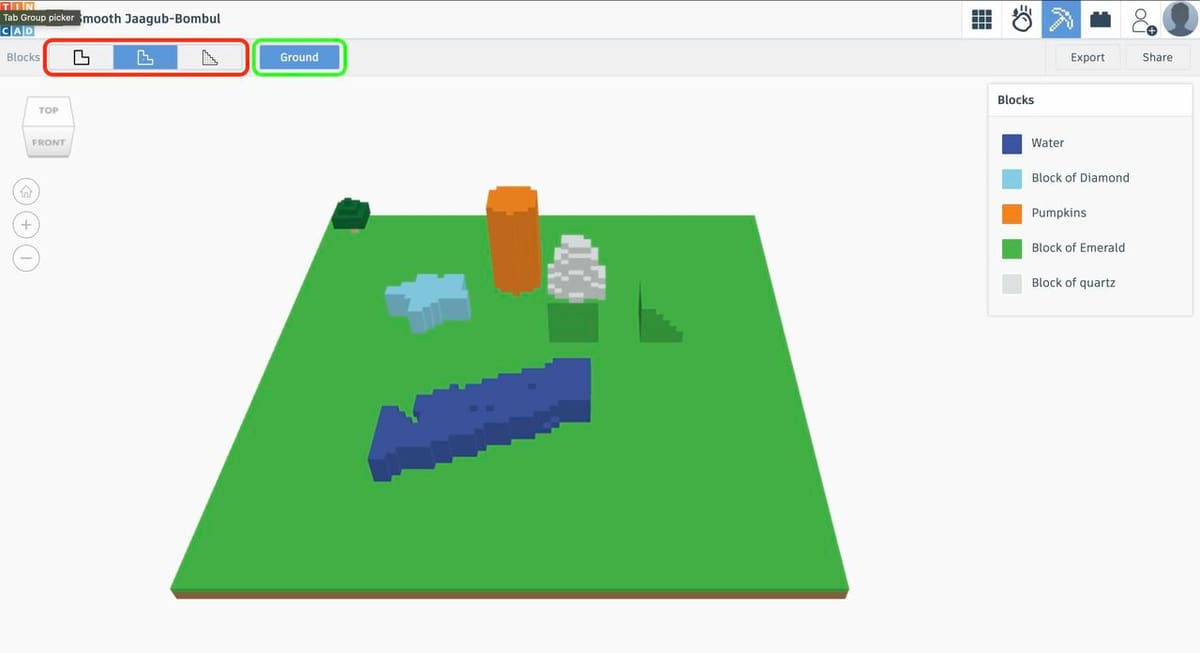
You might have noticed the Minecraft-like axe in the upper-right corner. When clicked, the current project is converted into a Minecraft model. This conversion simplifies the design in a way that translates the model into a basic block-shaped geometry.
As most of the editing and creating is done in the Workplane, this page features only a few buttons and areas. Basically, you have three degrees of “resolution” (red), where you define the size of the basic block that will form the shape. Then you can export your design. The only other feature available is to show or hide the ground on display (green).
Bricks
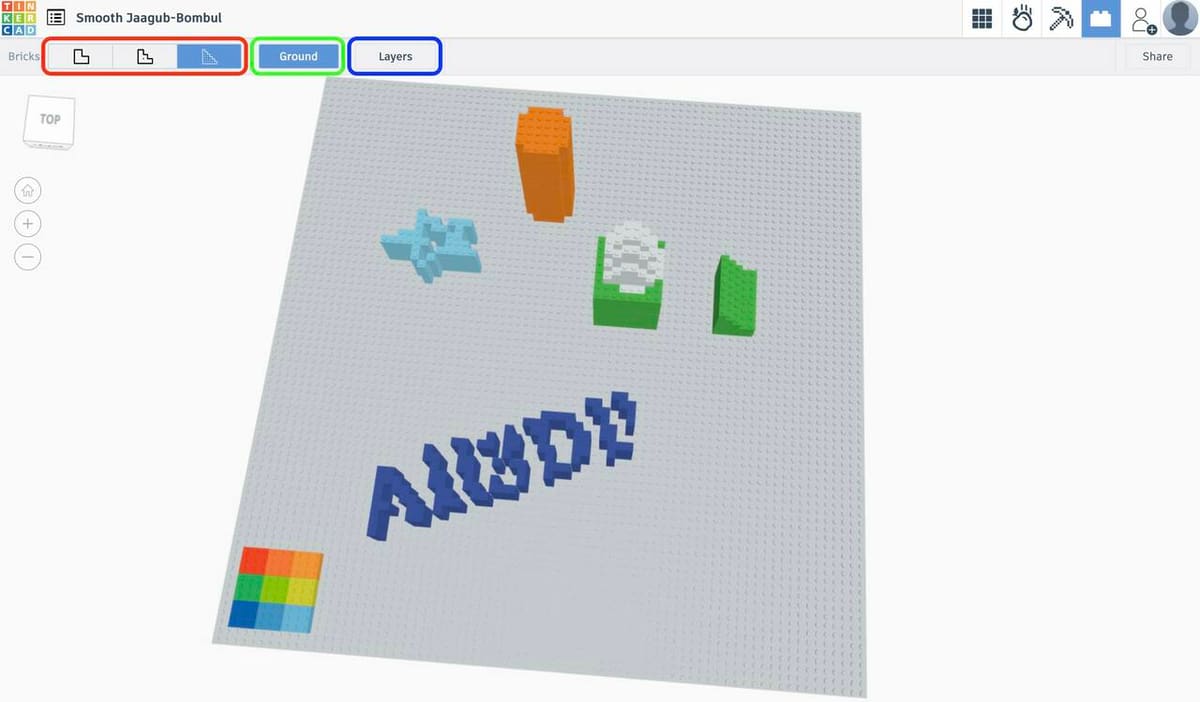
What’s that funny Lego-like box? The Bricks button converts the current model into a Lego brick model. This page is pretty much exactly the same as with the previous Blocks one.
The difference is that the model is converted into Lego-like bricks. You have the same sort of “resolution” (red) to define the size of the basic block, then export and show or hide the ground (green). Additionally, Bricks has a tool for the model’s different layers (blue), so one can see the quantity and position of the bricks from the first to the last layer.
User Experience & Alternatives
Considering it’s mostly drag and drop, using 3D Design is easy, but it comes at the expense of finesse in certain situations. For example, creating screw threads can be achieved, but one can’t simply select a standardized thread, as you can with many other design suites.
Depending on the intricacy of the designs, it can be challenging to think in terms of solids and holes to achieve complex structures. While it’s not impossible to achieve, there comes a point where more technically-minded applications, such as Autodesk’s Fusion, may be better suited. The design process is fluid enough to run on most PCs, even with slow internet connections.
As with many other software suites, there are plenty of projects, tutorials, and YouTube videos that provide varying qualities of instructions on a multitude of subjects. Tinkercad’s own Learning center is useful for most problems or questions. The provided tutorials are child-safe and reduce the need for too many internet searches.
Alternatives
If you’re interested in alternatives to Tinkercad’s 3D Design suite, here are some worth considering.
MS Paint 3D is an evolution of the classic MS Paint, expanding its capabilities to include 3D modeling features. Users can create 3D shapes from 2D contours and apply cut-outs from pictures as stickers on 3D models. It’s better suited for artistic uses, such as doodles and animations, compared to Tinkercad, which is more geared toward educational and technical applications. MS Paint 3D is a Windows app that requires downloading and installation on your machine.
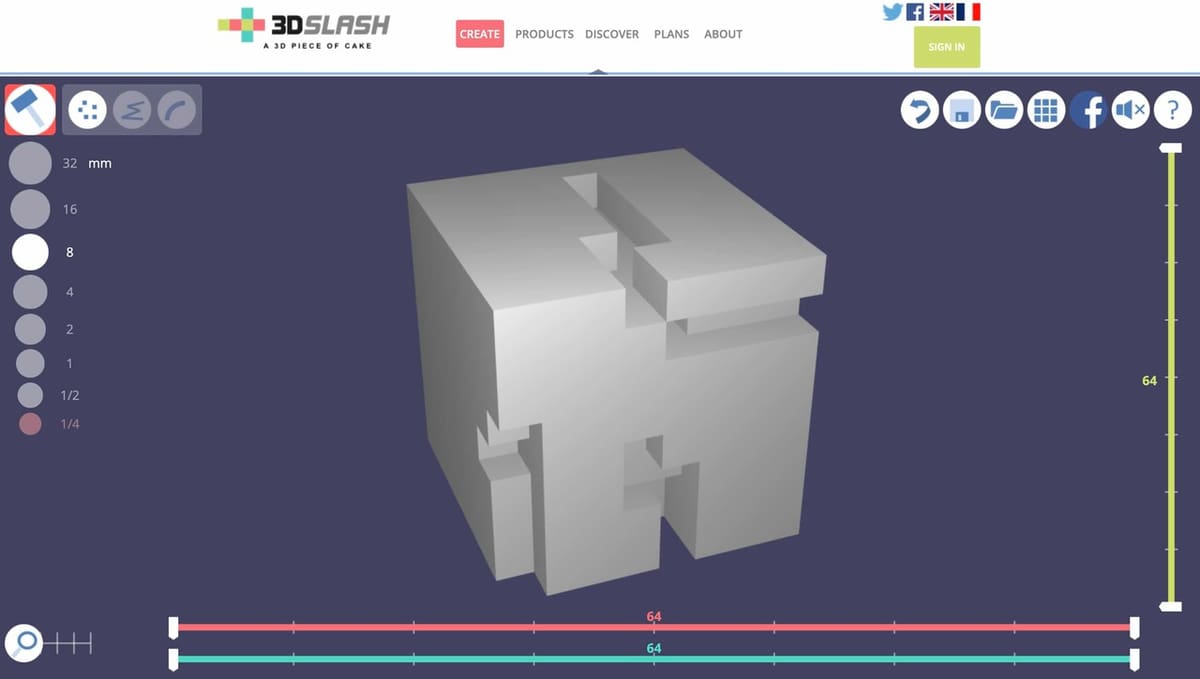
3D Slash allows users to create models using a simple building block concept. It enables the creation of basic 3D printable models without requiring extensive time to learn the software. Users start with a cube shape and subdivide it into smaller blocks to sculpt the desired shape. 3D Slash is available both to download for free and as a web-based application.
Leopoly enables users to create 3D models using various methods such as digital sculpting, form shifting, and cube crafting. In digital sculpting, you can start with a pre-made human head or body and sculpt it like clay. Form shifting allows you to begin with a basic shape, such as a cylinder, and modify its parameters through sliders to achieve the desired form. Cube crafting works as a Lego-like creation tool where you add small blocks to build objects.
Circuits
Circuits is a program for building and simulating electronic devices. It also offers a simplified coding program that can be used for a number of microcontroller boards. (We’ll see more of these in the next section.) The basic idea is to drag and drop electronic components into position, hook them up, and program them with nothing more than the mouse or touchpad.
Use Cases & Limitations
Before going into more detail, let’s briefly set out the possibilities and the limits of Circuits. This part of Tinkercad allows the creation of electronic circuits and simulations, but it doesn’t allow custom components to be imported, which could be a problem. Circuits allows variables to be created in the coding section, but it doesn’t support the design of new code blocks. In other words, we have to get along with what’s available to us.
Use Cases
- Learning about basic circuitry and electronics
- Simulating circuitry
- Teaching
Limitations
- Restricted availability of components
- Restricted availability of programming blocks
Layout
The layout of Circuits is similar to that of 3D Design, with a few minor differences.
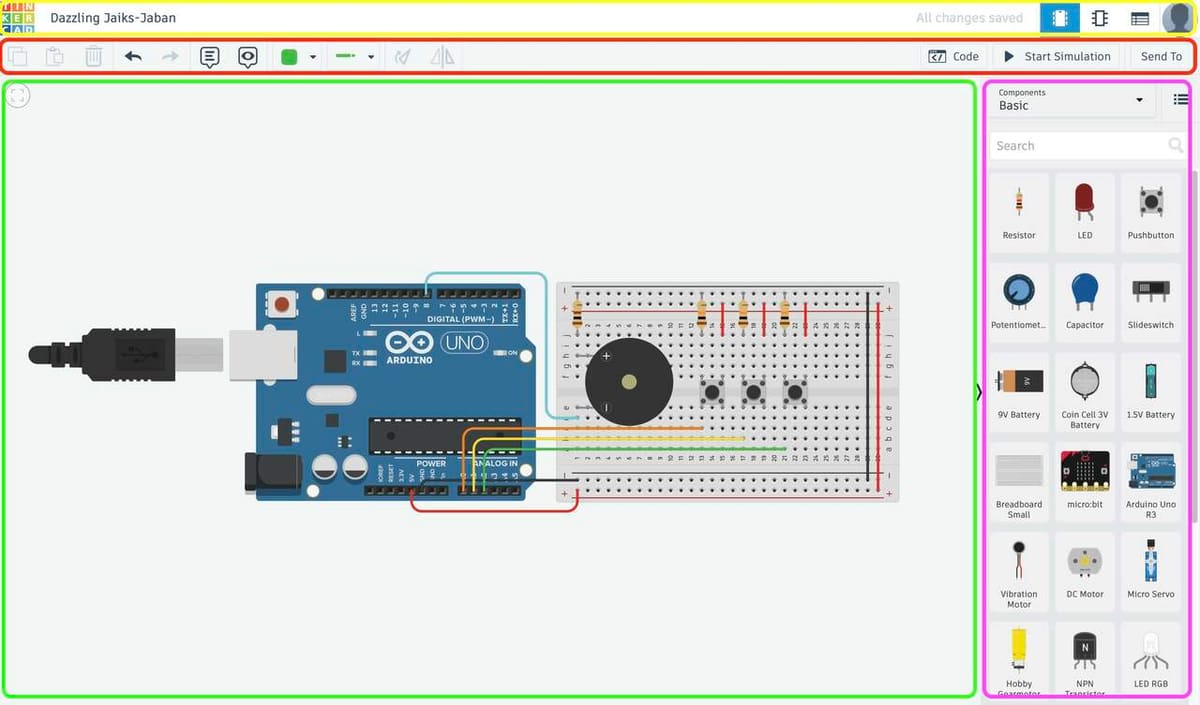
Once again, the topmost bar (outlined in yellow) includes platform- and mode-specific options, including visualization modes such as Circuit View, Schematic View, and Component List. The second topmost bar or the main menu (red) includes circuit-specific operations, such as wire color, attachment style, code (if you have programmable components), and simulation. The parts menu (purple) provides all available components including breadboard, batteries, resistors, Arduinos, and more. Finally, the design area (green) is where you, well, design!
Features & Functions
Here is a quick list of components you’ll find in Tinkercad. (Note that this list is by no means exhaustive.)
- Basic components: Such as resistors, potentiometers, light emitting diodes (LEDs), and capacitors. The values associated with resistors, potentiometers, and other components can be selected according to your needs in a pop-up menu that appears once a component is chosen.
- Basic integrated circuits: Such as timers, optocouplers, and comparators.
- Logic circuits: Such as NAND, AND, and OR gates.
- Arduino Uno starter: A premade circuit for an Arduino on which users can expand.
- Micro:Bit starters: Another premade circuit but for the Micro:Bit.
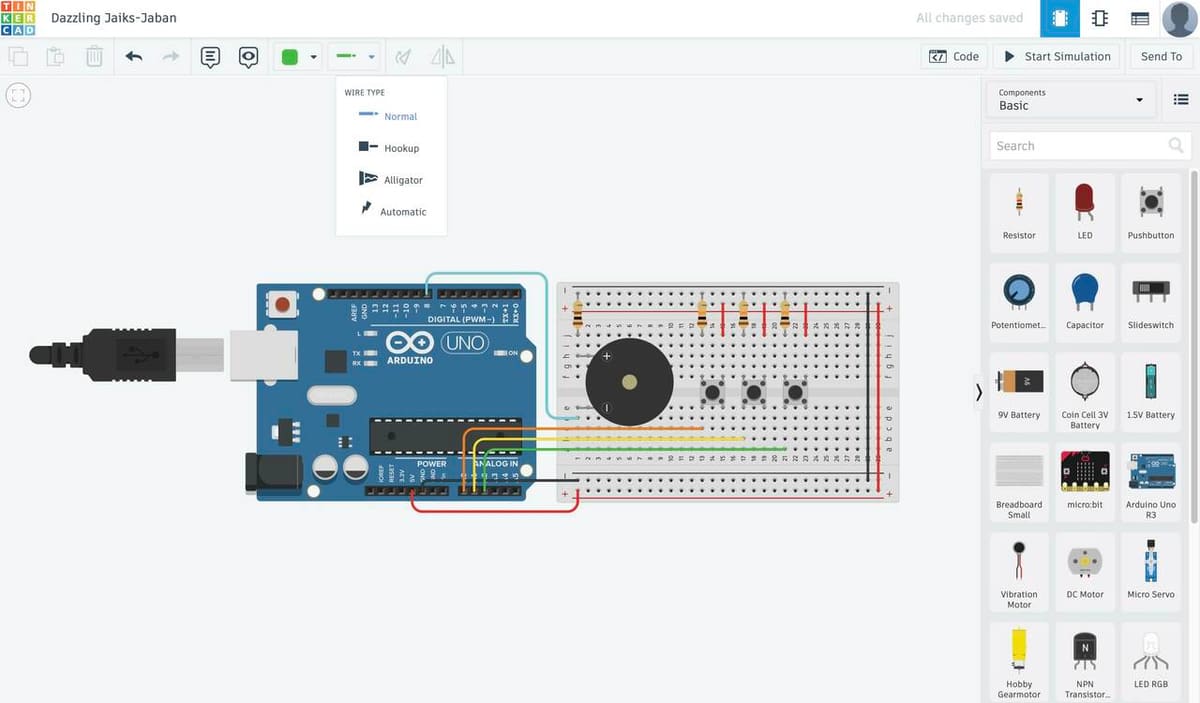
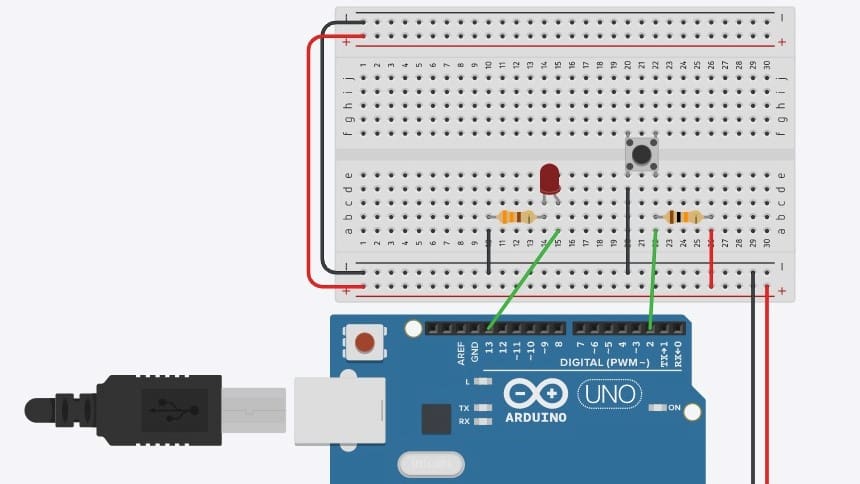
After opening a new circuits project page, the large empty gray area is your design space. You can select and drag any component into the design space. To create connections between components, you simply click on the relevant connection point of the component and drag it to the next connection point you choose. That’s it!
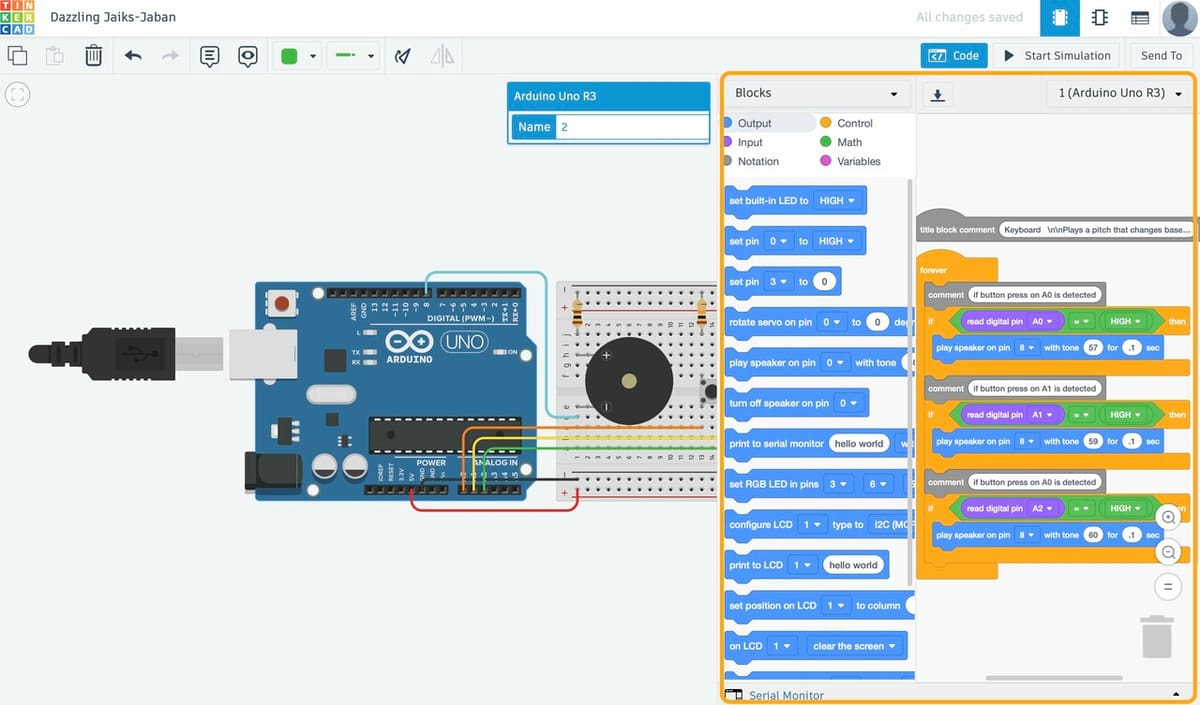
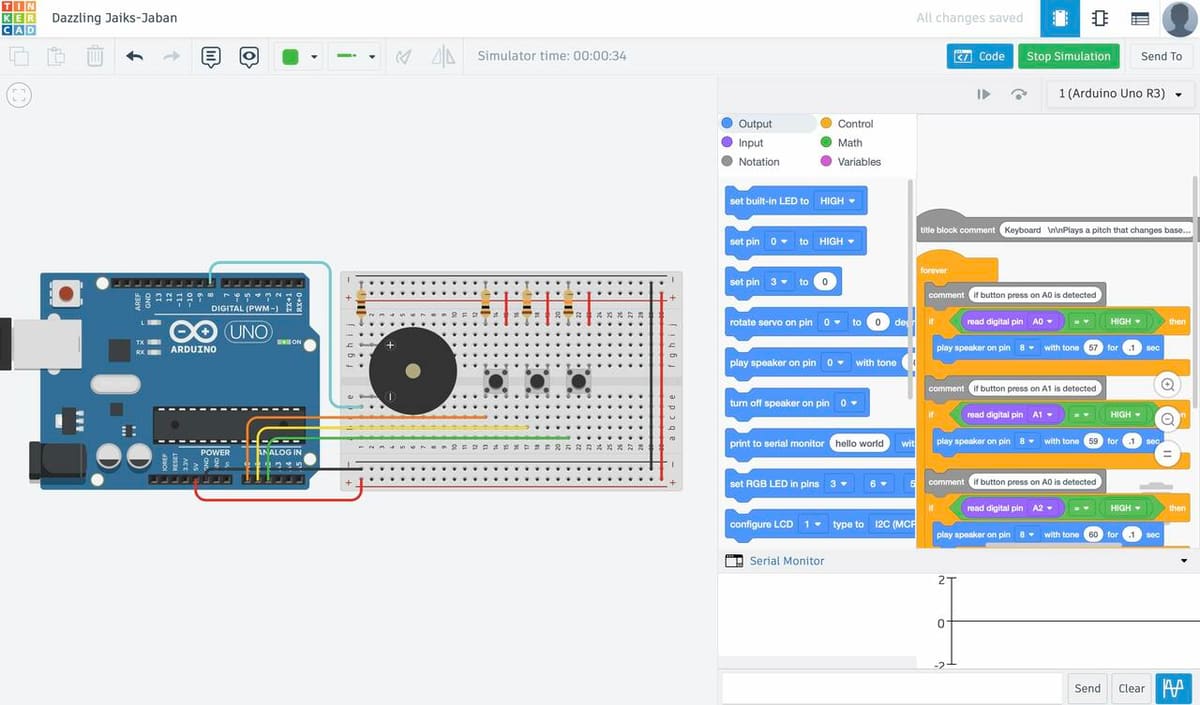
You can alter the connection (wire) colors for clarity and edit the names of your components as required. Depending on what you design, you can then click on the code button to open up the coding area (outlined in orange). Here you can find premade code blocks for programming microcontrollers, such as the Arduino Uno (which is available in Circuits). A serial monitor and oscillograph round up the tools at your disposal. You can actually see the programs you create with code blocks written out as a program in C after downloading it as an Arduino file and opening it with a text editor.
Circuits allows you to create a range of circuits, from very simple to fairly advanced circuitry. However, it is restricted by which components and code blocks are at your disposal.
User Experience & Alternatives
Overall, Circuits is an amazing product that’s easy and clear to use. Dragging, dropping, and occasionally entering text isn’t taxing by any means. But the ease of use comes with restrictions in terms of the components’ flexibility. You have to make do with what’s available. In all fairness, this is brilliant for learning purposes because finding workarounds requires deeper understanding and creativity while avoiding unnecessary jargon and confusion. Advanced users might not be that thrilled, though.
The code block style of programming is easy thanks to its drag-and-drop nature. Naturally, it’s aimed at beginners and can be a little confusing to start with if you’re already familiar with programming. Nevertheless, the overall experience is smooth, without any technical issues.
Lastly, the simulation experience is well done, it’s a great feature to be able to manipulate environmental variables, such as humidity and light while running the program. The serial monitor as well as any visual electronic indications, such as LEDs, provide effective feedback on what is happening when a simulation is running. And of course, the virtual oscilloscope provides yet another mode of feedback by displaying the resulting signals in real time.
Alternatives
Wondering what some alternatives to Tinkercad’s circuits might be? Ponder no more:
Microsoft’s MakeCode is a free, online, learn-to-code platform where anyone can build games, code devices, and mod Minecraft. It focuses on teaching programming concepts, making it especially useful for educational purposes. With it, users can develop their programming skills by evolving from block-based coding to languages like JavaScript and Python.
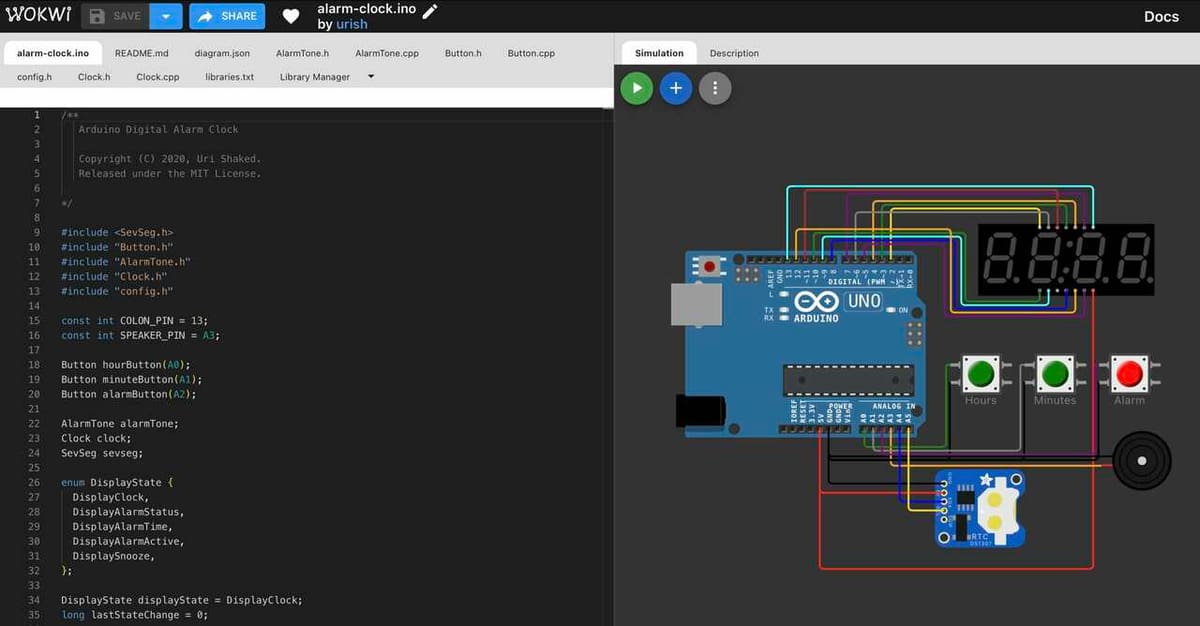
Wokwi Arduino simulator is an online electronics simulator, ideal for IoT projects. It’s a browser-based tool with a supportive Discord community. In addition to Arduino, you can simulate projects using Esp32, STM32, and Raspberry Pi Pico. Wokwi offers many features, including Wi-Fi simulation, allowing your simulated project to connect to the internet, and SD card simulation for storing and retrieving files and directories from your code. Wokwi is free, but professional users can pay a monthly subscription of $7 to access special features like uploading custom Arduino libraries and binary files, as well as keeping private projects unlisted.
Virtual Breadboard, available for free in the Windows App Store, is designed for students and hobbyists to learn electronics. It features ChatVBB, an OpenAI ChatGPT integration, enabling users to get results faster and learn from the AI assistant. The platform allows users to create and simulate electronic circuits, making it particularly useful for prototyping and testing before building the actual hardware.
Codeblocks
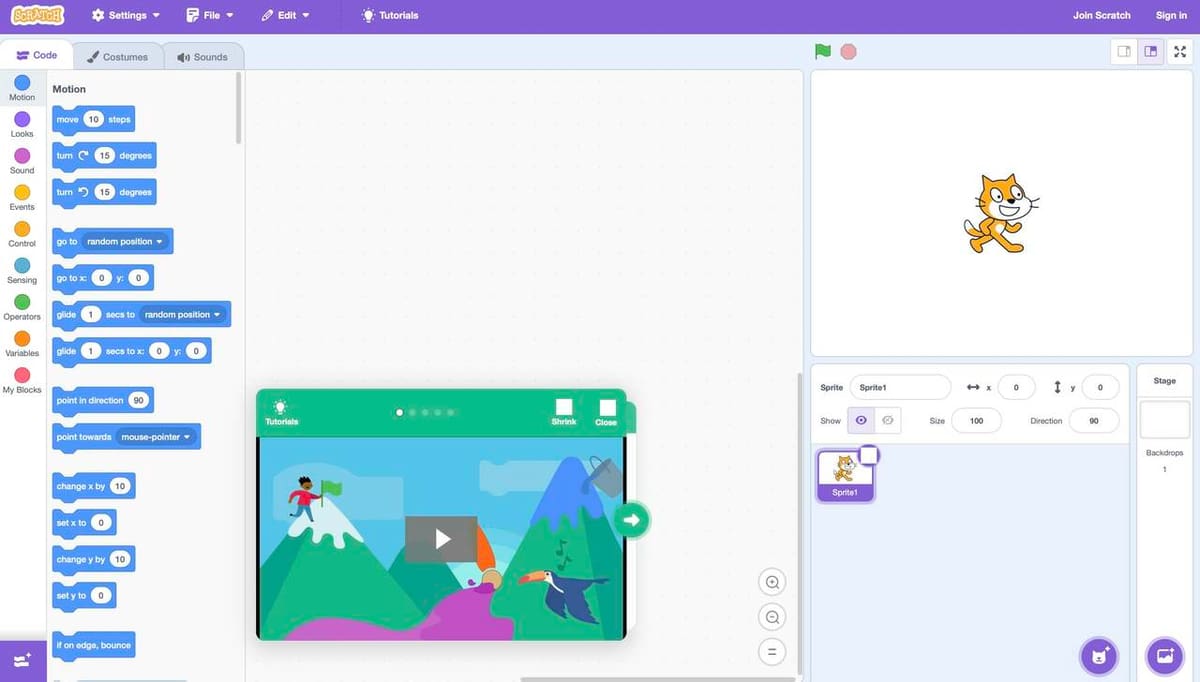
Introduced in 2018, Codeblocks offers a way to design and animate 3D shapes with programming, and it’s now an integral part of the Tinkercad suite. The coding engine behind it is Scratch, an open-source MIT programming language designed for kids.
The program is simple to use, mostly involving dragging and dropping blocks of code that snap into place. They’re labeled in an easily understandable format that’s designed to teach the principles of coding in a fun and playful way. The principle of stacking the code blocks, running the code, and tweaking as necessary instills the idea of coding as a structured process.
When it comes to Codeblocks, Tinkercad offers an inviting concept for trying things out and experimenting without consequences. It’s not a program that will cause a PC to crash or worse. It either accepts the input or it doesn’t. The worst outcome is that it may not work as intended.
Use Cases & Limitations
Compared to Scratch, Codeblocks has some notable differences in terms of possibilities and limits. The sky is the limit but only as long as it fits within the existing code blocks. New code blocks can’t be created, which is the same for Scratch, but Codeblocks has fewer blocks on offer, as it’s skewed towards 3D design rather than programming.
Any 3D object you create can be exported as an SVG, OBJ, STL, or GLIB file, and any animation created can be shared as a shape or GIF.
Use Cases
- Creating 3D models
- Creating programs
- Learning programming
Limitations
- No export function for created programs
- No access to underlying engine
- Limited to 3D modeling-related programming
- Restricted availability of code blocks
- Restricted availability of shapes
Layout
As you might expect, Codeblocks is laid out in a very similar way to 3D Design and Circuits.
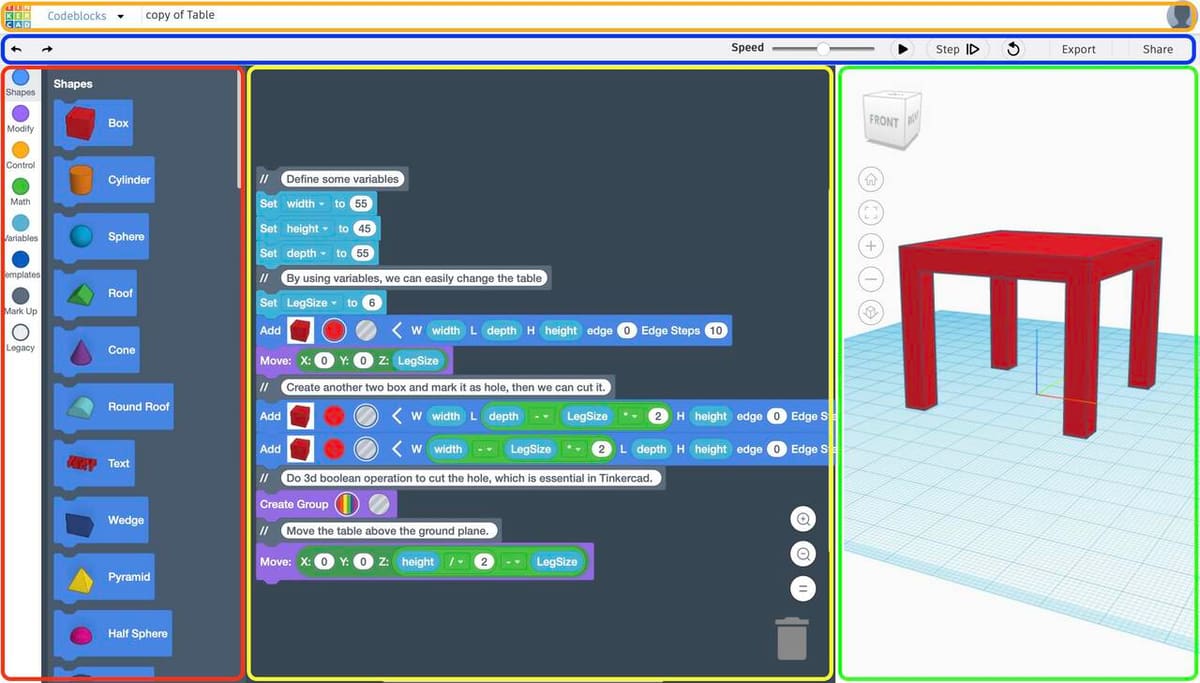
The topmost bar (outlined in orange) includes platform and mode-specific options. The second topmost bar, or the main menu (blue), includes code-specific operations such as Play, Run Step by Step, Rewind, Export, and Share. The blocks menu (red) provides all available code blocks from Shapes to Modifiers, and Control, Math, and Variables. The code block-editing area is located in the center (yellow), and it is where you stack the blocks of code to build an algorithm that results in a design. And the 3D viewer (green) shows your creation as it happens.
Features & Functions
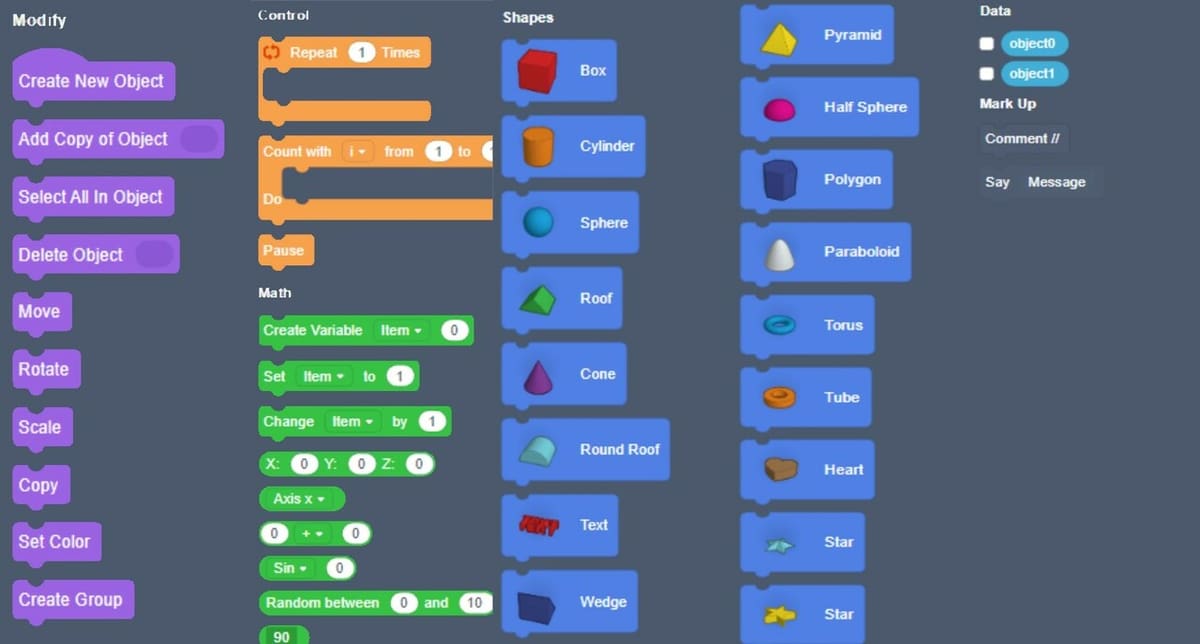
Code blocks are sorted by categories. Let’s look at each one to get an idea of what’s at our disposal.
- Shapes: Here there are basic shapes, from a box to a star.
- Modify: This section is for creating, copying, deleting, and generally modifying shapes.
- Control: These code blocks are for repeating, counting, and pausing functions.
- Math: These are for creating and changing variables, angles, and axes.
- Data: Depending on your code, if you’re generating data, it will be shown here.
- Mark-up: These are code blocks for inserting comments and creating messages.
User Experience & Alternatives
Codeblocks is an interesting addition to Tinkercad, as it combines coding and 3D modeling, and it runs smoothly without any mishaps. Some labels are missing when hovering over some icons, but that’s not really a problem. The program is mostly self-explanatory, but for first-time users, a quick start option exists every time a new Codeblocks project is created.
With Codeblocks, you can perform parametric modeling and create animated 3D objects. The main restrictions come as a result of the code blocks that are available. Additionally, parametric modeling is restricted to the dimensions of the code blocks. Issues will arise if you design and would like to alter a more complex body. While not impossible, it falls short of a more professional program that offers a dedicated list of editable parameters for the design.
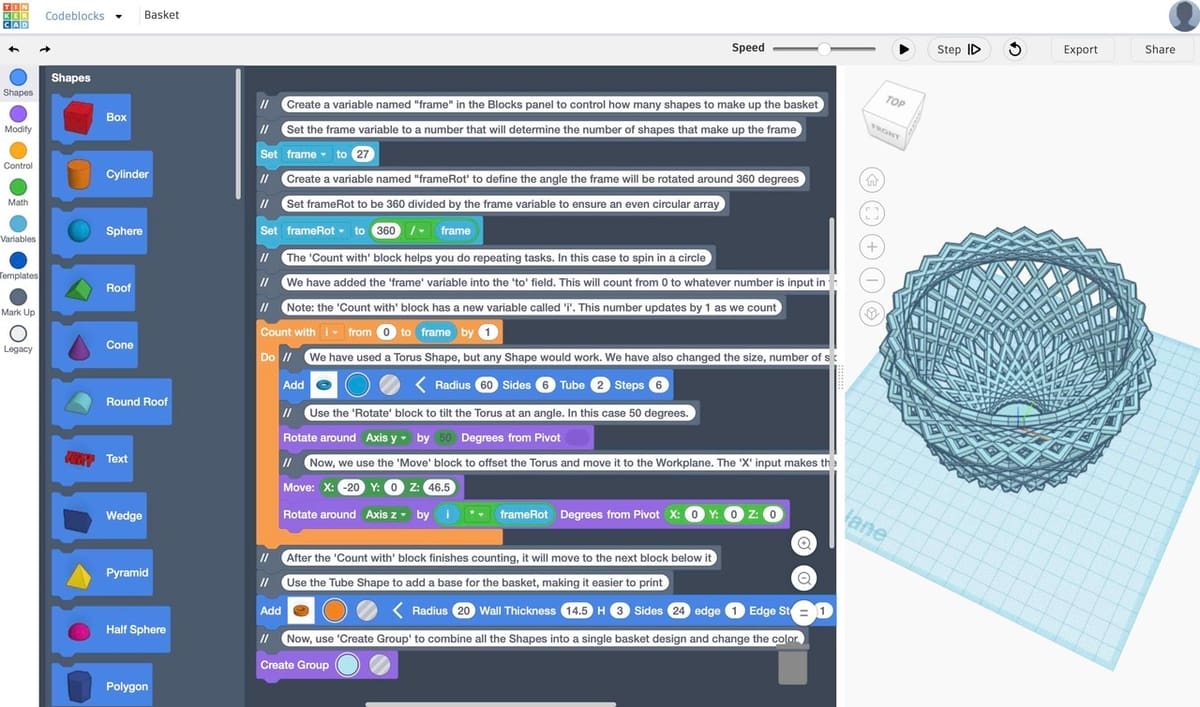
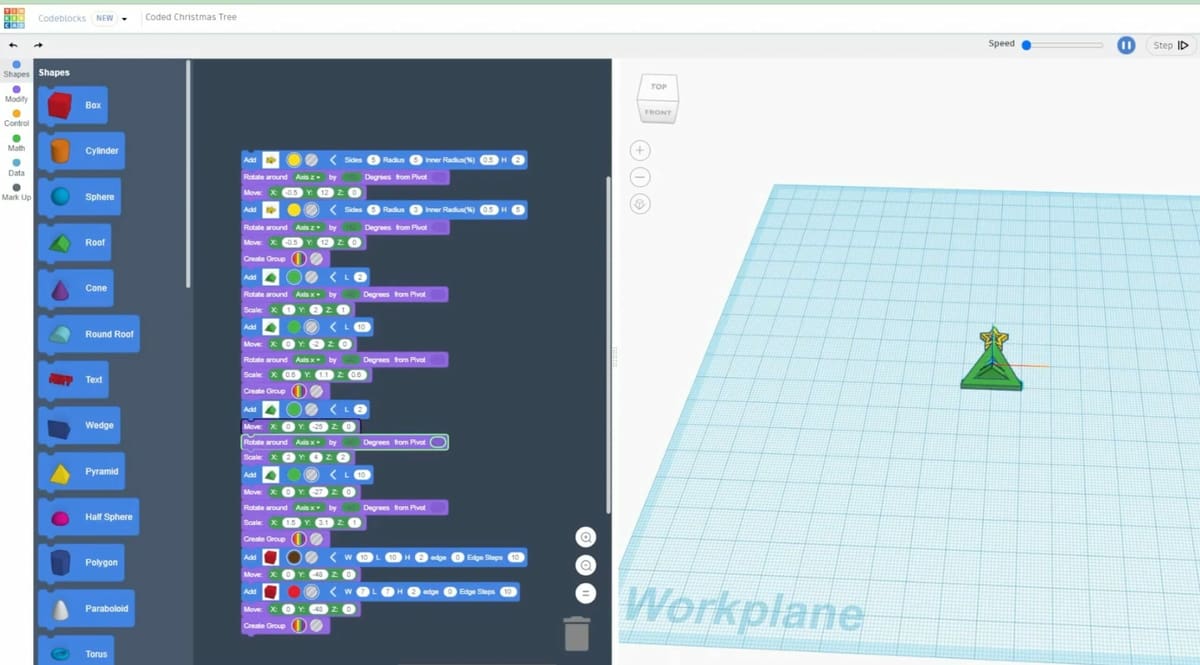
Exploration and learning are encouraged through available Codeblocks projects, such as the one in the image above, as well as tutorials in the resource center. Codeblocks has been designed for educational purposes with fun and ease of use in mind. Watching the animated build processes or going through it step by step is a nice feature. It runs smoothly and quickly, even with imperfect connections.
Alternatives
Just in case, here are some alternatives to Tinkercad’s CodeBlocks.
Scratch is an online tool designed, developed, and moderated by the nonprofit Scratch Foundation. It’s the world’s largest coding community for children, with a simple visual interface that allows young people to create digital stories, games, and animations. Although designed especially for ages 8 to 16, Scratch is used by people of all ages. It’s utilized in more than 200 countries and territories and is available in more than 70 languages.
Tynker is a platform that uses visual blocks to help kids learn coding concepts through games, motivating them to acquire skills and transition to more advanced programming languages like JavaScript and Python. It is a paid subscription service, but you can try it for free. Tynker offers three apps for tablets: Tynker Junior, Tynker, and Mod Creator.
Snap! is a visual, drag-and-drop programming language for kids and adults that also serves as a platform for serious study of computer science. It’s an extended reimplementation of the abovementioned Scratch, in which you can build your own blocks. Snap! runs in your browser and is presented by the University of California at Berkeley.
License: The text of "What Is Tinkercad? – All You Need to Know" by All3DP is licensed under a Creative Commons Attribution 4.0 International License.