3D Print Your Own Guardian Sword from Zelda: Breath of the Wild

Are you a Zelda fan with a 3D printer? Here’s is a project-based tutorial from Adafruit’s Pedro Ruiz that will teach you how to 3D print and illuminate the unforgettable Guardian Sword featured in Zelda: Breath of the Wild.
As many makers know, the two worlds of 3D printing and video game cosplay/props constantly collide with one another. Not only are there many gamers in the 3D printing community, but the technology itself makes it easy to customize and create memorable items from your favorite games.
If you surf through 3D model repositories like Thingiverse or MyMiniFactory, you’ll find a ton of props from Nintendo’s action-adventure series Zelda. The latest prop to emerge from the depths of Hyrule is the magnificent Guardian Sword that is wielded in Zelda: Breath of the Wild.
The open-source hardware company Adafruit originally came up with this design and published a video showcasing the project, which you can check out below. Since then, the 3D model repository Pinshape has taken the design and made a few adjustments of their own.
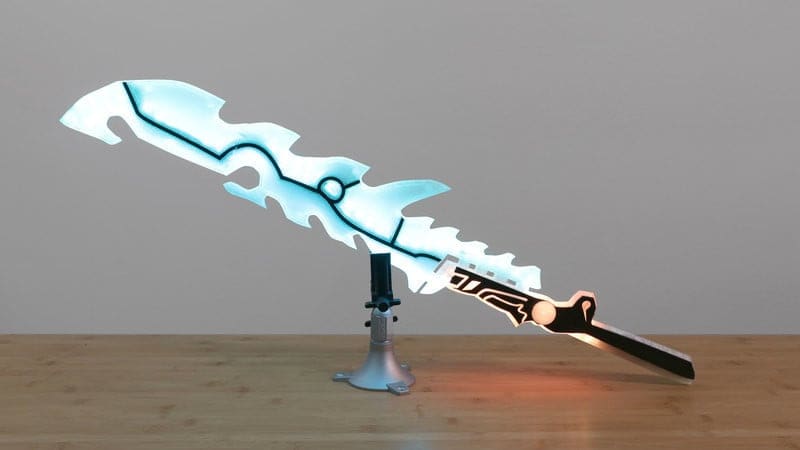
What makes this wildly shaped sword is that it’s illuminated by NeoPixel LEDs. This gives the 3D printed design an especially cool look when it’s unsheathed in the dark.
The sword was designed by Adafruit’s very own Pedro Ruiz, who used from reference images from the game to create the model in Autodesk Fusion 360 3D CAD software. Ruiz is a designer, 3D printing enthusiast, and the motion graphics and video guy at Adafruit. His design is broken up into several pieces in order to make the 3D printing process easier. Once printed, the final parts are assembled together with screws.
Let This 3D Printed Guardian Sword From Zelda: Breath of the Wild Light Your Path
In Adafruit’s version, the company used a Type A Machines Series 1 Pro 3D printer. This 3D printer is known for offering a huge build volume, making it ideal for larger parts used in the Guardian Sword. Unfortunately, Type A Machines recently announced that it was going out of business.
In the Pinshape version of the project, there are a few adjustments made to the Guardian Sword, the main one being the use of SLA 3D printing technology instead of FDM.
In order to 3D print the sword with a smaller build volume, the Pinshape team explains that they used MeshMixer to split the STL files into smaller pieces. Pinshape used the Formlabs Form 2 3D printer, providing an even higher quality surface finish than the Guardian Sword model made by Adafruit.
In both cases, the makers used clear 3D printing filament, which was done to ensure that the LED lights shine brightly. In order to complete this project on your own, you’ll need to feel comfortable working with electronics (or have someone with you who has that experience).
Here are the electronics that Adafruit uses to light up the 3D printed Guardian Sword:
The final design is 34 inches in length and has over 90 NeoPixels to help you along the dangerous roads that lead to Hyrule. You can visit the Adafruit or Pinshape website to find out more information on this stellar Zelda prop. It’s worth checking out both to see which guide is more suitable for your 3D printer (Adafruit for FDM, Pinshape for SLA).
And, for those of you who want to bring more Zelda props to life, be sure to check out our list of the 25 Greatest Legend of Zelda Props.

License: The text of "3D Print Your Own Guardian Sword from Zelda: Breath of the Wild" by All3DP is licensed under a Creative Commons Attribution 4.0 International License.