Cura Update to 5.3 – New Features & Hidden Gems

UltiMaker's Arjen Dirks walks you through how to get the most out of the latest version of Cura, including multi-material interlocking, tree supports, and recommended settings.
It’s been just about a year since UltiMaker launched Cura 5.0, the earth-shattering full-step update to its free, open-source slicing software, which is the most popular application in the world to prepare digital models to be 3D printed.
In that time, as you might expect, bugs have arisen, and opportunities for improvement have come to light. The result is, drumroll, Cura 5.3.
All3DP sat down with Ultimaker’s Director of Community Software, Arjen Dirks, to take a look at the new version’s features and fixes that give you more flexibility, efficiency, and quality in your 3D printing — plus alligator clips.
New Features Debut in Cura 5.3
We cover the improvements and tweaks below, but first let’s jump to the new and most exciting feature since the Cura 5.0 release: multi-material interlocking.
What is it, and why do you need it?
Let’s back up for a minute and talk about a fundamental flaw, or barrier, in FDM 3D printing: multi-material parts. Wouldn’t it be great to print a soft TPU handle directly onto your PLA or nylon tool? Unfortunately, PLA and TPU are incompatible materials, meaning they won’t bond together as two layers of the same material would. Your TPU handle would just fall off your tool, most likely.
There are workarounds, such as printing joints, using heat-set threaded inserts, or simply gluing parts together. But now, in Cura 5.3, the multi-material interlocking feature enables you to, let’s say, “weave” two materials together at an intersection layer to produce a strong, fully bonded effect. At the interface of two materials, Cura can generate an alternating overlapping pattern that physically locks different materials together.
UltiMaker is so excited about this new capability it calls it something that “makes you rethink the fundamental rules of 3D printing.” And they may be right.
The new feature redefines a multi-material part’s strength as the strength of the weakest of the two materials and not the compatibility of those materials, UltiMaker says. It is available on any printer capable of printing two or more materials at once. Simply enable the ‘Generate Interlocking Structure’ setting under the ‘Experimental’ heading. Experimental settings are only visible when enabled via the ‘Setting Visibility’ section of the ‘Preferences’ menu.
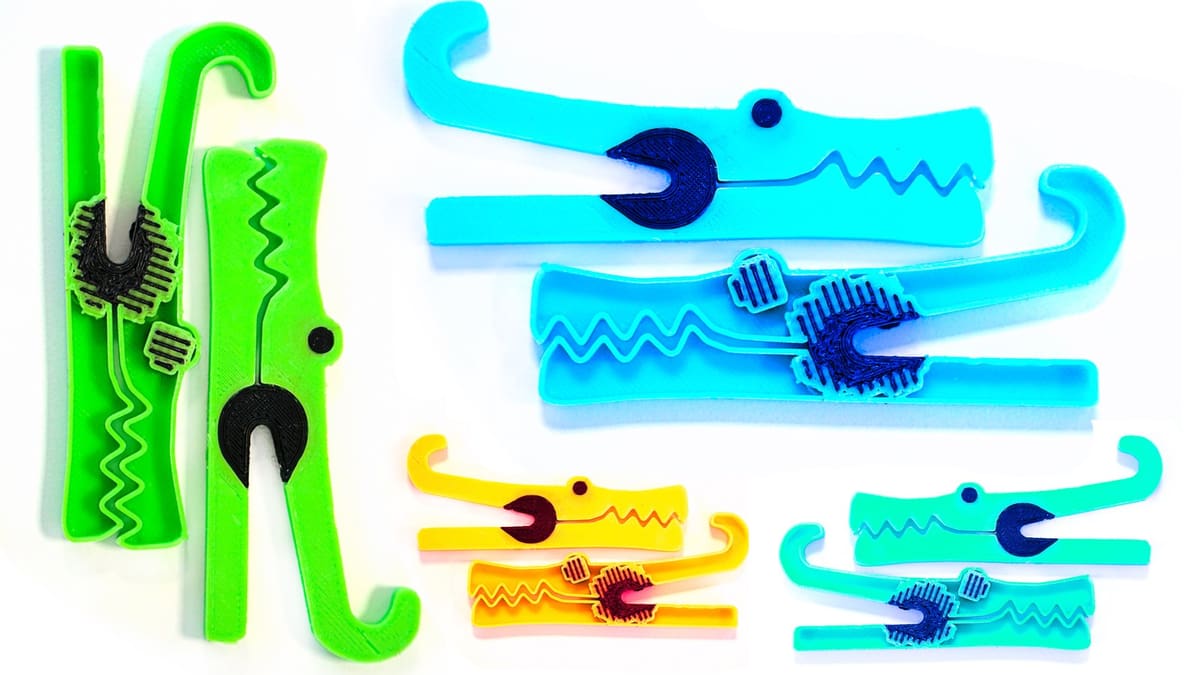
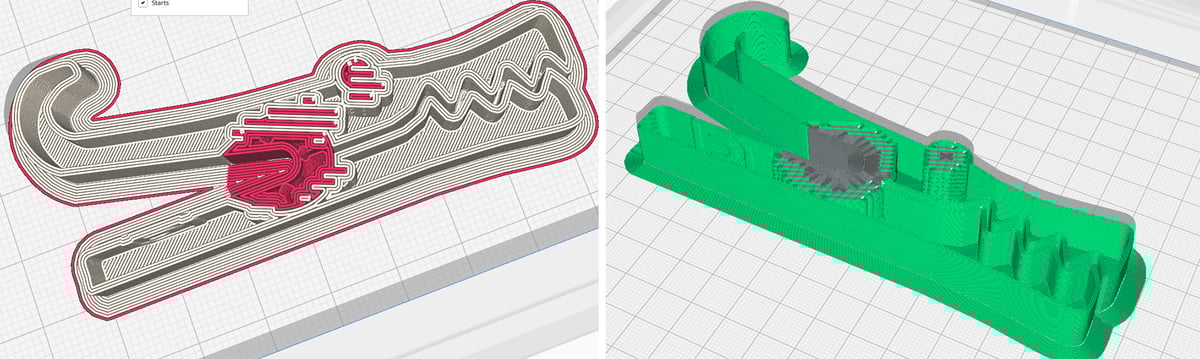
To illustrate multi-material interlocking, UltiMaker shows off a functional alligator clip printed in PLA with a TPU hinge (above). But the applications are endless. Dirks says he sees machine shops and factories printing nylon jigs and fixtures with TPU hinges or parts with softer materials as coverings where needed.
Take Interlocking for a Spin
Before you get too excited, note that there are very few models besides the alligator clip available for you to download and try out this feature. If you’re a designer, jump into your CAD program and take a new look at your part assemblies minding where interlocking may be an advantage.
Dirks says the easiest way to start is with multiple STL files. “Import multiple STL files into Cura, then give them both different textures, different materials assigned to different extruders, and then use the interlocking feature to mix them together.” Alternatively, you can work in CAD with meshes by assigning each mesh to a different print core, Dirks says, and then using the Cura interlocking feature to connect them together.
One interlocking material design tip is to have a bit of meat to your part, Dirks says. In other words, “if you have a hinge that’s just one or two millimeters thick, then there are likely going to be too few layers that overlap in interlocking. It’s easier when you start designing to not have a flat surface with a flexible surface but to think about mechanical interlocking; making something become a bit wider and then attached to something rigid.” A classic woodworking dovetail comes to mind. “The more layers you have, the stronger it will get.”

Recommendations You’ll Want to Follow
Now, let’s move on to something that irks seasoned Cura users – or Champions, as Ultimaker calls them – changing the recommended setting. Cura can recommend print settings that don’t suit everyone and need tweaking and manual adjustments.
Well, the folks at UltiMaker have seen your adjustments, and they agree, or at least, they’re intrigued. The recommended print settings menu has been updated to include many of the most commonly changed settings, such as the option to choose an infill pattern, support placement, and more. It is also now possible to save your changes to the recommended settings for future prints.
“When we, at Cura, take a look at the user slicing data, we see a lot of users doing things where we as specialists would say, why are people doing that?” says Dirks. “For example, we would not touch layer height that often, so we ask ourselves, why are people just changing the layer height? We look into what people are doing with the goal of finding ways to make it easier for them to achieve what they want to achieve without making the mistakes that might come with it.”
Cura developers uncover the mistakes so you don’t have to, but you still have the freedom to tweak settings at will. “If you know what you’re doing, please do your thing,” says Dirks. “But if you’re a bit of a novice, we hope you can achieve your goals within the recommended menu, and I think you’ll see a bit more of that.”
Tweaks & Fixes to Boost Quality
Now let’s get to the fixes you may or may not even notice but should result in overall better-printed parts.
Z Seam. Ugh, those noticeable Z seams; the vertical lines of blob created when the print head moves up to begin the next layer and leaves behind a little extra material. Cura 5.3 aligns Z seams more consistently when you use the “Sharpest Corner” Z seam alignment setting and ‘None’ under the “Seam Corner Preference” dropdown.
Brims. Printing with brims has also been improved, UltiMaker says. Brims will now print faster and should be easier to remove. Brims can also now be printed with two materials in a single model, resulting in better adhesion and cleaner print post-processing.
Base Layers. Ever wonder, as you carefully monitor the first layer of printing, why the print head doesn’t move in a sequential concentric pattern from the outside in, but seems to print out of order? Well, now, when selecting the “Concentric” option under the “Bottom Pattern Initial Layer” setting, your first layer will print sequentially. Mystery solved.

Supports. You may not notice something that isn’t there, which is a bonus when we’re talking about supports. Cura 5.3 will generate “fewer unnecessary support structures,” according to UltiMaker. How about only necessary support structures? Well, fewer is an improvement. The company says the updated slicer will generate more reliable supports overall, particularly when printing parts with small complex details.
What’s reliable? Dirks says supports are an evolving feature. “We’ve been playing around a bit in the past versions with making supports better, which means that the surfaces are better supported while at the same time using as little material as possible and printing as fast as possible. We overshot a little bit with the 5.2 version. We heard that from the community that, especially with organic shapes, it wasn’t always working.”
Dirks’ team dialed back the support features you saw in 5.2, so they should be more stable and predictable in 5.3.
If you were hoping the promised improved Xmas tree supports would debut in this update, sorry to disappoint. Apparently, they’re not quite ready, but you can still download the alpha release to try them out in anticipation of their eventual release. Dirks says Xmas tree supports should debut in Cura 5.4 and he sees these new supports becoming the default support of the future in Cura, “but it’s not there yet. We have to tweak a lot.”

Pointy Details. UltiMaker says printing speeds and minimum layer time behavior has been tuned to improve the quality of small layers. The result is that small spikes, cones, and pointy details will now print better.
Brand Recognition. Finally, UltiMaker acknowledges that not everyone uses an UltiMaker with their Cura. The improved onboarding lets you add a “non-UltiMaker” printer more easily. And while we’re talking about brands, you’ll notice the inclusion of UltiMaker (big M) to correctly reflect the merger with Makerbot.
License: The text of "Cura Update to 5.3 – New Features & Hidden Gems" by All3DP Pro is licensed under a Creative Commons Attribution 4.0 International License.