Thomas Sanladerer Converts Printrbot Play into Off-Grid Printer

YouTuber and maker Thomas Sanladerer turned a two-year-old Printrbot Play into an off-the-grid printer, which can print for six hours in the harshest of conditions. You can follow his video instructions to make your own.
3D printing isn’t known for its portability, but Thomas Sanladerer, a full-time maker and go-to resource on 3D printing on YouTube, took a step towards changing that.
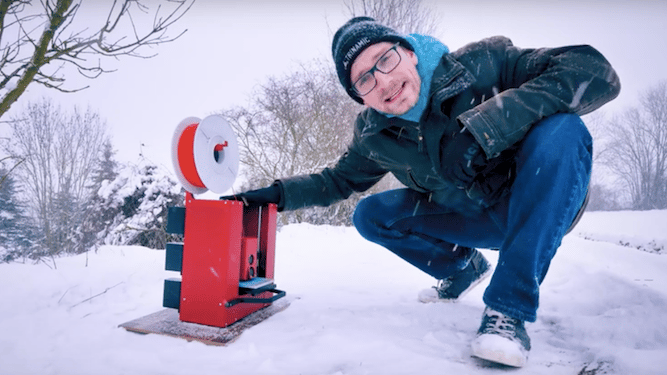
Walking in a snow-covered field in a recent YouTube video, Sanladerer pretended to stumble upon a Printrbot Play on the ground. The machine was hard at work despite no external power source, busily printing away.
Sanladerer has done tutorials on lots of other cool 3D printing related tricks in the past—from fun builds like the hairy lion to printer reviews.
This project is pretty hands-on and requires a bit more work and materials than the hairy lion, but it will let you print anywhere. You can even pick it up and run around with it, as Sanladerer shows in his video.
To get around the external power source, Sanladerer used six NP-F batteries. He also built in a WiFi access point to access Octoprint on his phone.
The result is a machine that can print unencumbered for at least six hours.
Create Your Own “Off-the-Grid” Printrbot Play
The Printrbot Play, a two-year-old machine, was the perfect choice for this project for a number of reasons, explained Sanladerer.
“First of all, this thing is built like a tank,” he said, showing it off in this video.
Furthermore, it is compact and has a “neat-ish beam” which makes carrying the printer a lot easier. Finally, the fact that this printer doesn’t have a heated bed means that it doesn’t draw as much power meaning it can run on batteries for longer.
To make your own off-the-grid Printrbot Play, you’ll need:
- A Printrbot Play
- Raspberry Pi access point
- 100W Boost converter (battery voltage to 12V)
- 5A CC-CV Buck converter
- 3A Buck converter (battery voltage to 5V)
- 2.6mm banana plug
- NP-F batteries
- A lot of patience
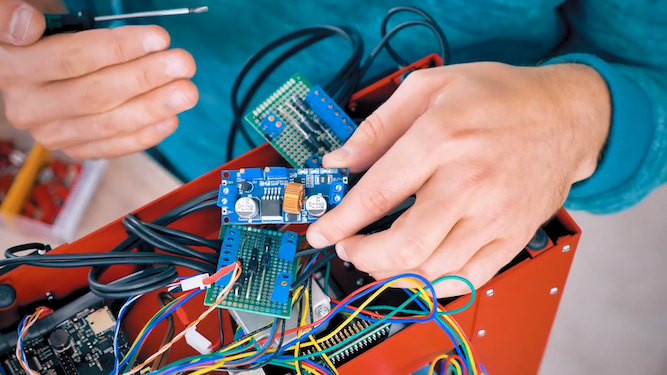
If you decide to take on this ambitious project, you’ll be required to add the six Sony NP-F camera batteries to the machine via 3D printed mounts. You’ll also need to be comfortable tinkering with hardware inside the printer to enable it to rely on the external batteries.
Such tinkering includes running the batteries into a DC boost converter which enables the voltage to reach the required 12V for the printer to work. A DC regulator will also be used to bring the voltage to 5V to run the Raspberry Pi which in turn runs OctoPrint.
Already squirming at the necessary hardware work? The software side is not much easier. You should be comfortable working with Raspberry Pi before taking on this project as it needs configuring to work as a WiFi access point. You can find Sanladerer’s German instructions here.
If the above hasn’t deterred you, you can follow Sanladerer’s 30-minute video below, which explains the process in-depth from start to finish.
License: The text of "Thomas Sanladerer Converts Printrbot Play into Off-Grid Printer" by All3DP is licensed under a Creative Commons Attribution 4.0 International License.