3D Printed DSLR Accessories Essential For Filmmakers

Who should read this: Anyone who wants to save money by 3D printing your filmmaking tools.
When you’re just diving into the world of filmmaking, you’re always on a tight budget. If it either is a hobby or you’re at the start of your career, you’re not making much money yet. Filmmaking equipment isn’t cheap, in fact, you often pay a huge upcharge just because an item is designed specifically for filmmaking purposes. You’re just starting out, and there is no huge savings account available on the side. Your first clients aren’t paying much, or not at all. You need to build a portfolio and still try your best to deliver stunning works. Or are you more of an artist – art film has zero budget in the majority of cases. Turning your visions into works of art will cost you a lot of money.
I collected some useful 3D printable projects for DSLR filmmaking so you can pursue your filmmaker aspirations without paying an arm and a leg.
Always rig (towards the center of gravity)
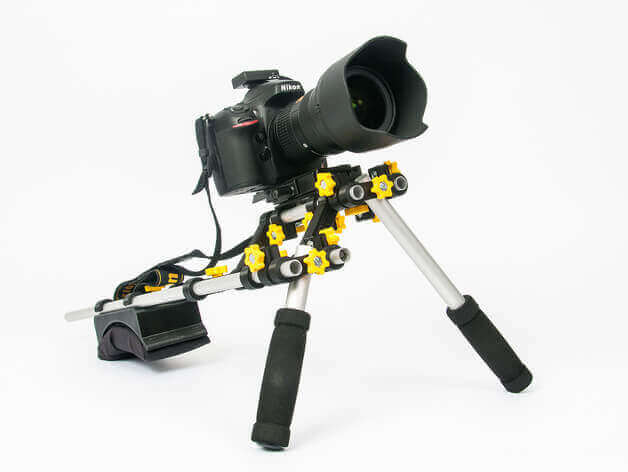
One very basic tool that can improve your work tremendously is a camera rig. A rig adds stability to shots you can’t do on a tripod. Tilts, pans and a little movement become possible without the shakiness that might ruin your shots if you try to do those out of hand. Keep in mind that 3D printed rigs aren’t as stable as those machined out of massive metal. But you won’t always need those when you’re shooting with lighter cameras such as DSLRs, mirrorless, a black magic pocket cinema camera and such. I myself have used the 3D printed DSLR shoulder rig (in fact, you can see it on my profile picture), coming to the conclusion that a very lightweight rig is a real improvement, especially when you have to carry it around for a long time.
The rig designs of course need additional screws and nuts, but nothing you can’t get for a few bucks in the next hardware store. Also worth checking out is this 10$ 3D printed rig (full instructions here), this 3D printed rig with a break lever follow focus or the DSLRrigger – a 3D printed DSLR rig design that adds more of a cage to your cam.
More stability
A rig doesn’t provide absolute stability. As soon as you begin to walk, every step you take will be visible in your end result. In this case, the industry’s standard over a long period was using a Steadicam or Glidecam. You can build a steady calm system using 3D printed parts, a few screws and a rod. The model is called the Kontinuum Glide. While that sounds more like some sort of lube, it is definitely worth a try. But expect to spend a lot of time calibrating and balancing it out the first time you shoot with it.
This video about the possible, smooth results should be motivating enough:
Smoother movements
Slower movements on the horizontal axis, for close up shoots, landscape and other more more controlled and predictable shots, you don’t need to try and achieve them with a Steadicam. Spare your nerves, save the money and time, and use a horizontal slider. Adafruit Industries has a nice 3D printed slider online. Option 2 is the <20$ 3D printed DSLR slider using 2 rods, which could be favourable for longer slide distances.
Again, a video showing the results you can achieve with a slider:
Need to focus?
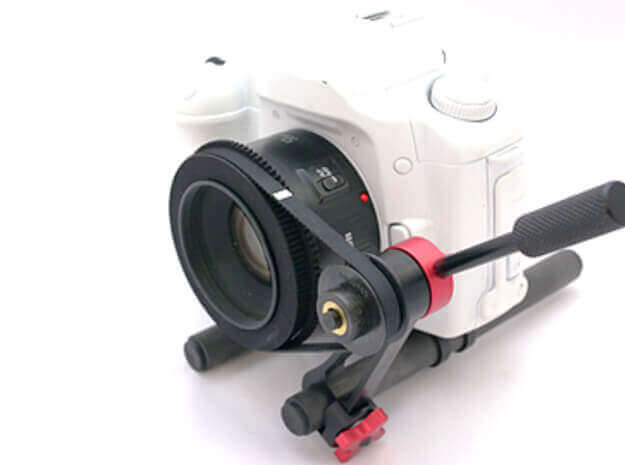
At one point, you will realise that the autofocus of your camera doesn´t do it for you anymore. With a large aperture and shallow depth of field, full control on where the image is in focus becomes necessary. So you need a follow focus that enables you to pull the focusing gear of your elements without constantly fiddling around on the lens itself. A geared follow focus is your best guess. If you´re using Canon’s “nifty fifty” lens, there’s an extra 3D printed follow focus adapter available so your follow focus has a good grip.
Get that J.J. Abrams look

A look director J. J. “More lens flare!” Abrams is well-known for is the use of anamorphic lenses. It produces distinctive lens flares and a more oval bokeh. The latter is hard to achieve, but lens flares can be produced with the lens flare filter. If you have any old, broken or very cheap filters to spare, you can produce lens flares now.
Clap… action!
Another little thing you’ll need when you have scenical work and many takes you could mix up is a clapperboard. There’s no reason not to use a 3D printed clapperboard, at least for macro shots or close-ups (and, as always, low budget and DIY movie making).
aaand… That’s a wrap!
License: The text of "3D Printed DSLR Accessories Essential For Filmmakers" by All3DP is licensed under a Creative Commons Attribution 4.0 International License.