Formlabs Shares Secret to Making Metal Miniatures With 3D Printing

Formlabs releases a tutorial on how to make metal miniatures from pewter casting molds using the Form 2 3D printer and High Temp Resin.
The scope of 3D printing technology is vast and limitless, offering a broad range of manufacturing and prototyping possibilities to the world. However, when it comes to desktop 3D printing, the material options become strictly limited to thermoplastics. But, as Formlabs has just shown in their latest tutorial, this problem can be solved with a little creativity and maker-spirited spunk.
At the moment, neither desktop FDM nor SLA technology is capable of directly printing metal. But, that doesn’t mean you can’t create metal miniatures with your home printer. The Massachusetts 3D printing startup recently shared a process that allows you to 3D print molds for direct casting.
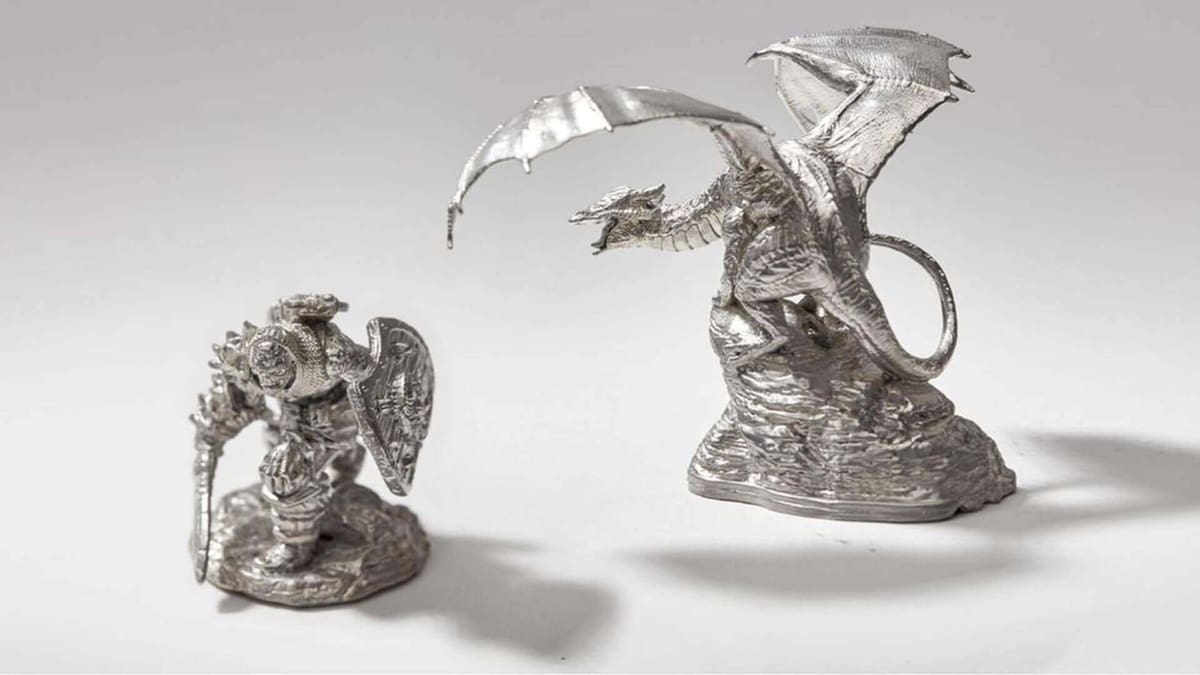
Moreover, direct pewter casting actually offers better detail and surface finish in comparison to metal 3D printing. Not to mention, the overall process costs a fraction of the price. Formlabs uses their High Temp Resin and Form 2 3D printer t0 prove the validity of this unique concept.
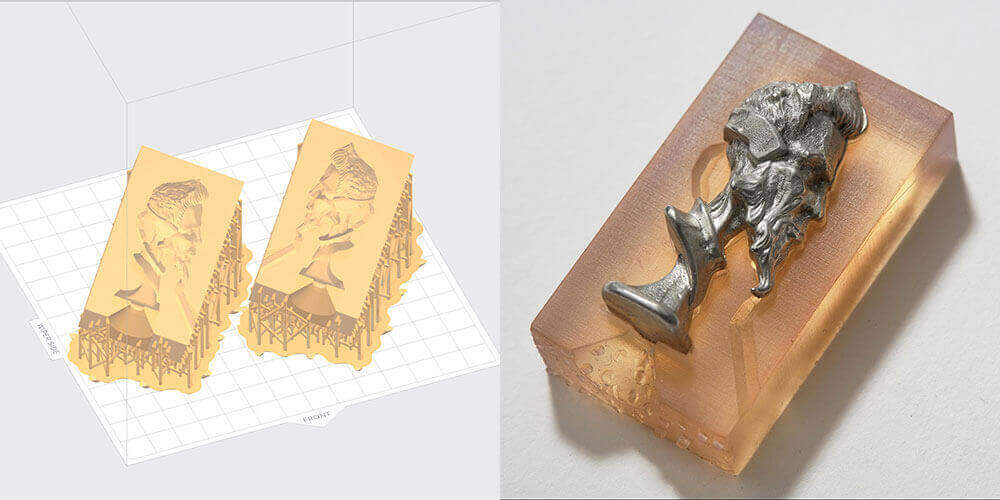
The tutorial requires a 3D model, Form 2, High Temp Resin, a curing chamber (i.e Form Cure), Autodesk Meshmixer, and CAD software. In this case, the company teamed up with Hero Forge to use their custom characters. After you have all the necessary supplies, prepare the design with a sacrificial mold or a pull-apart mold.
Making Metal Miniatures With 3D Printed Pewter Casting Molds
To create a sacrificial, you can use something like Meshmixer or Blender to create a shell of the selected model. Otherwise, you can design your model in CAD into a pull-apart mold. Remember, air vents are needed in the mold to improve how the pewter fills the model.
After the 3D design is prepared, you will print the model in Formlabs’ High Temp Resin. Try to ensure that the model doesn’t include internal support structures. Then, place the print in a curing chamber chamber, helping the material to reach its optimal heat resistant properties.
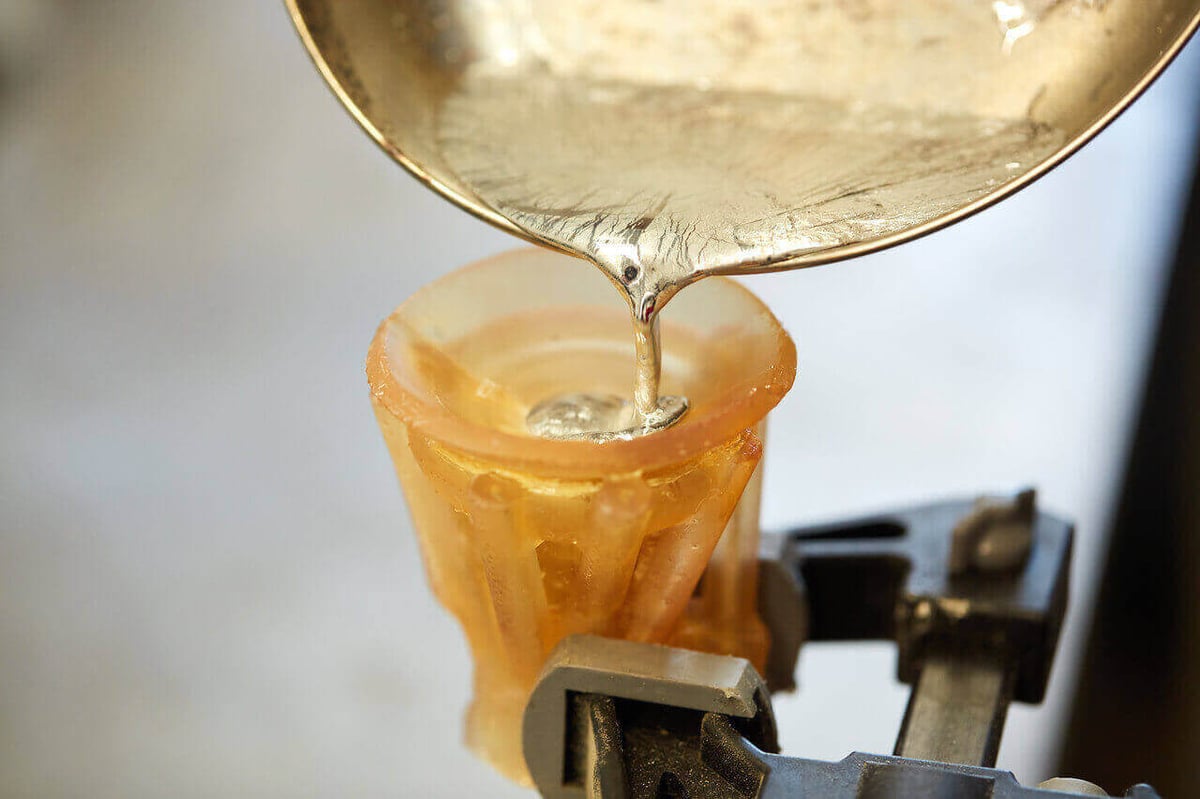
Finally, it’s time to fix the mold with a clamp or vise and pour the pewter alloy inside. Formlabs recommends Alloy R98 from Rotometals, which has a melt temperature of 260 °C. You can melt the alloy on a stovetop frying pan, forming molten pewter with a layer of oxide on top (carefully scrape this off!). Then, after making sure the molten material is at the right temperature, slowly and continuously pour the metal into the mold.
Once the part is cool, which can take anywhere from one to 20 minutes, it’s time to “demold” the part. If you’re using the sacrificial mold, gently chisel the 3D print away with a small screwdriver. You can buffer or polish these pewter miniatures by hand, or with a high gloss finish via rotary tools. Electroplating the precious metals can also help simulate a gold or silver for jewelry.
All in all, this innovative little project will expand the potential of your 3D printing experience even further. It also provides a use study that shows why the Form 2 is one of the most capable desktop machines. Check out the full tutorial and make your own pewter casting molds now!
Check out other fun Formlabs projects: How to Color 3D Printed Prototypes and Models With Crayons
License: The text of "Formlabs Shares Secret to Making Metal Miniatures With 3D Printing" by All3DP is licensed under a Creative Commons Attribution 4.0 International License.