![Featured image of [Project] Make Life Easier with the Pocket-Sized Keytool](https://i.stageall3dp.com/workers/images/fit=scale-down,w=1200,h=675,quality=79,gravity=0.5x0.5,format=auto/wp-content/uploads/2018/03/26160805/FVBMU9SJEYIR290.LARGE_.jpg)
[Project] Make Life Easier with the Pocket-Sized Keytool

Looking for an easy way to organize your life? This 3D printable keytool will hold your keys, USB, a small ruler, a docking device for your phone, and even a bottle opener all in one place.
It’s the little things in life that can make or break your day. What better way to ensure that life goes smoothly than a bit of organization. Today’s Weekend Project is a 3D printable keytool that will give you easy access to a number of gadgets that always seem to disappear when you need them most.
Now, you can keep five essential tools in your pocket with this 3D printed Keytool designed by Lucas de Groot. The project, which was recently shared on Instructables, is an easy and fun way to make something functional with your 3D printer.
In under one hour, you’ll have yourself a one-stop shop for your house keys, a USB drive, a ruler, a mobile docking device, and a bottle opener. This 3D printed Keytool is great for beginners or makers who want a practical example of what desktop 3D printing is capable of.
Interested in undertaking this useful project? Let’s take a quick look at what you need to make your very own Keytool.
3D Printed Keytool: What Do You Need?
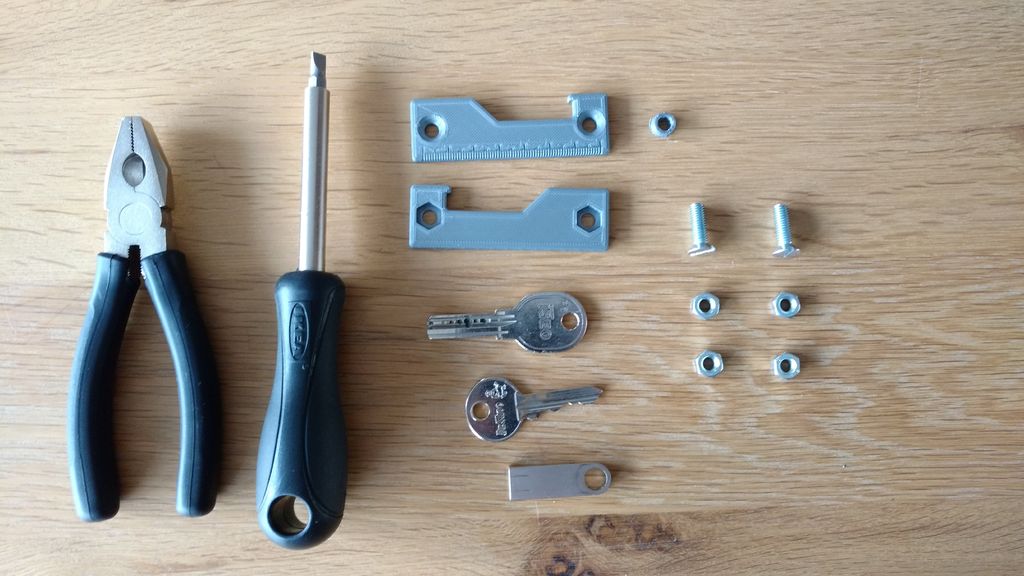
The frame of the Keytool is 3D printed, but you’ll also need a few components to put this useful little kit together. Aside your 3D printer, filament, and of course, keys, here’s what else you need:
3D Printed Keytool: Putting it All Together
The first step to making this Keytool is 3D printing the three separate STL files, which de Groot has made freely available on Instructables. The maker shares that he 3D printed his own with PLA, using a low layer height ranging between 0.2 to 0.1 mm.
Once the 3D printed parts are ready, you’ll insert the M6 Hex Nuts into one side of the Keytool. The model is designed so that they should fit snugly and not fall out.
Then, taking the other part of the Keytool, you’ll plug in the two bolts. Choose one bolt to mount your keys and the USB ring before tightening everything together. On the other bolt, you’ll place two nuts to make sure the parts don’t move around.
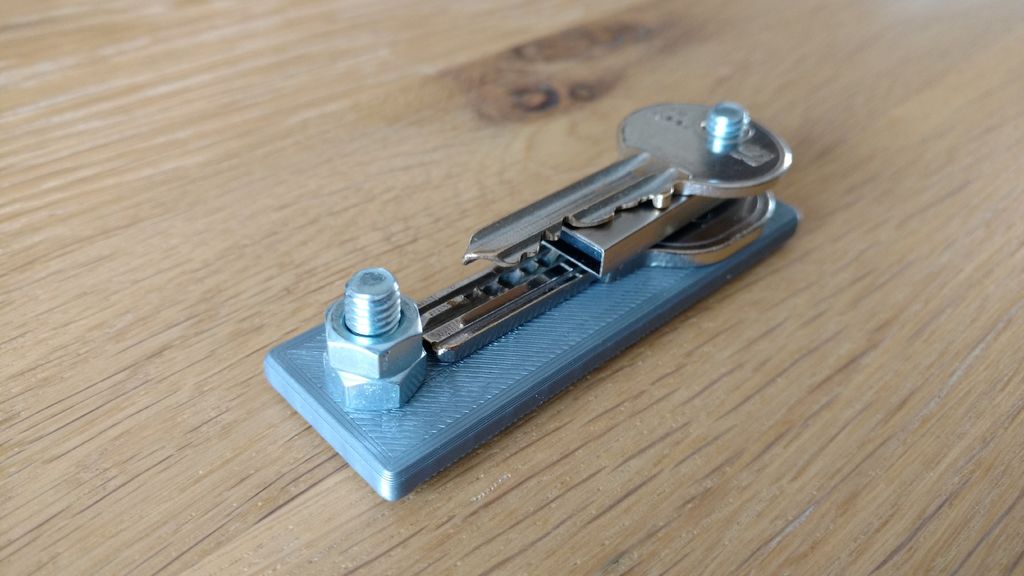
And that’s it! Now you have your very own 3D printed Keytool. The designer recently entered this project into Instructables’ Pocket-Sized Challenge. So, if you love this neat little t0ol, feel free to vote for it and check out the other small (yet significantly useful) 3D printing projects!
License: The text of "[Project] Make Life Easier with the Pocket-Sized Keytool" by All3DP is licensed under a Creative Commons Attribution 4.0 International License.