ZMorph 2.0 SX 3D Printer Review: Life at the Bleeding Edge
Rating

If you like to experiment then the ZMorph 2.0 SX is an easy recommendation. But for daily use? Read our ZMorph 2.0 SX 3D printer review.
We’ve tested out a broad variety of 3D printers in the past year. We’ve looked at Fused Filament Fabrication (FFF) and Stereolithography (SLA). We’ve reviewed both single extrusion and dual extrusion machines. And we’ve compared bargain builds to expensive precision machinery.
Of all of them, the ZMorph 2.0 SX is perhaps one of the most difficult 3D printers to categorise. This is because it’s much more than just a 3D printer. It can also function as a laser engraver and a CNC milling machine. It’s even capable of food extrusion.
It’s also a complete ecosystem of hardware and software. As well as engineering a machine that’s capable of so many functions, the boffins at ZMorph have developed the Voxelizer Software suite that attempts to straddle each of them. This company simply cannot be faulted for the scale of their ambition — even if they don’t quite suceed in meeting their goals.
For the purposes of this review, we’re confining ourselves to evaluting the merits of the ZMorph 2.0 SX as a 3D printer. To adequately cover all the rest falls outside the scope of ALL3DP. Within this range, however, the single and dual extrusion capabilities of this machine are plenty to be getting on with.
ZMorph 2.0 SX 3D Printer Review: Overview
- Pros
- Cons
- Verdict
- Features & Specs
- Unboxing & Setup
- Build Quality & Design
- Software
- Print Performance
- Wrapping Up
ZMorph 2.0 SX 3D Printer Review: Pros
- Impressive hardware design
- Modular toolheads are clever
- Cutting edge experimental features
- Smooth touchscreen UI
- Versatile connectivity
ZMorph 2.0 SX 3D Printer Review: Cons
- Calibration and setup is difficult
- Average print quality
- Sloooooooow
- Voxelizer software is underdeveloped
- Doesn’t play nice with third party slicers
ZMorph 2.0 SX 3D Printer Review: Verdict
The ZMorph 2.0 SX offers some unique experimental capabilities that you won’t find on many other 3D printers. Tinkering with color blending and image mapping is a whole new frontier for desktop manufacturing; while early results are not perfect, they are truly exciting.
The hardware design is impressive, too, with a muscular triangular frame that wouldn’t look out of place in a car showroom. Switching toolheads is simple and painless, and the modular philosophy is something that we wish more manufacturers would follow.
But while the ZMorph 2.0 SX sits at the bleeding edge of what is currently possible with fused filament fabrication, it’s harder to recommend it as a daily driver for 3D printing projects.
We were frustrated with the calibration process, and the Voxelizer Software suite is a weakness. It’s just not as polished as the hardware, and the end results are not comparable to machines whose sole, dedicated purpose is 3D printing.
If you take into account the other features like laser engraving and CNC milling, then the ZMorph 2.0 SX is a more enticing proposition. You could become a true Maker Maestro, juggling and interweaving these different technologies into a single project.
But assessing the 3D printing capabilities in isolation, there are more reliable, faster, cheaper and easier machines you should consider first.
ZMorph 2.0 SX 3D Printer Review: Features & Pricing
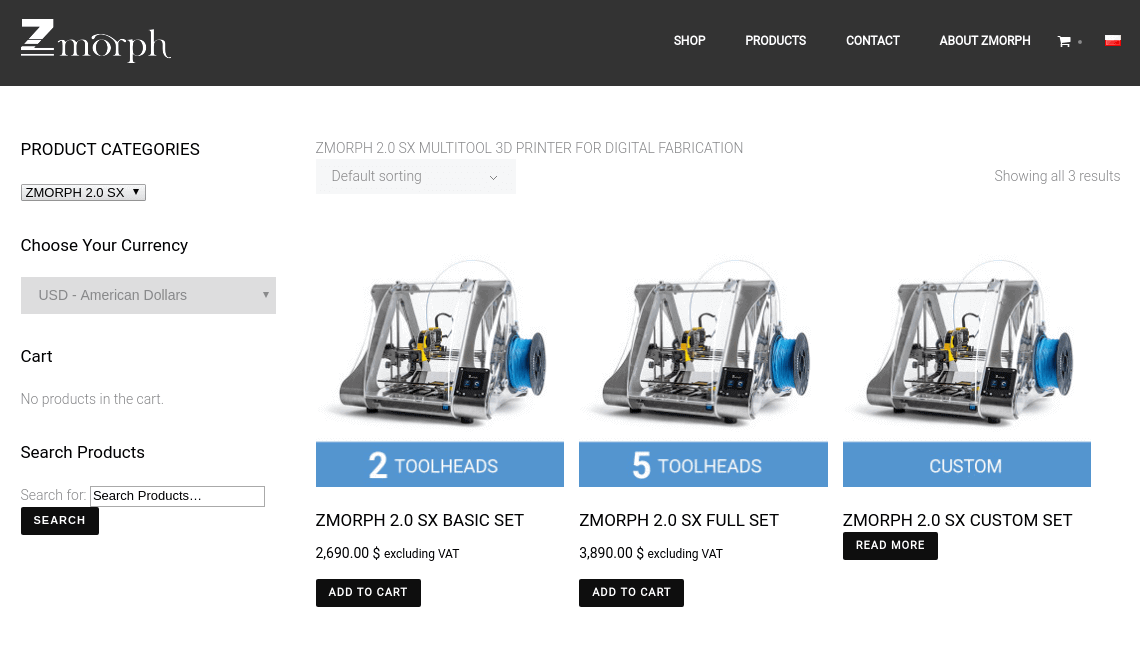
The ZMorph 2.0 SX is available in a variety of packages. You can buy a base package with 2 toolheads; the full monty with all 5 toolheads; or a third custom option where you can mix and match.
For pure 3D printing purposes, which would include the single and DUAL PRO extrusion toolheads, you would have to go with the custom option. This would require liaising directly with the ZMorph sales team for a quote.
Alternatively, you can purchase the base package for $2,690 / €2,390, which includes a 1.75 mm single filament extuder and a CNC milling toolhead. Thereafter, you can buy the DUAL PRO toolhead for an additional $550 / €490.
You can also sniff around for a 3.00 mm single filament extruder, or a 1.75 mm dual filament extruder (which has two independent hotends), but these are not strictly essential.
Regardless of which configuration you get, the standard features of the base ZMorph 2.0 SX are a heated bed for 3D printing, a touchsceen user-interface, touch probe and fan add-ons, spare extruder nozzle, a BuildTak plate to overlay on the glass bed, and a nifty toolbox stuffed full of maintenance gear.
In terms of print quality the stated range is 50 to 400 microns, and the build area is 250 x 235 x 165 mm (though available space depends on the toolhead in operation).
ZMorph 2.0 SX 3D Printer Review: Unboxing & Setup
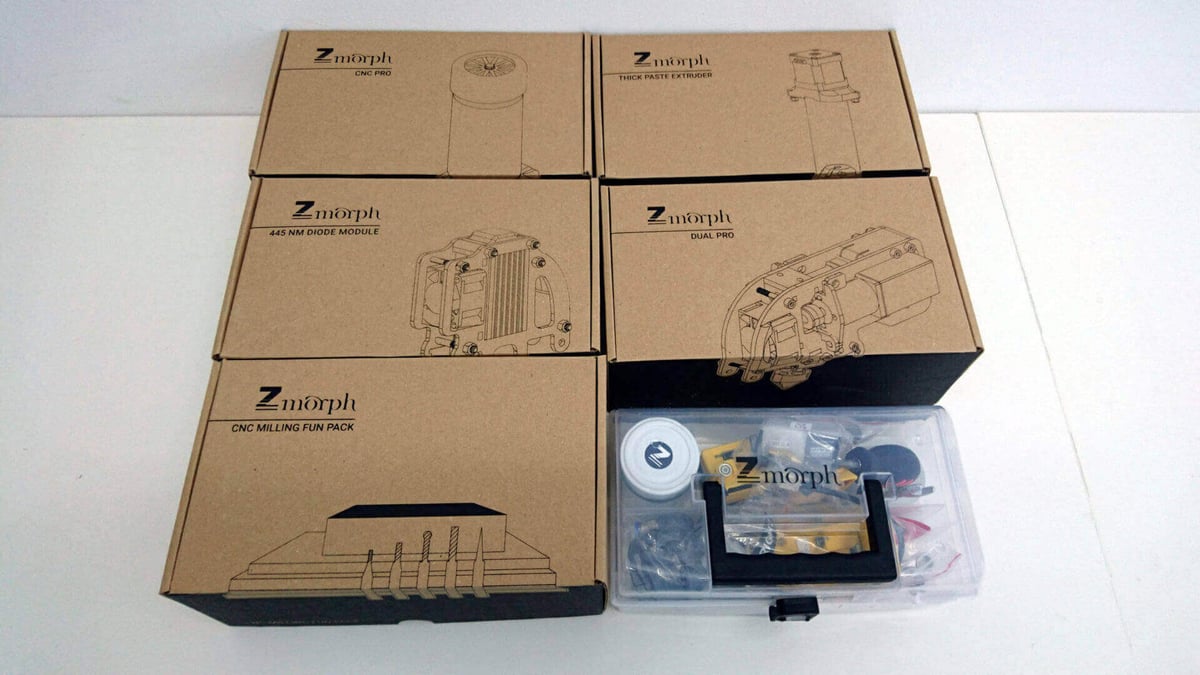
When it arrived at our offices, the box containing the core unit, peripherals and accessories were all securely packaged. The rods and carriage inside the printer, for example, are fixed in place with little plastic straps so they’re not knocked around in transit.
We mentioned the toolbox already. This has everything you need for both initial setup and long-term maintenance. The individual toolheads come in their own boxes and clear labeling, as do the spools of filament. There’s also a sheaf of basic documentation that steers you to a website for initial setup instructions.
The single filament toolhead was already in place when we unpacked the machine, so that part was taken care of. The first stage is to calibrate the print bed. This is done using a touchprobe in a 3D printed housing, which you connect to the print head by removing one of the fans (also in a 3D printed housing).
It’s rather slow about it, but the calibration requires the touchprobe to measure the level at three points of the plate, and then prompts you to manually tweak three screws by degrees. We weren’t sure how reliable this process was, to be honest. Even after the probe tells you the bed is roughly level, initiating a second round of calibration may contradict itself by saying it isn’t level at all. Confusing!
The next stage is to mount the filament spools to the exterior of the ZMorph 2.0 SX. One can be attached to each side of the unit, much like a vintage Princess Leia hairdo. This is done with a set of 3D printed wheels and spindles, and then you feed the filament through a tube to a direct drive extruder mounted on the toolhead.
Finally, you’re advised to connect the printer to your computer via a USB cable and check for firmware updates using the free Voxelizer Software suite (available for PC and Mac).
ZMorph 2.0 SX 3D Printer Review: Build Quality & Design
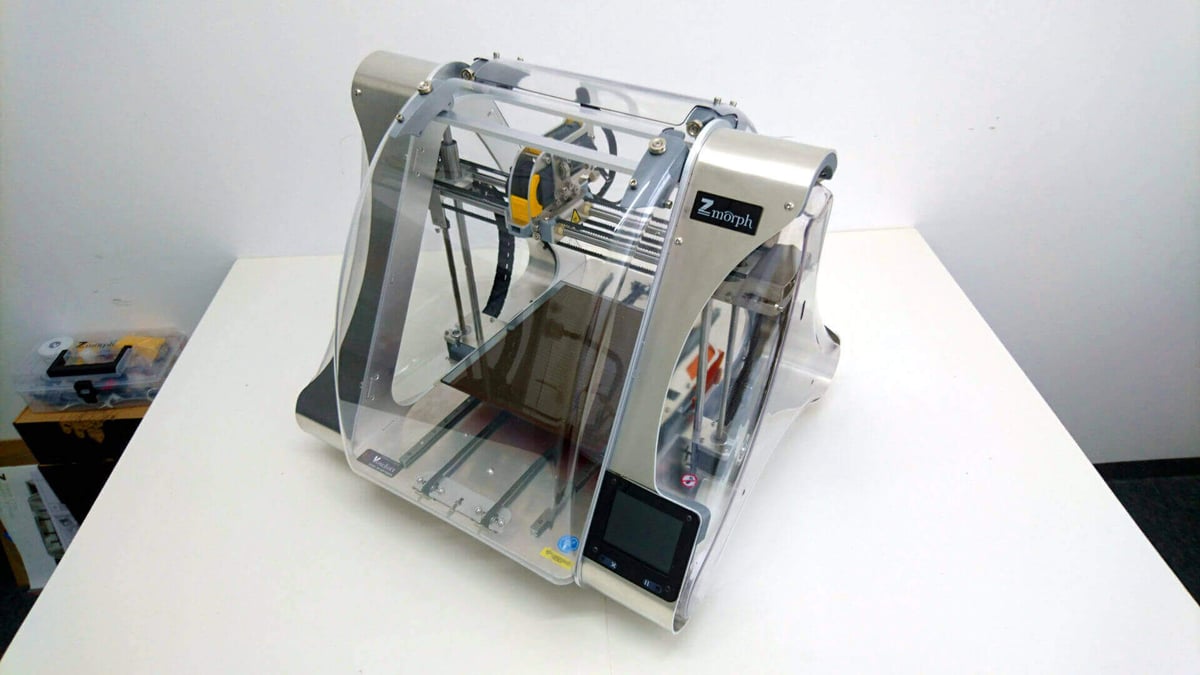
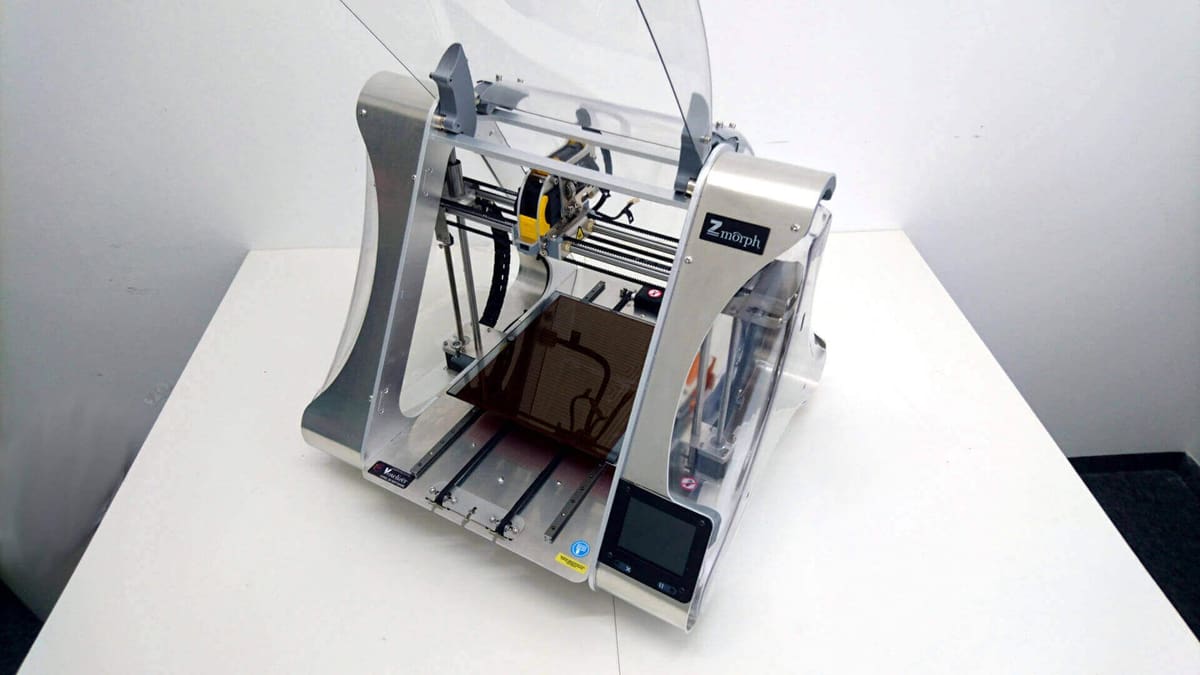
The design of the ZMorph 2.0 SX is truly spectacular. The aesthetic is both retro-futuristic and industrial, and many of the surface components are clearly 3D printed. We’re not aware if ZMorph has any kind of association with the open source RepRap movement, but it’s a stylish and functional tribute to the concept of a self-replicating machine.
The frame of the printer is a triangle made from Aluminum, which is enclosed with injection moulded clear plastic on magnetic hinges. But perhaps the best feature is at its heart; it’s built for multi-functional use thanks to modular, swappable components. Again with magnets, each toolhead is guided into place, and power is provided by plugging or unplugging the relevant cables.
The same principle is applied to accessories like the cooling fans and touch probe, and where relevant these same items have 3D printed cases.
The movement of the toolhead is Cartesian, where the head moves on the Z and X axis, and the plate moves back and forth on Y axis. This is a standard foundation for 3D printing, but is also perfectly suited for CNC milling and laser engraving.
The touchscreen interface is also pretty decent — responsive without being laggy — and has clearly laid out menus to access various controls. For connectivity you’re spoiled for choice; there’s an SD card slot, plus connectivity via Ethernet and USB. In theory, you can connect the printer to a wifi router using the Ethernet jack, so it can also be managed over a network.
Alternatively, you can plug in your computer to the ZMorph 2.0 SX and directly interface with it using the Voxelizer Software suite.
ZMorph 2.0 SX 3D Printer Review: Software
With so many disparate features under the hood, the Voxelizer software is the glue that holds everything together. Once you boot it up, you can switch between the different toolheads and manage these respective workflows. That’s what it’s supposed to be in theory, in any case.
In practice, Voxelizer is very bad, very clunky, and not particularly intuitive. We tested it on MacOS and Windows 10, and in either case the experience was overwhelmingly lacklustre.
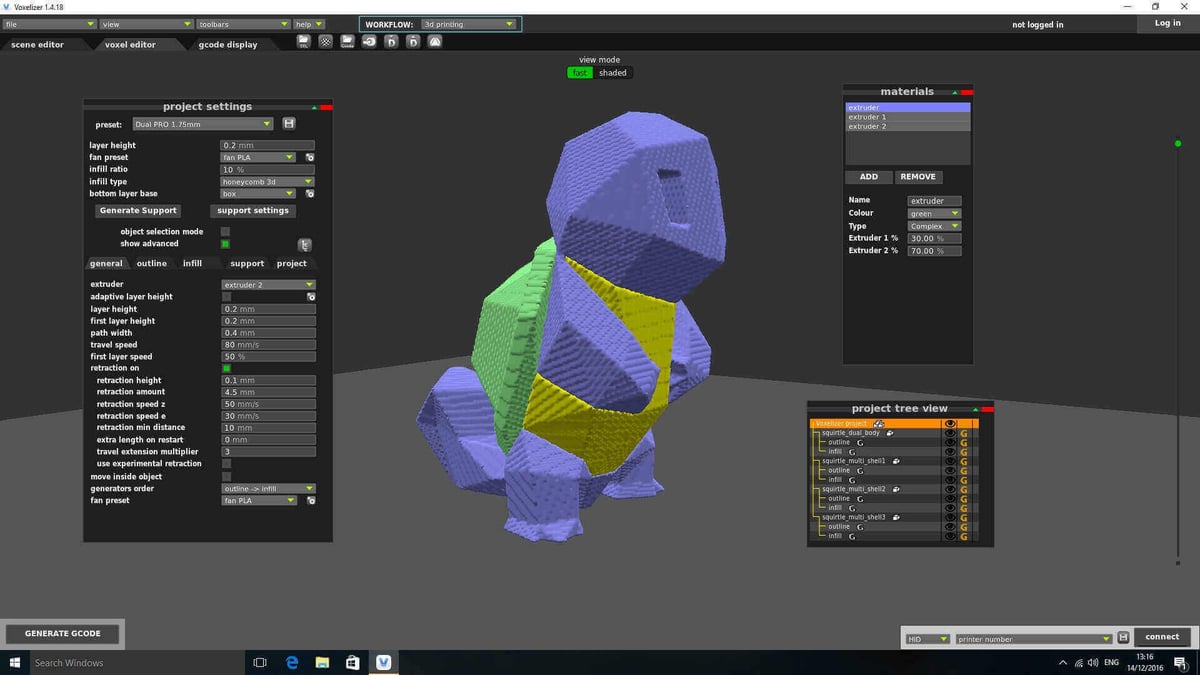
For 3D printing, the process is to upload the STL file and adjust the orientation and dimensions as necessary. The next stage is to “voxelize” the model, and this is where you can apply quality settings like infill and layer height. Once this is done, you move onto generating the GCode and then save the project to an SD card or run it from your computer if physically connected to the printer.
The slicing engine is agonizingly slow; and the bigger or more complex the model, the slower the process. If you’re running a low-powered computer, it will take even longer. This is not good.
Working with multipart models for dual extrusion is also cumbersome. The software is not intelligent when it comes to arranging them on the buildplate, and it’s made worse if scaling them in size. Manual arrangement of individual elements is required, and if the model is very complicated then it’s very much a case of trial and error.
The quality settings are hidden in a flurry of menus and sub-menus, so there’s a lot of clicking around to find the features you want. We had some head-scratching in particular over the infill settings. Despite specifying something like 10% infill in a honeycomb pattern, the actual infill during printing tended to be much more dense. Perhaps related to this, the subsequent print job would take longer than the official estimation given.
Also buried in the software are options for color blending and experimental image mapping. The color blending was a process of discovery, in terms of picking the ratio of filament to blend and then assigning the material to certain parts of the model. There’s not much in the way of guidance from the software, but we got something workable.
The image mapping, meanwhile, was locked down to a handful of prototype images and objects. But we tried to have some fun with it anyway.
Finally, we did try to use third party slicing software using Cura and Simplify3D profiles supplied directly by ZMorph, but the results were consistently terrible.
ZMorph 2.0 SX 3D Printer Review: Print Performance
We created multiple test models for both the single and DUAL PRO toolheads on the ZMorph. Results ranged from the ridculous to the sublime. The first thing we had to address before any successful models were produced was dialling in the correct temperature settings for the heated bed and the hotend. Too hot or too cold, and the prints were less than stellar.
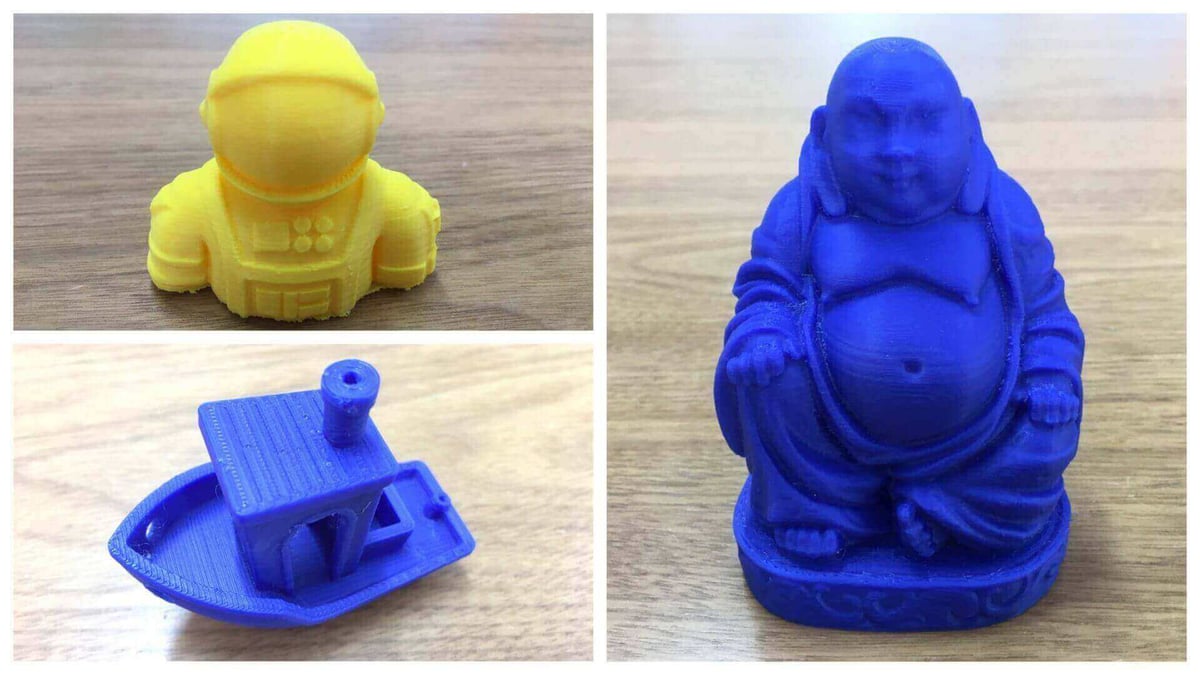
First up, there’s the demo model of an astronaut preloaded on every ZMorph 2.0 SX. This is a small little trinket with both straight edges and curves, plus overhangs and fine details, so it’s a capable test subject for single extrusion. It turned out pretty good, at a resolution of 200 microns in yellow filament. The only wrinkle was a raft which is applied to the model by default, so prising it off is a bit of a pain. If you have a heated bed and decent cooling, a raft is totally unnecessary for your models.
Next up was a single extrusion 3DBenchy at 200 microns in blue filament. This was acceptable, but there was some minor wurfling on the bow of the ship. Interesting to note here was the orientation of the extrusion. Typically in Cura or Simplify3D, we see 3DBenchy being fabricated with the extruder moving in a diagonal fashion. In this instance, the upper deck has horizontal extrusion and the lower deck has vertical extrusion. It’s not a complaint, it’s just different.
Getting a bit more ambitious, we printed a Laughing Buddha statue at 100 microns in blue filament. This had 10% infill in a honeycomb 3D configuration, which meant that the layers of the infill were not flat hexagons but stacked 3D hexagons for greater strength. The end result was a sturdy, well made object with fine detail, and quite a bit of heft to it. We appreciate the result, but it took 18 hours to print — twice longer than the official estimation given in the software.
Time for some DUAL PRO action. The way this works is that two spools of filament are fed via direct drive to a single hotend, where a reservoir inside the hotend can switch between the two. This provides the option not just for dual color printing, but color blending too.
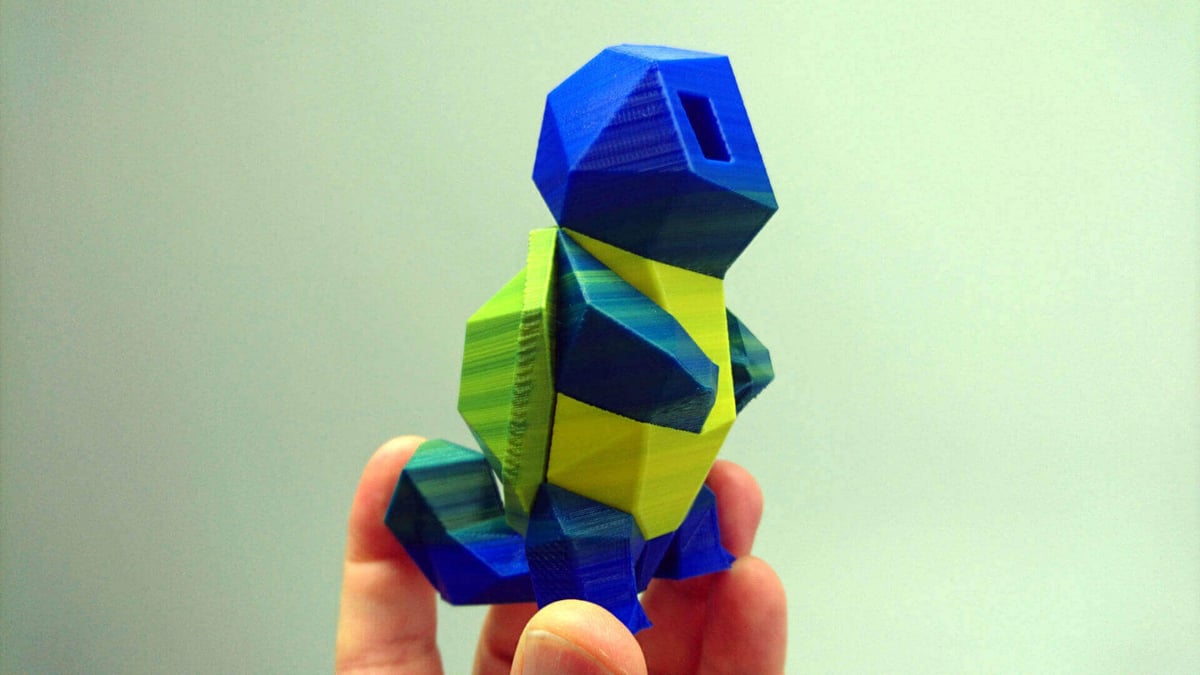
Testing the color blending resulted in our favorite object of the bunch. This was a Low-Poly Squirtle Pokemon, recently redesigned by Flowalistik for dual extrusion. Digging around in the Voxelizer Software, we assigned a color blend to the shell, resulting in a blue, yellow, and green arrangement. The object was scaled up to 200% and printed at 200 microns. It’s not perfect — you can see color bleeding on the same horizontal plane as the shell — but by golly we just love it.
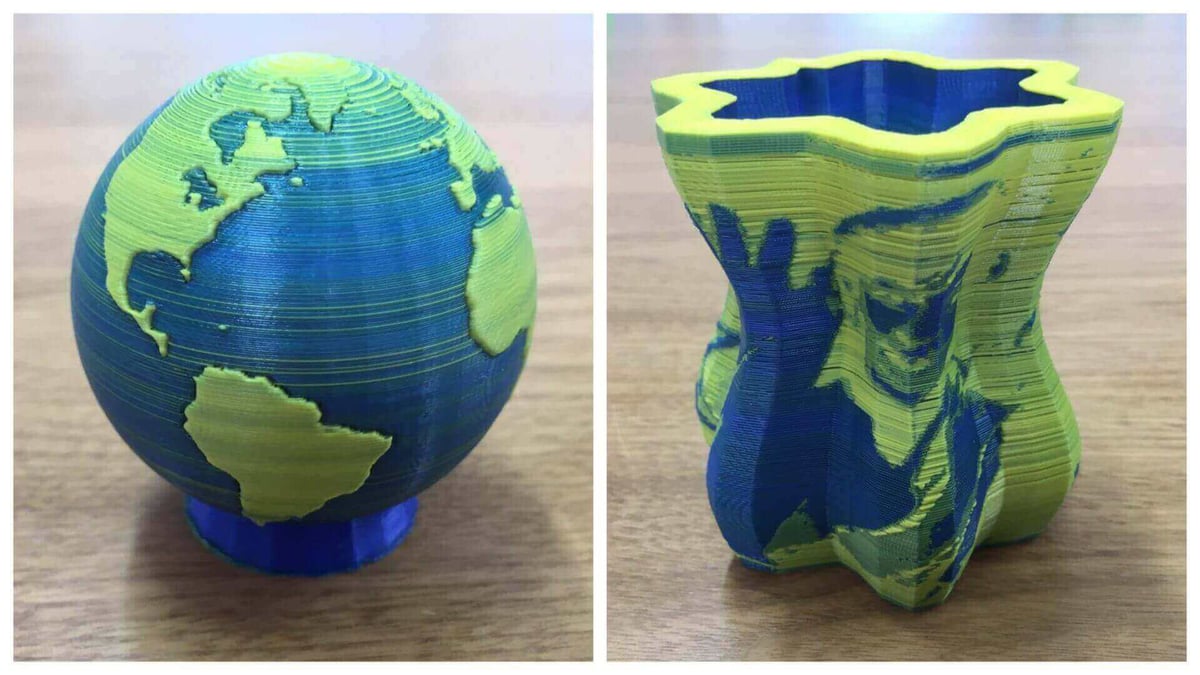
Reverting to non-color blending, we fabricated a globe of the Earth at 200 microns in yellow and blue filament. The results were disappointing, with too much bleed between the two materials. The end result is more unintentionally green than anything else. We inserted the priming tower inside the globe, as a way to save on filament and strengthen the object, but perhaps this is what caused the excessive bleed.
Finally we moved on to the experimental image mapping feature. We tried mapping a picture of Paul McCartney and Michael Jackson onto a vase. Printed at 200 microns, the image turned out too garbled to be comprehensible. Perhaps we pushed things too far, but in promotional material we’ve seen the Mona Lisa mapped onto a vase, so this attempt should have been a (moon)cakewalk. Frankly, it wasn’t.
All in all, a mixed bag of prints. Some were really good, some not so good. The cause lies with the slicing software, we suspect. And the print times were far too slow. Color blending is an intriguing new technique to keep an eye on, however. With the right settings and filament that’s optimized for this purpose, print projects could take on a whole new dimension.
ZMorph 2.0 SX 3D Printer Review: Wrapping Up
On first impressions, the ZMorph 2.0 SX dazzled us with the sleek hardware design. But in operation, a series of disappointments took the wind out of our sails.
Is it the case that this machine has been over-engineered? In trying to tick so many boxes, perhaps it fails to excel at the one thing that matters to us most — 3D printing.
No, we don’t think so. We’re laying responsibility at the feet of the Voxelizer software suite. For the ZMorph 2.0 SX to succeed, it requires a software solution that’s as elegant and robust as the hardware. And it’s not there yet. It desperately needs refinement to coax better results from the printer.
That said, it should be reiterated that 3D printing is only one of multiple tools available on this platform. CNC milling and laser engraving have their fans, too. Perhaps to the right customer, a range of “good enough” tools is a better investment than just one tool that excels in just one application.
And we really do love the color blending feature on the DUAL PRO toolhead. Even with imperfect execution, the results were outstanding. With some further development, it could well become a killer application for the ZMorph 2.0 SX.
In addition to FDM printing, the impressively built ZMorph 2.0 SX features laser engraving and CNC milling.
License: The text of "ZMorph 2.0 SX 3D Printer Review: Life at the Bleeding Edge" by All3DP is licensed under a Creative Commons Attribution 4.0 International License.
CERTAIN CONTENT THAT APPEARS ON THIS SITE COMES FROM AMAZON. THIS CONTENT IS PROVIDED ‘AS IS’ AND IS SUBJECT TO CHANGE OR REMOVAL AT ANY TIME.